
You know that vintage dessert your grandma made that everyone raves about but secretly tastes like disappointment?
This isn’t that.
I spent way too many years making dry, overly sweet pineapple upside down cakes that looked pretty but tasted like cafeteria food. The kind where you take one polite bite and then push it around your plate hoping no one notices.
Then I figured out what was going wrong.
Most recipes dump canned pineapple juice into the batter (mistake number one) and use way too much butter in the topping (mistake number two). You end up with a soggy, greasy mess that’s more sugar than cake.
This version? The cake is tender and buttery without being dense. The caramelized topping has that perfect balance of sweet and tangy. And the pineapple actually tastes like pineapple instead of sugar syrup.
I’ve made this cake at least thirty times in the past year. It’s become my signature dessert for potlucks, birthdays, and random Tuesday nights when I need something that feels special but doesn’t require three hours and a culinary degree.
Let me show you how to make it right.
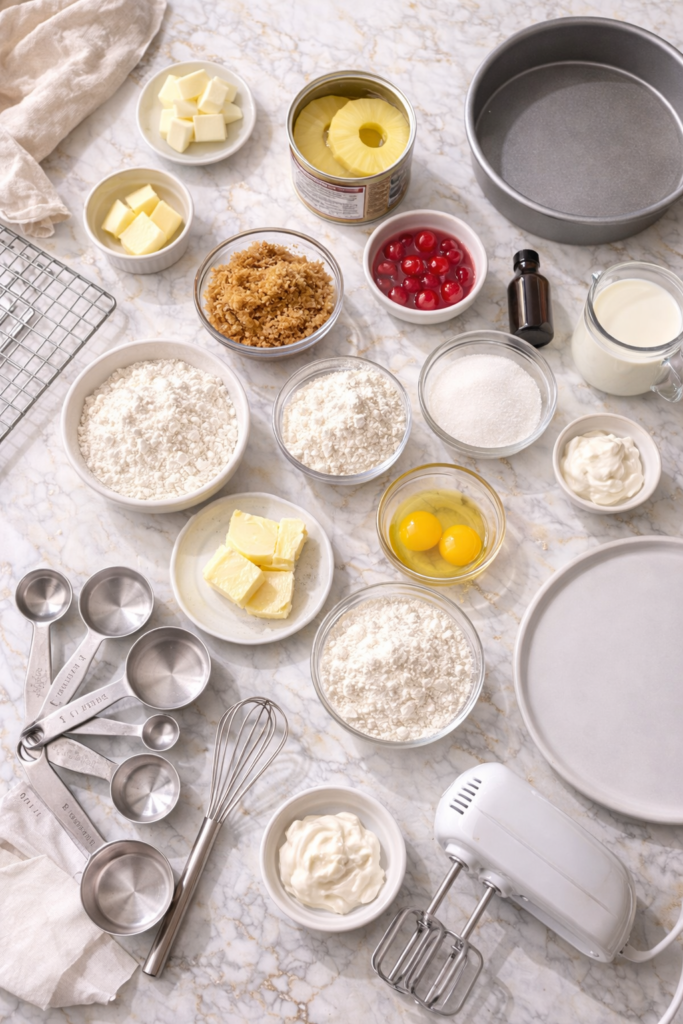
What You’ll Need
For the Topping:
- 1/4 cup (4 tablespoons) unsalted butter
- 2/3 cup packed light brown sugar
- 1 can (20 oz) pineapple rings in juice, drained well
- 8-10 maraschino cherries (optional but classic)
For the Cake:
- 1 1/2 cups all-purpose flour
- 1 1/2 teaspoons baking powder
- 1/4 teaspoon salt
- 1/2 cup (1 stick) unsalted butter, softened
- 3/4 cup granulated sugar
- 2 large eggs, room temperature
- 1 1/2 teaspoons vanilla extract
- 1/2 cup whole milk, room temperature
- 2 tablespoons sour cream
Tools You’ll Need:
- 9-inch round cake pan (metal works best)
- Medium saucepan
- Electric mixer (stand or hand)
- Two mixing bowls
- Whisk
- Rubber spatula
- Measuring cups and spoons
- Paper towels
- Cooling rack
- Serving plate for flipping
Pro Tips
Drain those pineapples like your cake depends on it. Because it does. Place the pineapple rings on paper towels and pat them dry. Then flip them and do it again. Excess moisture is the enemy of that beautiful caramel topping. I usually let mine sit on paper towels for 10-15 minutes while I prep everything else.
Room temperature ingredients are non-negotiable for the cake batter. Cold eggs and cold milk won’t incorporate properly with the butter, and you’ll end up with a dense, uneven cake. Set them out on the counter 30-60 minutes before you start baking. If you forget, place the eggs in warm water for 5 minutes and microwave the milk for 15 seconds.
Use a metal cake pan, not glass. Glass pans conduct heat differently and you won’t get that same golden caramelization on top. Plus, metal pans are easier to flip without the cake sticking. I learned this the hard way after three failed attempts with my pretty glass pan.
Don’t skip the sour cream. I know it seems random, but this tiny addition keeps the cake incredibly moist without making it heavy. You can substitute with Greek yogurt if that’s what you have.
Flip it while it’s still warm, but not hot. Wait about 10 minutes after it comes out of the oven. If you flip it too soon, the topping slides everywhere. Wait too long, and it sticks to the pan. Set a timer so you don’t forget.
How to Make Pineapple Upside Down Cake
Step 1: Prep Your Pan and Pineapples
Start by preheating your oven to 350°F.
Open your can of pineapple rings and drain them completely. Lay them out on a few layers of paper towels. Pat the tops dry, then flip them over and do the same on the other side.
This step seems tedious but it matters. All that extra juice will make your topping watery instead of caramelized.
While they’re drying, you can move on to making the topping.
Step 2: Make the Caramel Topping
Grab a medium saucepan and melt the 4 tablespoons of butter over medium heat. Once it’s melted, add the brown sugar.
Stir it constantly for about 2-3 minutes. It’ll start to bubble and smell incredible. You want it to come together into a thick, smooth mixture.
Pour this directly into the bottom of your 9-inch cake pan. Use a spoon or spatula to spread it evenly across the entire bottom.
Now arrange your pineapple rings on top. I usually fit about 7 rings in a circle pattern with one in the center. Press them gently into the brown sugar mixture.
If you’re using maraschino cherries (and honestly, they make it look so much better), place one in the center of each pineapple ring. You can also tuck a few extra cherries in the gaps between rings.
Set this aside while you make the cake batter.
Step 3: Mix the Dry Ingredients
In a medium bowl, whisk together the flour, baking powder, and salt.
Give it a good whisking so everything is evenly distributed. This only takes about 30 seconds.
Set this bowl aside. You’ll add it to the wet ingredients later.
Step 4: Cream the Butter and Sugar
In your mixing bowl (or the bowl of your stand mixer), add the softened butter and granulated sugar.
Beat them together on medium-high speed for about 3-4 minutes. You want the mixture to be light, fluffy, and pale yellow. It should increase in volume and look almost like frosting.
If your butter wasn’t soft enough, this will take forever and the texture won’t be right. Properly softened butter should leave an indent when you press it with your finger.
Step 5: Add Eggs and Vanilla
Add the eggs one at a time, beating well after each addition.
I usually beat for about 30 seconds after each egg. You’ll see the mixture come together and become smooth again.
Add the vanilla extract and beat for another 10 seconds.
Step 6: Alternate Adding Dry and Wet Ingredients
Here’s where it gets a little technical, but stick with me. This method creates the most tender cake texture.
With your mixer on low speed, add about one-third of the flour mixture. Mix just until it’s barely incorporated.
Then add half of the milk. Mix again, just until combined.
Add another third of the flour. Mix.
Add the remaining milk. Mix.
Add the final third of flour. Mix just until there are no more streaks of flour visible.
Stop the mixer and add the sour cream. Use a rubber spatula to gently fold it in. Don’t overmix at this stage or you’ll develop too much gluten and end up with a tough cake.
The batter should be thick, smooth, and smell amazing.
Step 7: Assemble and Bake
Carefully spoon the cake batter over your pineapple and brown sugar topping.
Start from the center and work your way out. Be gentle so you don’t disturb the pineapple arrangement underneath.
Use your spatula to spread it evenly, making sure you reach all the edges. The batter will be thick, so take your time.
Place the pan on the center rack of your preheated 350°F oven.
Bake for 45-50 minutes. You’ll know it’s done when the top is golden brown, the edges pull away slightly from the pan, and a toothpick inserted in the center comes out clean or with just a few moist crumbs.
The top might crack a little. That’s totally normal and it’ll be on the bottom anyway.
Step 8: The Big Flip
This is the moment of truth.
Remove the cake from the oven and place it on a cooling rack. Set a timer for 10 minutes.
While you wait, find a serving plate that’s at least 10 inches wide (bigger than your cake pan). You’ll need the extra space because some of that gorgeous caramel topping will spread.
When the timer goes off, place the serving plate upside down on top of the cake pan.
Take a deep breath. Using oven mitts or dish towels, hold the plate and pan together firmly. In one confident motion, flip the whole thing over.
Set it down and let it sit for about 30 seconds. Then carefully lift off the cake pan.
If any pineapple rings stick to the pan, just use a fork to remove them and place them back on top of the cake. No one will ever know.
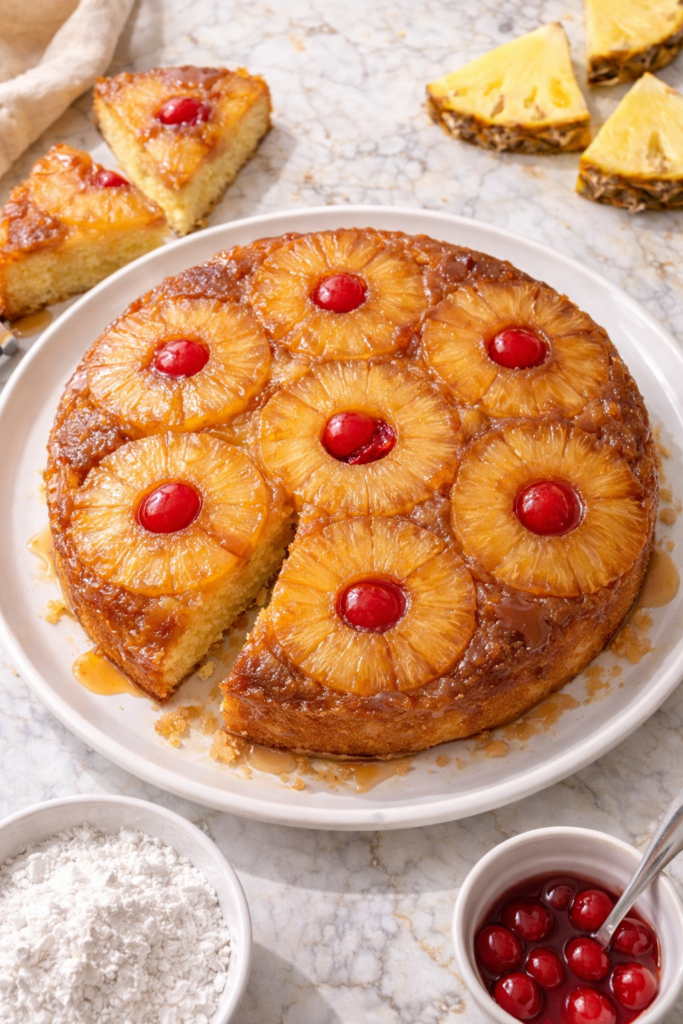
Look at that beauty. The caramelized pineapples glistening on top, the golden cake underneath. This is what we came for.
Step 9: Serve
Let the cake cool for at least 15-20 minutes before slicing. It tastes incredible warm, at room temperature, or even cold from the fridge the next day.
Cut it into wedges and serve as is, or add a dollop of whipped cream or a scoop of vanilla ice cream.
Substitutions and Variations
Fresh pineapple: You can absolutely use fresh instead of canned. Cut it into 1/2-inch thick rings and make sure to pat them really dry. The texture is slightly firmer, which some people prefer.
Different fruits: Try this same method with peaches, apples, or pears. You might need to adjust the sugar depending on how sweet your fruit is.
Make it boozy: Add 2 tablespoons of rum to the cake batter for a more grown-up version. It pairs beautifully with the caramelized pineapple.
Gluten-free option: Use a 1:1 gluten-free baking flour blend. The texture will be slightly different but still delicious.
Dairy-free: Swap the butter for vegan butter, use non-dairy milk, and replace the sour cream with coconut cream. I’ve done this for friends with allergies and it worked perfectly.
Spice it up: Add 1/2 teaspoon of cinnamon or 1/4 teaspoon of cardamom to the cake batter. Gives it a subtle warmth that’s really nice.
Make-Ahead Tips
The batter: You can make the cake batter up to 2 hours ahead. Cover it tightly and keep it in the fridge. Let it sit at room temperature for 15 minutes before pouring over your pineapple topping.
The whole cake: Bake it up to 24 hours in advance. Once it’s completely cool, cover it tightly with plastic wrap and store at room temperature. It actually tastes better the next day because the flavors have time to develop.
The topping: Make the brown sugar topping and arrange the pineapples in your pan up to 4 hours ahead. Cover with plastic wrap and leave at room temperature until you’re ready to add the batter and bake.
Leftovers and Storage
Store leftover cake covered at room temperature for up to 2 days, or in the fridge for up to 5 days.
I actually love this cake cold from the fridge. The texture becomes denser and almost pudding-like. Perfect with morning coffee.
You can freeze individual slices wrapped in plastic wrap and then aluminum foil for up to 3 months. Thaw at room temperature or pop them in the microwave for 20 seconds.
Leftover makeover ideas:
Crumble it over vanilla ice cream for an instant sundae.
Toast slices in a pan with butter for a decadent breakfast.
Make a trifle by layering cake pieces with vanilla pudding and whipped cream.
Turn it into cake pops (the pineapple adds moisture so they hold together great).
Nutritional Information
Per slice (recipe makes 8 slices):
- Calories: 385
- Protein: 4g
- Carbohydrates: 58g
- Fat: 16g
- Fiber: 1g
- Sugar: 42g
- Sodium: 180mg
This is definitely a treat, not an everyday dessert. But you knew that already.
Pairing Suggestions
This cake pairs beautifully with:
A strong cup of black coffee to balance the sweetness.
Vanilla ice cream melting over a warm slice (this is my personal favorite).
Fresh whipped cream with a tiny bit of rum mixed in.
A scoop of coconut sorbet if you want to go full tropical.
Cold milk, honestly. Sometimes simple is best.
For drinks, try it with a dessert wine like Moscato, or make piña coladas to really lean into the tropical vibes.
FAQ
Why did my cake stick to the pan?
Usually this happens because you waited too long to flip it. The sugar hardens as it cools and acts like glue. Make sure to flip it after 10 minutes, not longer. Also, using a metal pan instead of glass helps prevent sticking.
Can I use pineapple chunks instead of rings?
You can, but it won’t look as pretty when you flip it. The rings create that classic presentation. If you use chunks, scatter them evenly across the bottom of the pan.
My topping turned out runny instead of caramelized. What happened?
The pineapples weren’t dry enough. All that extra juice dilutes the brown sugar mixture. Next time, really go hard with the paper towels and let them drain for at least 10 minutes.
Can I make this in a different size pan?
An 8-inch pan works but you’ll need to bake it a bit longer (check at 55 minutes). A 10-inch pan will give you a thinner cake that bakes faster (check at 35 minutes). The 9-inch is the sweet spot for this recipe.
Do I have to use maraschino cherries?
Nope. They’re purely decorative. Some people love them, some people think they’re too sweet. The cake is delicious either way.
Can I make cupcakes instead?
Yes! Put a teaspoon of the brown sugar mixture in the bottom of each liner, add a small pineapple chunk or piece, then fill with batter. Bake at 350°F for 18-22 minutes. Flip them onto a serving platter while still warm.
Why is my cake dry?
Probably overbaked. Check it at 45 minutes and pull it out as soon as that toothpick comes out clean. Every oven is different, so yours might run hot. Also make sure your ingredients were at room temperature so they mixed properly.
Can I skip the sour cream?
You can, but the cake won’t be as moist. If you don’t have sour cream, use plain Greek yogurt instead. In a pinch, add an extra tablespoon of milk, but the texture won’t be quite the same.
Wrapping Up
This pineapple upside down cake is one of those recipes that looks impressive but is actually pretty straightforward once you’ve done it once.
The key is in the details: really drying those pineapples, getting your butter and eggs to room temperature, and nailing that flip timing. Get those three things right and you’re basically guaranteed success.
I love that this cake works for any occasion. Fancy enough for a dinner party, casual enough for a weeknight dessert, and retro enough to make people nostalgic.
Make this soon. Your kitchen will smell incredible and you’ll have something delicious to show for it.
Let me know how yours turns out! Drop a comment below with any questions or if you tried any fun variations. Did you add rum? Skip the cherries? I want to hear all about it.
You know that vintage dessert your grandma made that everyone raves about but secretly tastes like disappointment?
This isn’t that.


