By Grace Moser · Updated March 2026 · Prep: 20 min · Bake: 20 min · Total: 1 hr · Makes: 8–10 horns
You know those pastries sitting behind the glass at a bakery that you always look at but never buy because they seem complicated? These are those.
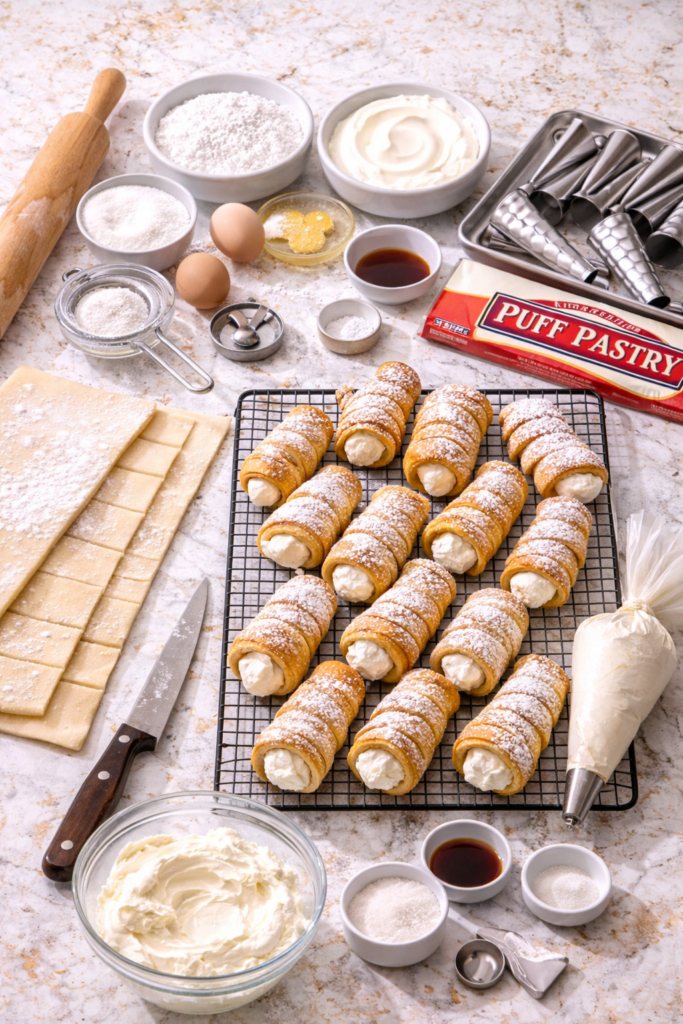
Cream horns look like something a professional pastry chef spent half the morning on. Flaky golden cones, piped full of fluffy sweetened cream, dusted with powdered sugar. They’re the kind of thing people photograph before they eat.
And they take less than an hour. 😲
Seriously. Store-bought puff pastry is your secret weapon here, and once you have the molds (more on that below), the whole process is surprisingly straightforward. No special baking skills required. No fancy equipment beyond the molds.
If you’ve ever had a cream horn from a grocery store bakery and found the filling weirdly thick and almost waxy — that’s because commercial versions are made shelf-stable. Homemade filling is a completely different experience. Light, airy, just sweet enough, and it doesn’t leave a coating on your teeth.
Let’s make them.

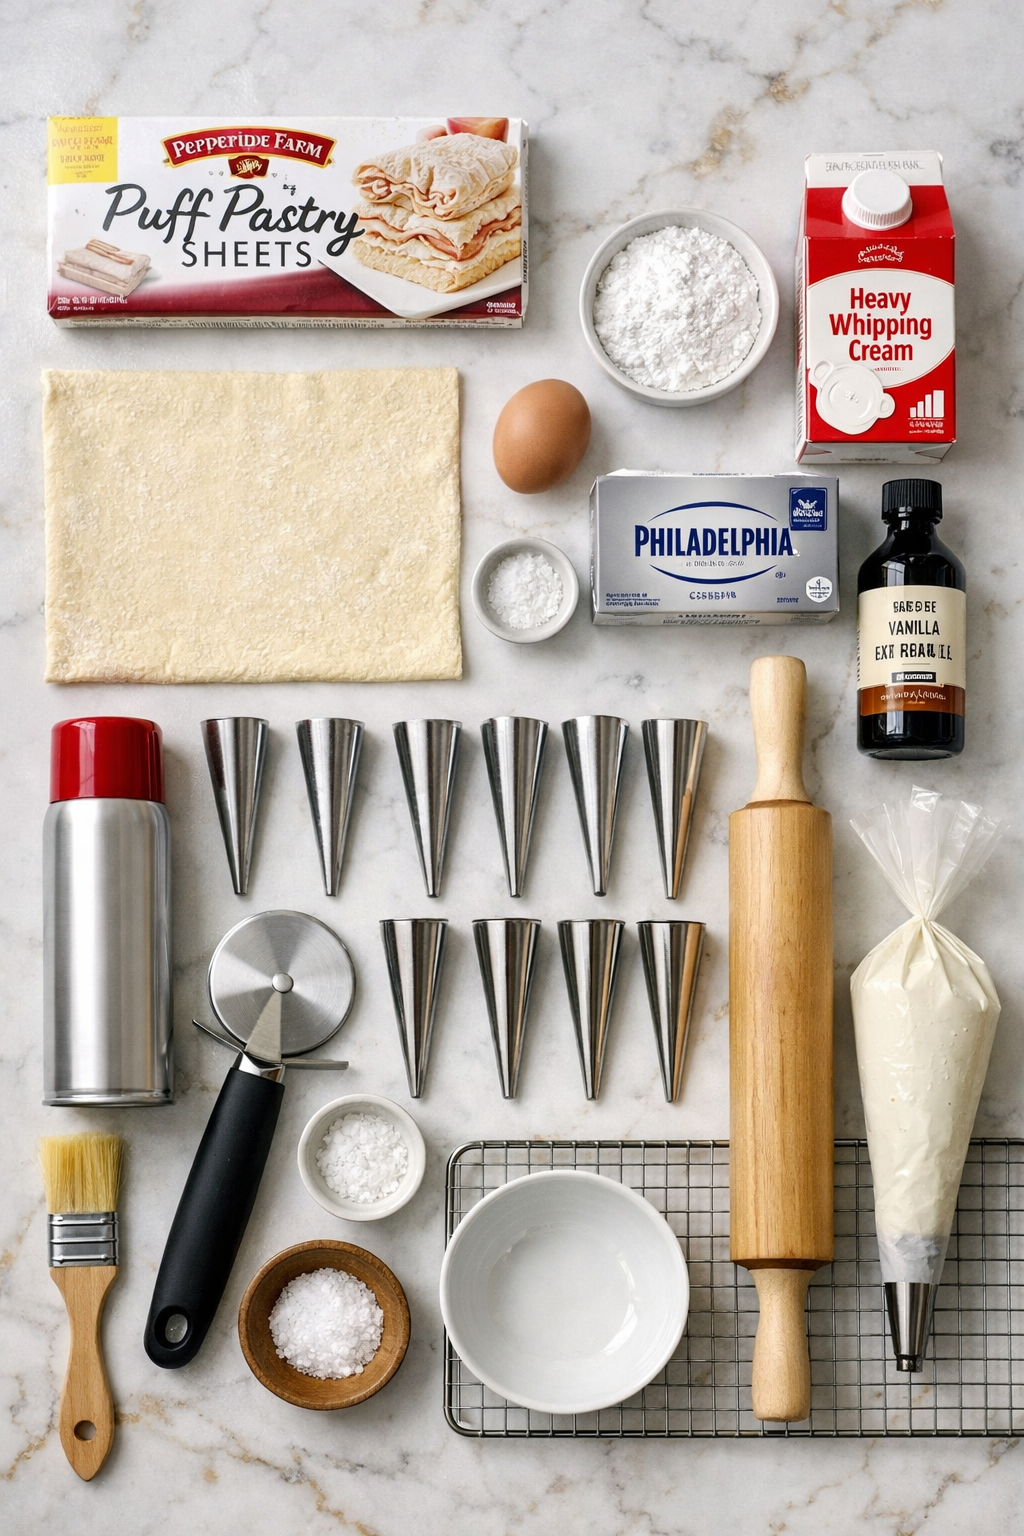
What You’ll Need
For the Pastry
- 1 sheet frozen puff pastry (from a 17.3 oz / 490g package, like Pepperidge Farm), thawed
- 1 large egg
- 1 tablespoon water
- 2–3 tablespoons powdered sugar (for dusting the pastry before baking, optional)
- Cooking spray or softened butter (for greasing the molds)
For the Cream Filling
- 1 cup (240ml) heavy whipping cream, cold
- 4 oz (113g) cream cheese, softened to room temperature
- ½ cup (60g) powdered sugar, sifted
- 1 teaspoon pure vanilla extract
- Pinch of sea salt
Optional Toppings
- Extra powdered sugar for dusting finished horns
- Melted dark or milk chocolate for dipping the ends
Tools You’ll Need
- 8–10 metal cream horn molds (cone-shaped) — these are essential, and around $10 for a set on Amazon. You can sub with sugar cones wrapped tightly in aluminum foil if you’re in a pinch.
- Baking sheet
- Parchment paper
- Pizza cutter or sharp knife
- Rolling pin
- Small bowl (for egg wash)
- Pastry brush
- Hand mixer or stand mixer
- Piping bag with a long tip (a star tip or plain tip both work beautifully)
- Wire cooling rack
Pro Tips
⭐ Keep your pastry cold. Puff pastry puffs because of cold butter layers creating steam in the oven. If it gets warm and soft while you’re working, pop it back in the fridge for 10 minutes. Warm pastry = flat horns.
⭐ Spray the molds generously. Don’t be shy with the cooking spray. Under-greased molds mean the pastry sticks and your beautiful horn cracks when you try to slide it off.
⭐ Remove from the mold while still warm. About 5 minutes after they come out of the oven, gently slide the mold out. If you wait until completely cool, the pastry shrinks slightly and grips the mold much harder.
⭐ Your cream cheese must be room temperature. Cold cream cheese in the filling = lumpy filling. Let it sit out for at least 30 minutes before you start. This one step makes the texture go from decent to genuinely silky.
⭐ Fill right before serving (or close to it). Once filled, the pastry starts to soften from the moisture in the cream. They’re best within a few hours of filling. If you’re making these for a party, bake the shells ahead and fill the day-of.
How to Make Cream Horns
Step 1: Prep
1
Preheat your oven to 400°F (200°C). Line a baking sheet with parchment paper. Spray your cream horn molds with cooking spray and set aside.
Step 2: Cut the Pastry
2
Lightly flour your work surface and unroll your thawed puff pastry sheet. Use a rolling pin to gently flatten it just a little, then cut it into 8–10 strips that are roughly 1 inch wide using a pizza cutter or sharp knife.
Step 3: Wrap the Molds
3
Starting at the pointed tip of each mold, wrap a strip of pastry in a spiral going down the cone. Overlap each layer slightly — this is what gives you that beautiful layered look when baked. Gently press the end of the strip against the pastry to seal.
Step 4: Egg Wash and Chill
4
Whisk together the egg and 1 tablespoon of water. Brush the egg wash over each wrapped mold. Place them seam-side down on your prepared baking sheet. If your kitchen is warm, pop them in the fridge or freezer for 15–20 minutes before baking — this helps them hold their shape.
Step 5: Bake
5
Bake for 18–22 minutes, or until deep golden brown and puffed. Watch them after the 15-minute mark — ovens vary and you want golden, not pale.
Step 6: Remove from Molds
6
Let the horns cool on the baking sheet for about 5 minutes. Then gently twist and slide each mold out while still slightly warm. Use a kitchen towel to hold the hot metal end. Set the empty shells on a wire rack to cool completely before filling.
Step 7: Make the Filling
7
Beat the softened cream cheese with a hand mixer until completely smooth and fluffy — no lumps. Add the powdered sugar, vanilla, and salt. Mix again. In a separate bowl, whip the cold heavy cream to stiff peaks. Fold the whipped cream into the cream cheese mixture gently until just combined. Transfer to a piping bag.
Step 8: Fill and Finish
8
Once the shells are completely cool (not a moment before — warm shells = melted filling), pipe the cream into each horn from both ends if possible, or just from the wide end. Dust with powdered sugar and serve.
Substitutions and Variations
| Swap | Use Instead | Notes |
|---|---|---|
| Heavy cream | Cool Whip (thawed) | Slightly less rich but works well |
| Cream cheese filling | Marshmallow fluff + shortening + powdered sugar | Classic American cream horn filling |
| Vanilla filling | Add 1–2 tbsp cocoa powder | Chocolate cream filling — a total crowd-pleaser |
| Plain pastry | Dip ends in melted chocolate after baking | Add crushed pistachios or sprinkles on the chocolate |
| Cream horn molds | Sugar cones wrapped in foil | Spray the foil well before wrapping the pastry |
| Powdered sugar | Organic granulated sugar (blended smooth) | Works in a pinch |
Make-Ahead Tips
The shells can be baked up to 2 days ahead and stored in an airtight container at room temperature. Keep them unfilled until you’re ready to serve.
The cream filling can be made 1 day ahead and kept refrigerated in the piping bag or a covered bowl. Give it a quick stir before piping if it’s settled.
Filled cream horns can also be frozen for up to 3 months. Store in a single layer in an airtight container. Pull them out 10–15 minutes before serving — some people actually prefer them this way, almost like an ice cream-filled pastry. 🍦
Nutritional Breakdown
| Per Horn (approx.) | Amount |
|---|---|
| Calories | ~280 kcal |
| Total Fat | ~19g |
| Saturated Fat | ~10g |
| Carbohydrates | ~22g |
| Sugar | ~8g |
| Protein | ~4g |
Values are estimates based on standard ingredients and will vary depending on your brands and any swaps you make.
Meal Pairing Suggestions
These pair well as part of an afternoon tea spread alongside finger sandwiches, scones, and fresh fruit. They’re also great as a standalone dessert after a lighter dinner — pasta, salads, or anything where you want to end on a sweet, impressive note without feeling too heavy.
For a party dessert table, pair them with chocolate-dipped strawberries and mini cheesecake bites for a spread that looks like it took twice the effort it actually did.
Leftovers and Storage
- Filled horns: Store in an airtight container in the fridge for up to 3 days. After that, the shell starts absorbing moisture from the filling and softens significantly.
- Unfilled shells: Airtight container at room temperature for 2 days.
- Frozen filled horns: Up to 3 months in a freezer-safe container. Thaw at room temperature for 10–20 minutes before eating.
- Do not store filled cream horns uncovered — the filling dries out and the shell gets stale faster.
FAQ
Do I absolutely need cream horn molds?
You need something cone-shaped. Metal cream horn molds are the easiest option (a set runs about $10 on Amazon). If you need to make them today without ordering, take sugar cones, wrap them tightly in aluminum foil, and spray the foil with cooking spray. It works.
My pastry unrolled during baking. What happened?
Two likely causes: the pastry got too warm before baking, or the seam wasn’t pressed firmly enough. Next time, pop the wrapped molds in the freezer for 15–20 minutes before baking, and make sure to place them seam-side down on the baking sheet.
What’s the difference between a cream horn and a cannoli?
The shell and the filling. Cream horns use puff pastry that’s baked to golden and flaky. Cannoli use a fried dough shell. The filling in cream horns is typically sweetened whipped cream or a cream cheese-based mixture. Cannoli filling is traditionally a denser ricotta-based cream. Both are excellent life choices.
Can I make these without a piping bag?
Yes. Use a zip-lock bag with a small corner snipped off. It won’t give you as pretty a result as a proper piping tip, but the filling gets in, and that’s what matters.
My filling is lumpy. What did I do wrong?
The cream cheese wasn’t soft enough. It needs to be genuinely room temperature — not just slightly less cold — before mixing. If it’s lumpy, try beating it a little longer. Sometimes the lumps work out. If not, pass it through a fine mesh sieve.
Can I make a dairy-free version?
The filling can be made with dairy-free cream cheese and full-fat canned coconut cream (whipped cold). The puff pastry in most stores is made with butter — check the label, as some brands offer vegan versions. The taste will be slightly different but still genuinely good.
Wrapping Up
If there’s one recipe that makes people assume you went to culinary school, it’s this one. The look-to-effort ratio is completely unfair in your favor. 😄
Cream horns are one of those recipes you’ll make once, realize how simple they actually are, and then start making for every gathering you host because you enjoy watching people’s faces when they bite in.
Make them. Then come back and tell me how they went — and if you tried any fun filling variations, I really want to hear about it. Drop a comment below!
🎉 Did you try this recipe? Leave a star rating and let me know how they turned out. Questions? Drop them in the comments — I read every single one.


