
Cottage cheese in bread might sound weird, but this loaf is about to become your new obsession.
I know what you’re thinking. Cottage cheese? In bread?
Trust me on this one.
I stumbled across this recipe when I was looking for ways to sneak more protein into my day without chugging another smoothie. Turns out, cottage cheese transforms into the most incredible bread you’ve ever tasted.
It’s got this soft, pillowy texture that’s somewhere between focaccia and challah. The crust gets golden and slightly crispy while the inside stays tender and moist for days. And here’s the kicker: each slice packs around 8 grams of protein.
I’ve made this bread at least a dozen times in the past month. Sometimes I eat it plain and warm right out of the oven. Other times I toast it for breakfast with butter and jam. My husband loves it for sandwiches because it actually holds up without getting soggy.
The cottage cheese basically melts into the dough and you can’t even taste it. What you do get is this amazing richness and moisture that regular bread just doesn’t have.
Ready to try something different?
What You’ll Need
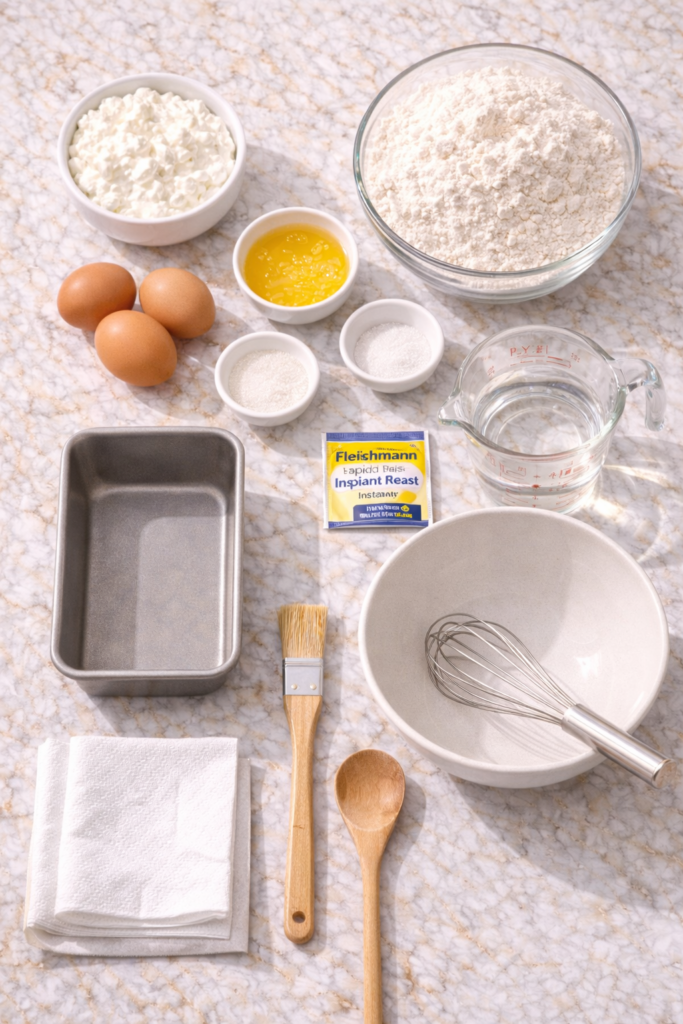
For the Bread:
- 1 cup (226g) full-fat cottage cheese, at room temperature
- 3 large eggs, at room temperature
- 3 tablespoons (42g) unsalted butter, melted and cooled
- 2 tablespoons (25g) granulated sugar
- 1 teaspoon salt
- 3 cups (360g) all-purpose flour, plus more for dusting
- 2 ¼ teaspoons (7g) instant yeast (one standard packet)
- ½ cup (120ml) warm water (about 110°F)
For the Egg Wash:
- 1 egg
- 1 tablespoon water
- Pinch of salt
Optional Toppings:
- Everything bagel seasoning
- Sesame seeds
- Flaky sea salt
- Fresh herbs like rosemary or thyme
Tools You’ll Need
Here’s what you’ll want to have ready:
- Large mixing bowl
- Whisk
- Wooden spoon or sturdy spatula
- Kitchen scale (optional but helpful)
- 9×5-inch loaf pan
- Pastry brush
- Clean kitchen towel
- Instant-read thermometer (optional)
- Stand mixer with dough hook (optional, makes life easier)
Pro Tips
Room temperature matters. Cold cottage cheese won’t incorporate as smoothly into your dough. Take it out of the fridge about an hour before you start baking. Same goes for the eggs. This one step makes a huge difference in texture.
Don’t skip the melted butter cooling step. If you add hot melted butter directly to your eggs, you’ll end up with scrambled eggs in your dough. Been there, learned that lesson the hard way. Let it cool for about 5 minutes after melting.
The dough should be slightly sticky. If your dough feels too dry, you’ve added too much flour. It should stick to your fingers a bit when you touch it, but not be so wet that it won’t hold its shape. When in doubt, err on the side of slightly sticky.
Give it time to rise properly. I know waiting is hard when you’re excited about fresh bread, but rushing the rise will give you dense, heavy bread instead of that light, airy texture we’re going for. Your dough should literally double in size.
Brush that egg wash on generously. This is what gives you that gorgeous golden-brown crust. Don’t be shy with it. Get into all the nooks and crannies.
How to Make Cottage Cheese Bread

Step 1: Wake up the yeast
Pour the warm water into your mixing bowl and sprinkle the yeast on top. Give it a quick stir and let it sit for about 5 minutes. You’ll know it’s ready when it gets foamy and smells slightly sweet. If nothing happens, your water was too hot or too cold and you’ll need to start over with fresh yeast.
Step 2: Mix the wet ingredients
Add the cottage cheese, eggs, melted butter, sugar, and salt to the yeast mixture. Whisk everything together until it’s mostly smooth. Don’t stress if there are still some lumps of cottage cheese – they’ll work themselves out as you knead.
Step 3: Add the flour
Dump in the flour all at once. Using a wooden spoon or your hands, mix until you can’t see any more dry flour. The dough will look shaggy and rough. That’s exactly what you want at this stage.
Step 4: Knead the dough
Turn the dough out onto a lightly floured surface. Knead for about 8-10 minutes by hand, or 5-6 minutes if you’re using a stand mixer with the dough hook. You’re looking for smooth, elastic dough that springs back when you poke it.
Add tiny amounts of flour if the dough is sticking to your hands or the counter, but go easy. You want sticky, not dry.
Step 5: First rise
Shape your dough into a ball and place it in a lightly greased bowl. Turn it once so the top is greased too. Cover with a clean kitchen towel and let it rise in a warm spot for about 1 to 1.5 hours.
I usually stick mine in the oven with just the light on. Works like a charm every time.
The dough should double in size. Poke it with your finger – if the indent stays, it’s ready.
Step 6: Shape the loaf
Punch down the dough to release the air bubbles. Turn it out onto your counter and shape it into a rectangle roughly the length of your loaf pan.
Roll it up tightly from the short end, pinching the seam closed as you go. Tuck the ends under and place seam-side down in your greased loaf pan.
Step 7: Second rise
Cover the pan with your towel again and let it rise for another 30-45 minutes. It should rise about an inch above the rim of the pan.
While it’s rising, preheat your oven to 350°F.
Step 8: Egg wash and toppings
Whisk together the egg, water, and pinch of salt for your egg wash. Gently brush it all over the top of the loaf. If you’re using toppings, sprinkle them on now.
Step 9: Bake
Bake for 35-40 minutes until the top is deep golden brown and the internal temperature reaches 190°F.
If the top is browning too quickly, tent it loosely with foil for the last 10 minutes.
Step 10: Cool and slice
This is the hardest part. Let the bread cool in the pan for 10 minutes, then turn it out onto a wire rack.
Wait at least 20 minutes before slicing. I know, I know. But cutting into hot bread will give you gummy slices. The texture needs time to set.
Substitutions and Variations
Cottage cheese alternatives: You can swap in ricotta cheese if that’s what you have. The texture will be slightly denser but still delicious. Greek yogurt works too, though you might need to add a tablespoon or two of milk to get the right consistency.
Make it whole wheat: Replace up to half the all-purpose flour with whole wheat flour. Any more than that and the bread gets too dense. You might need to add a bit more liquid if you go this route.
Dairy-free option: Use dairy-free cottage cheese (yes, it exists now) and replace the butter with coconut oil or vegan butter. I haven’t tried this version myself, but readers have told me it works.
Sweet version: Add ½ cup of raisins or dried cranberries and increase the sugar to ¼ cup. Cinnamon is amazing here too – about 1 teaspoon mixed into the flour.
Savory herb bread: Skip the sugar and add 2 tablespoons of fresh chopped herbs like rosemary, thyme, or basil. Garlic powder (1 teaspoon) is incredible in this variation.
Cheese lovers: Fold in ½ cup of shredded cheddar or parmesan cheese right before shaping the loaf. The cheese gets all melty and creates these amazing pockets of flavor.
Make Ahead Tips
This bread is actually perfect for meal prep.
The dough: After the first rise, you can punch it down, shape it, and refrigerate it overnight in the loaf pan. Just cover it tightly with plastic wrap. In the morning, let it sit at room temperature for about 30 minutes while your oven preheats, then bake as directed. You might need to add 5 extra minutes to the baking time.
Freeze the dough: Shape the dough, wrap it tightly in plastic wrap and then foil, and freeze for up to 3 months. Thaw it overnight in the fridge, then let it come to room temperature and do its second rise before baking.
Freeze the baked bread: Let the bread cool completely, slice it, and freeze the slices in a freezer bag with parchment paper between each slice. Toast them straight from frozen for breakfast.
Nutrition Facts (Per Slice, Based on 12 Slices)
- Calories: 165
- Protein: 8g
- Carbohydrates: 24g
- Fat: 4g
- Fiber: 1g
- Sugar: 3g
- Sodium: 245mg
The protein content is what makes this bread special. Regular white bread has about 2-3 grams per slice, so you’re getting nearly triple the protein here.
For different diets:
Low-carb: This isn’t going to work for strict keto, but if you’re watching carbs loosely, one slice gives you a decent protein-to-carb ratio.
Gluten-free: You’d need to use a gluten-free flour blend and add xanthan gum. I haven’t perfected this version yet, so I can’t recommend specific measurements.
Vegetarian: Already vegetarian as written.
High-protein: This is your bread. Pair it with nut butter or use it for a protein-packed sandwich.
What to Serve With This Bread
This bread is crazy versatile.
Breakfast: Toast it and top with butter and jam, avocado and everything bagel seasoning, or cream cheese and smoked salmon.
Lunch: It makes incredible sandwiches. The texture holds up to wet ingredients like tomatoes without getting soggy. Try it with turkey, bacon, lettuce, and mayo. Or go vegetarian with hummus, roasted vegetables, and feta.
Dinner: Serve slices alongside soup or salad. It’s amazing for soaking up pasta sauce or the last bits of a curry.
Snack: Honestly, I just eat this plain sometimes. Especially when it’s still slightly warm from the oven.
Pairing suggestions: This bread works beautifully with Italian dishes like pasta or lasagna. It’s also great with breakfast scrambles or frittatas. For lunch, pair it with a hearty salad or vegetable soup.
Cooking Time Efficiency
Active time: About 20 minutes of actual hands-on work
Passive time: About 2-2.5 hours for rising and baking
Total time: Roughly 3 hours from start to finish
Here’s how to make it work with your schedule:
Start the dough in the late afternoon. While it’s doing its first rise, you can make dinner or relax. Shape it, do the second rise, and pop it in the oven before you eat. By the time you’ve finished dinner and cleaned up, you’ve got fresh bread cooling on the counter.
Or use the make-ahead method and have fresh bread ready for breakfast without any morning stress.
Leftovers and Storage
Room temperature: This bread stays fresh at room temperature for about 3-4 days. Keep it in a bread box or wrapped in a clean kitchen towel. Don’t use plastic bags – they make the crust soft and chewy instead of crispy.
Refrigerator: I don’t recommend refrigerating this bread. It’ll dry out and get stale faster in the fridge than on your counter.
Freezer: Slice it first, then freeze for up to 3 months. Toast slices straight from frozen. They’ll taste like you just baked them.
Stale bread hacks: If your bread does get a little stale, don’t toss it. Turn it into:
- French toast (the cottage cheese makes it extra custardy)
- Breadcrumbs for coating chicken
- Croutons for salad
- Bread pudding
Just cube it up, toast it in the oven, and use it wherever you’d use regular bread.
FAQ
Can I taste the cottage cheese?
Nope. The cottage cheese completely disappears into the bread. You get the benefits (moisture, protein, tender texture) without any cottage cheese flavor. Even people who say they hate cottage cheese love this bread.
Why is my bread dense instead of fluffy?
Usually this happens for one of three reasons: you didn’t let it rise long enough, you added too much flour, or your yeast was dead. Make sure your yeast foams up in the warm water. Let the dough actually double in size during both rises. And remember, the dough should be slightly sticky.
Can I make this without a stand mixer?
100%. I made this by hand for months before I got a stand mixer. It just takes a bit more arm work during the kneading step. Put on your favorite music and embrace it as a workout.
My bread cracked on top while baking. Did I do something wrong?
Not at all. Sometimes bread cracks as it rises in the oven. It’s actually kind of pretty and rustic-looking. If it bothers you, make sure to do a really thorough egg wash and score the top with a sharp knife before baking.
How do I know when it’s done?
The top should be deep golden brown and when you tap the bottom of the loaf, it should sound hollow. If you have an instant-read thermometer, the internal temperature should be around 190°F.
Can I make rolls instead of a loaf?
Absolutely. After the first rise, divide the dough into 12 equal pieces, shape them into balls, and place them in a greased 9×13 inch pan. Let them rise until puffy (about 30 minutes) and bake for 20-25 minutes.
Is full-fat cottage cheese necessary?
Low-fat works, but the bread won’t be quite as moist and rich. If you use low-fat, consider adding an extra tablespoon of butter to make up for it.
Why did my bread sink in the middle?
This usually means it over-proofed (rose too much) during the second rise. It gets too airy and then collapses in the oven. Next time, bake it when it’s risen just about an inch over the rim of the pan.
Wrapping Up
Listen, I get that cottage cheese bread sounds a little out there.
But this recipe works. I’ve made it so many times that I’ve stopped measuring some ingredients and just go by feel now.
The protein content makes it perfect for busy mornings when you need something filling. The texture is soft enough for kids but interesting enough for adults. And the fact that it stays fresh for days means you’re not rushing to finish it before it goes stale.
Give it a shot this weekend. Make it your own with whatever toppings or mix-ins sound good to you. Slice it thick, toast it golden, and slather it with butter while it’s still warm.
Then come back and tell me what you think. Did you add herbs? Go sweet with cinnamon? Toast it for breakfast sandwiches? I want to hear about it in the comments below.
And if you have any questions about the recipe, drop them down there too. I read every single one and I’m always happy to help troubleshoot.


