You know that moment when you open the fridge three days after the big feast and there’s still half a turkey staring back at you?
Most people panic and start Googling “how long does turkey last in the fridge” or end up making the same boring sandwiches until everyone’s sick of them.
But here’s what nobody tells you: leftover turkey can become something even better than the original meal.
I’m talking about creamy, rich, soul-warming comfort food that’ll have your family asking when you’re making it again. This isn’t about using up leftovers because you feel guilty about waste (though that’s a nice bonus). This is about creating something so good that you might actually consider cooking a whole turkey just to have leftovers for this recipe.
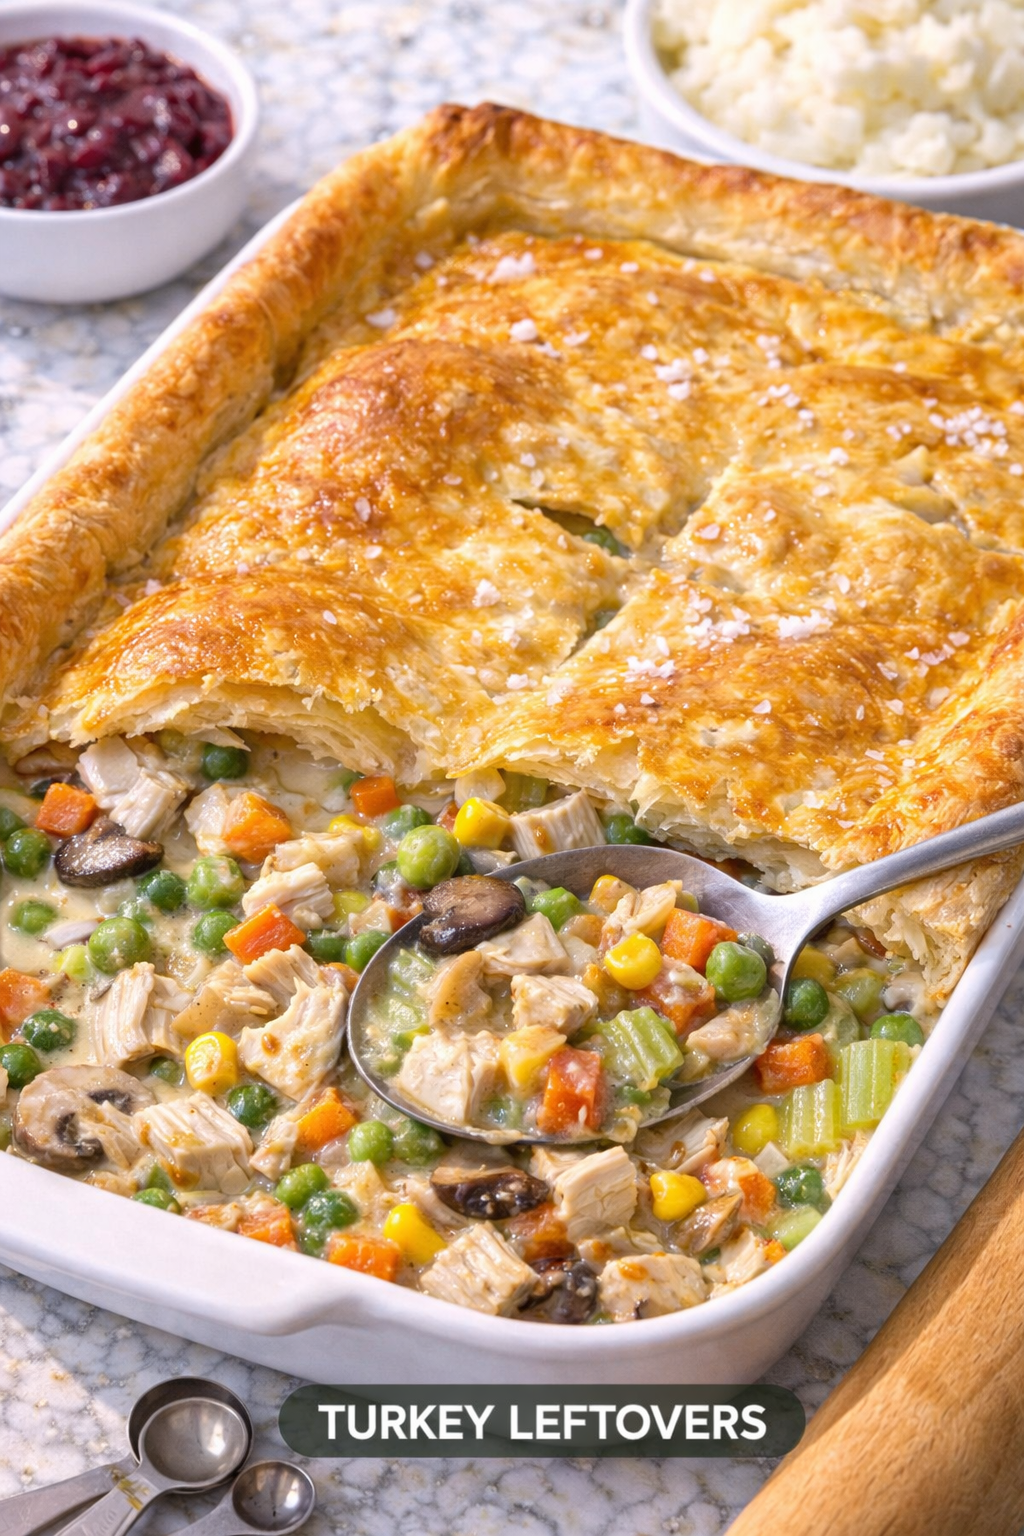
The secret? A hot, bubbling turkey pot pie that’s equal parts nostalgic and sophisticated. Flaky pastry on top, creamy filling below, and enough flavor to make you forget you’re eating yesterday’s dinner.
Ready to stop dreading those Tupperware containers and start looking forward to them?
What You’ll Need
For the Filling:
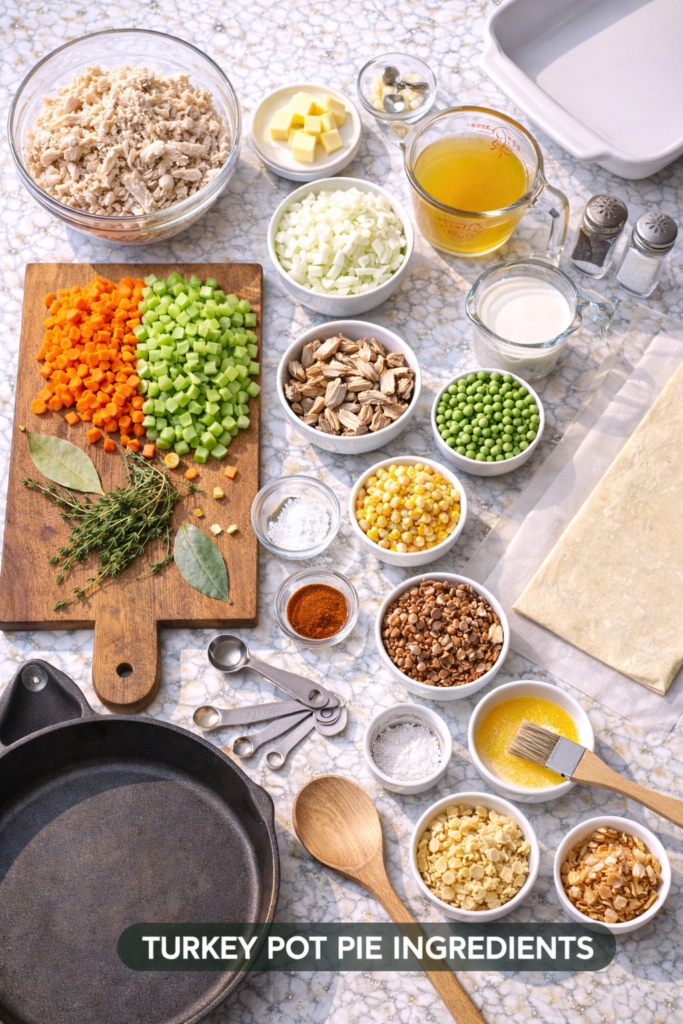
- 4 cups leftover turkey, shredded or cubed
- 4 tablespoons unsalted butter
- 1 large onion, diced
- 3 cloves garlic, minced
- 3 medium carrots, peeled and diced
- 2 celery stalks, diced
- 8 oz mushrooms, sliced
- 1/3 cup all-purpose flour
- 2 cups turkey or chicken stock
- 1 cup whole milk or heavy cream
- 1 cup frozen peas
- 1/2 cup frozen corn
- 2 teaspoons fresh thyme (or 1 teaspoon dried)
- 1 teaspoon fresh rosemary, chopped (or 1/2 teaspoon dried)
- 1 bay leaf
- Salt and black pepper to taste
- 1/2 teaspoon smoked paprika (optional, but adds depth)
For the Topping:
- 1 sheet store-bought puff pastry, thawed
- 1 egg, beaten (for egg wash)
- Flaky sea salt for sprinkling
Pro Tips
1. Don’t Overcook Your Turkey (Again) Your turkey is already cooked, so you’re just reheating it. Add it at the very end of making the filling, otherwise you’ll end up with dry, rubbery pieces. Think of it as gently warming the turkey in that beautiful creamy sauce, not cooking it from scratch.
2. Make Your Roux Dark Enough When you’re cooking the flour and butter together, let it go a shade or two darker than you think. It should smell nutty and look like wet sand, not white paste. This step adds so much flavor that most people skip, and you can taste the difference.
3. Cool Your Filling Before Adding Pastry I know you’re excited, but if you top hot filling with cold pastry, you’ll get a soggy mess. Let that filling cool for at least 20 minutes. Go fold some laundry, scroll Instagram, whatever. Just give it time.
4. Use a Hot Oven 425°F is not a typo. You want that pastry to puff up and turn golden before the filling has time to bubble over. A hot oven = flaky, crispy top. A moderate oven = sad, pale, limp pastry.
5. Taste and Adjust Leftover turkey can be bland (let’s be honest about this). Don’t be shy with the salt, pepper, and herbs. Taste your filling before it goes in the oven and make sure it’s well-seasoned. You want people to actually want seconds.
Tools You’ll Need
- Large, deep skillet or Dutch oven (at least 12 inches)
- Wooden spoon or silicone spatula
- Sharp knife and cutting board
- Measuring cups and spoons
- 9×13 inch baking dish (or any 3-quart baking dish)
- Pastry brush
- Rolling pin (if your pastry needs stretching)
How to Make It

Step 1: Prep Your Vegetables
Get all your vegetables chopped and ready before you start cooking. Dice the onion, mince the garlic, chop the carrots and celery into small, bite-sized pieces, and slice your mushrooms.
This is one of those recipes where having everything ready makes the actual cooking so much easier. Plus, you won’t burn your garlic while frantically chopping carrots.
Step 2: Build Your Base
Melt the butter in your large skillet over medium heat. Once it’s foaming, add the diced onion and cook for about 5 minutes until it’s soft and starting to turn translucent.
Add the garlic and cook for another minute until it smells amazing. Then toss in your carrots, celery, and mushrooms. Cook everything together for about 8-10 minutes, stirring occasionally.
You want the vegetables to soften but still have a little bite. The mushrooms will release their liquid and then start to brown. That’s exactly what you’re looking for.
Step 3: Make the Roux
Sprinkle the flour over your vegetables and stir it in really well. Let this cook for about 3-4 minutes, stirring constantly.
The flour will coat everything and start to smell a bit toasty. This is your roux, and it’s what’s going to thicken your sauce and give it that rich, deep flavor.
Step 4: Add Your Liquids
Pour in your stock, stirring constantly as you go. The mixture will look thick and pasty at first, but keep stirring and it’ll smooth out.
Once the stock is incorporated, add your milk or cream. Keep stirring until everything is smooth and there are no lumps. If you see lumps, just keep whisking and they’ll disappear.
Step 5: Season and Simmer
Add your thyme, rosemary, bay leaf, smoked paprika (if using), and a good pinch of salt and pepper.
Bring the mixture to a gentle simmer and let it cook for about 10-15 minutes, stirring occasionally. It should thicken up nicely into a gravy-like consistency that coats the back of a spoon.
Step 6: Add Turkey and Vegetables
Stir in your shredded turkey, frozen peas, and frozen corn. The frozen vegetables will cool the mixture down a bit, which is actually helpful.
Cook for just 2-3 minutes until everything is heated through. Remove the bay leaf.
Taste your filling now. This is your chance to add more salt, pepper, or herbs if needed. It should taste rich, savory, and well-seasoned.
Step 7: Cool the Filling
Pour the filling into your baking dish and spread it out evenly. Let it cool for 20-30 minutes while you preheat your oven to 425°F.
This step is really important. If you skip it, your pastry will be sad and soggy instead of golden and flaky.
Step 8: Top with Pastry
Unroll your puff pastry and lay it over the cooled filling. It doesn’t need to be perfect. In fact, a slightly rustic look is kind of charming.
Trim any excess pastry hanging over the edges, or tuck it down the sides of the dish. Cut a few small slits in the top to let steam escape.
Brush the top with beaten egg and sprinkle with a little flaky sea salt.
Step 9: Bake
Pop the whole thing in your preheated oven and bake for 25-30 minutes. You’re looking for the pastry to be deeply golden and puffed up, and you should see the filling bubbling around the edges.
If the pastry is browning too quickly, tent it loosely with foil.
Step 10: Rest and Serve
Let the pot pie rest for about 10 minutes before serving. This gives the filling time to set up a bit so it’s not too soupy when you scoop it out.
Serve in big bowls with the flaky pastry on top. Maybe add a simple green salad on the side if you want to pretend you’re being healthy.
Substitutions and Variations
Different Proteins: This works just as well with leftover rotisserie chicken, turkey breast from the deli, or even leftover ham. Just use about 4 cups of whatever cooked meat you have.
Vegetarian Version: Skip the turkey and double up on mushrooms. Add some cubed butternut squash or sweet potato, and use vegetable stock. You’ll want to add an extra tablespoon of butter for richness.
Different Vegetables: Use whatever vegetables you have. Green beans, diced potatoes, parsnips, or even leftover roasted Brussels sprouts all work. Just keep the total amount of vegetables around 3-4 cups.
Biscuit Topping: Not into puff pastry? Drop biscuit dough on top instead. You can use store-bought biscuit dough or make your own. Bake at 400°F for about 20-25 minutes until the biscuits are golden.
Individual Portions: Divide the filling among ramekins and top each one with a circle of pastry. Bake at 425°F for 15-20 minutes. Great for meal prep or dinner parties.
Dairy-Free: Use olive oil instead of butter and coconut milk instead of cream. It’ll have a slightly different flavor, but it’s still really good.
Make Ahead Tips
The filling can be made up to 2 days ahead. Just cool it completely, cover it, and refrigerate. When you’re ready to bake, let it come to room temperature for about 30 minutes, then top with pastry and bake as directed.
You can also freeze the unbaked pot pie for up to 3 months. Don’t thaw it first. Just add an extra 15-20 minutes to the baking time and cover with foil if the pastry browns too quickly.
If you want to get really ahead of things, make a double batch of filling and freeze half. Future you will be grateful.
Leftovers and Storage
Store any leftovers in an airtight container in the fridge for up to 4 days. The pastry won’t be as crispy when reheated (that’s just physics), but the filling is still delicious.
Reheat in a 350°F oven for about 20 minutes, or microwave individual portions for 2-3 minutes. You can also crisp up the pastry under the broiler for a minute or two if you’re feeling fancy.
This freezes really well after baking. Just let it cool completely, wrap it tightly, and freeze for up to 3 months. Thaw in the fridge overnight and reheat in the oven.
Honestly though, this usually gets eaten pretty quickly. It’s comfort food at its finest and people tend to go back for seconds (and thirds).
Frequently Asked Questions
Can I use turkey breast instead of dark meat? Absolutely. Any leftover turkey works. If you’re using all white meat, you might want to add an extra tablespoon of butter to the filling for moisture.
Do I have to use puff pastry? Nope. You can use pie dough, biscuit topping, or even mashed potatoes on top. Each gives you a different texture and vibe, but all are delicious.
My filling is too thick. What do I do? Just stir in more stock or milk, a little at a time, until it reaches the consistency you want. It should be like thick gravy.
My filling is too thin. Help! Let it simmer for a few more minutes to reduce. Or mix a tablespoon of cornstarch with 2 tablespoons of cold water and stir that in. It’ll thicken as it cooks.
Can I skip the mushrooms? Yes, but they add a lot of umami flavor and a meaty texture. If you skip them, maybe add a splash of soy sauce or Worcestershire sauce for depth.
How do I know when it’s done? The pastry should be golden brown and puffed up, and you should see the filling bubbling at the edges. If you insert a knife in the center, it should come out hot.
Can I make this in a cast iron skillet? Yes! Just make the filling right in an oven-safe skillet, let it cool, top with pastry, and bake. One less dish to wash.
Wrapping Up
So there you have it: your new favorite way to use up leftover turkey. No more dry sandwiches, no more turkey soup that nobody really wants, no more guilt about wasting food.
This pot pie is the kind of meal that turns leftovers into something special. The kind of recipe you’ll bookmark and come back to every time you have extra turkey sitting in the fridge.
Plus, it’s flexible enough to work with whatever you have on hand. Different vegetables? Go for it. No puff pastry? Use biscuits. Want to make it ahead? Done.
Give this a try and let me know how it turns out! Drop a comment below and tell me what you put in yours, or if you have any questions about making it work with what’s in your fridge right now.
And if you’re reading this before you’ve cooked your turkey, you might want to make sure you have extra leftovers. Trust me on this one. 🦃


