
Ever wonder why Reese’s cups taste different after sitting in your Halloween bucket for a week?
It’s because they’re loaded with preservatives and stabilizers to keep them shelf-stable. But here’s what most people don’t realize: you can make them at home with just 5 ingredients, and they’ll taste a thousand times better than anything you’d find at the grocery store.
I’m talking about that perfect balance of salty-sweet peanut butter wrapped in rich, smooth chocolate. No waxy aftertaste. No weird texture. Just pure, melt-in-your-mouth perfection.
And the best part? They take about 30 minutes from start to finish, with most of that being hands-off time while the chocolate sets.
You don’t need any fancy equipment or pastry skills. If you can melt chocolate and stir peanut butter, you’re already qualified to make these.
What You’ll Need
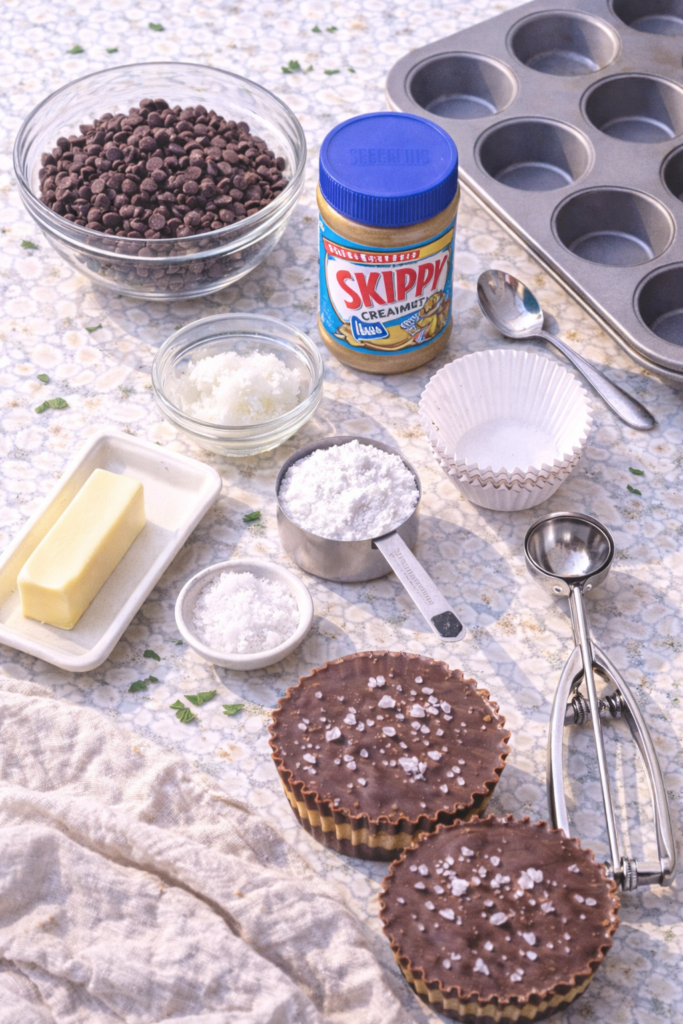
For the Chocolate Layers:
- 2 cups semi-sweet chocolate chips (or dark chocolate if you prefer)
- 2 tablespoons coconut oil (helps the chocolate stay smooth and snappy)
For the Peanut Butter Filling:
- 1 cup creamy peanut butter (not the natural kind; you need one that stays firm)
- 1/4 cup powdered sugar
- 1/4 teaspoon salt (brings out the peanut butter flavor)
- 1 tablespoon softened butter
Special Equipment:
- Muffin tin
- Paper cupcake liners (standard or mini size)
- Microwave-safe bowl
- Spoon or small cookie scoop
That’s it. Five main ingredients and some basic kitchen tools you probably already own.
Pro Tips
1. Use regular peanut butter, not natural
Natural peanut butter separates and gets oily when it sits, which means your cups will turn into a greasy mess after a day or two. Stick with brands like Jif or Skippy that have stabilizers. Trust me on this one.
2. Don’t skip the coconut oil
I know it seems unnecessary, but coconut oil keeps your chocolate smooth and gives it that satisfying snap when you bite into it. Without it, the chocolate can seize up and become grainy. You can use refined coconut oil if you don’t want any coconut flavor.
3. Tap the muffin tin on the counter
After you pour each chocolate layer, give the muffin tin a few good taps on the counter. This releases air bubbles and helps the chocolate settle into a smooth, even layer. It’s the difference between professional-looking cups and ones that look homemade in a bad way.
4. Keep your filling at room temperature
Cold peanut butter is hard to work with and won’t spread evenly. Let your peanut butter filling sit at room temperature for about 10 minutes before you start assembling. It should be soft enough to flatten easily but not so warm that it’s runny.
5. Work quickly once you start
Once your chocolate is melted, you need to move fast. It starts to set up pretty quickly, and if you take too long between layers, the bottom and top won’t bond properly. Have everything measured and ready to go before you start melting anything.
Tools Required
- Standard 12-cup muffin tin (or mini muffin tin if you want bite-sized cups)
- 12 paper cupcake liners
- Medium microwave-safe bowl
- Spoon for mixing and spreading
- Small cookie scoop or spoon for portioning filling
- Refrigerator or freezer space
Substitutions and Variations
Chocolate Options: Swap semi-sweet chips for dark chocolate (60-70% cacao) if you want something less sweet. Milk chocolate works too, but it’ll be sweeter and won’t have that classic Reese’s taste. You could even use white chocolate if you’re feeling wild, though I’ve never tried it myself.
Peanut Butter Alternatives: Almond butter, cashew butter, or sunflower seed butter all work if you have nut allergies. The texture will be slightly different, but still delicious. Just make sure whatever you use isn’t the natural, oil-separating kind.
Add-ins: Stir mini chocolate chips, crushed pretzels, or a pinch of sea salt into your peanut butter filling. Some people love adding a spoonful of graham cracker crumbs for a cheesecake-like texture.
Size Variations: Use mini muffin tins for bite-sized treats (you’ll get about 24), or use a standard muffin tin for king-sized cups. You could even make them in silicone candy molds for fun shapes.

Make Ahead Tips
These actually taste better after sitting in the fridge for a day. The flavors meld together and the texture firms up perfectly.
Make a double batch on Sunday and keep them in an airtight container in the fridge for up to two weeks. They also freeze beautifully for up to three months.
If you’re making them for a party or as gifts, you can prep the chocolate layers the day before, add the peanut butter filling the next day, then top them off a few hours before serving.
How to Make Homemade Reese’s Cups
Step 1: Prep Your Muffin Tin
Line a 12-cup muffin tin with paper liners. If you’re worried about the chocolate sticking, give each liner a light spray with cooking spray, but honestly, I’ve never needed to.
Step 2: Melt the First Chocolate Layer
Combine 1 cup of chocolate chips with 1 tablespoon of coconut oil in a microwave-safe bowl. Microwave in 30-second intervals, stirring between each one, until smooth and fully melted. This usually takes about 90 seconds total.
Don’t try to rush it by microwaving for longer periods. You’ll burn the chocolate and have to start over.
Step 3: Create the Bottom Layer
Spoon about 1 tablespoon of melted chocolate into each liner. Use the back of your spoon to spread it up the sides slightly, creating a little cup shape. You want the bottom to be thick enough that it won’t crack when you bite into it, but thin enough that you’re not eating a solid chocolate puck.
Tap the muffin tin firmly on the counter a few times to smooth out the chocolate and release air bubbles.
Pop the tin in the freezer for 10 minutes while you make the filling.
Step 4: Make the Peanut Butter Filling
In a medium bowl, mix together the peanut butter, powdered sugar, salt, and softened butter. Stir until completely smooth. The mixture should hold together like cookie dough but still be soft enough to flatten easily.
If it’s too dry, add another teaspoon of softened butter. If it’s too wet, add a bit more powdered sugar.
Step 5: Add the Peanut Butter Layer
Take your muffin tin out of the freezer. The chocolate should be firm to the touch.
Roll the peanut butter mixture into 12 equal balls (about 1 tablespoon each). Place one ball in the center of each chocolate cup, then gently press down with your fingers to flatten it. Leave about 1/4 inch of space around the edges so the top chocolate layer can seal properly.
Step 6: Melt the Second Chocolate Layer
Melt the remaining 1 cup of chocolate chips with 1 tablespoon of coconut oil, using the same method as before. Let it cool for about 2 minutes so it’s not hot enough to melt the peanut butter filling.
Step 7: Seal the Cups
Spoon about 1 tablespoon of melted chocolate over each peanut butter center, making sure to cover it completely and seal the edges. The chocolate should flow down and connect with the bottom layer.
Tap the muffin tin on the counter again to smooth everything out.
Step 8: Set and Serve
Refrigerate for at least 30 minutes, or freeze for 15 minutes if you’re impatient like me.
Once they’re fully set, peel off the paper liners and enjoy. Keep any leftovers in an airtight container in the fridge.
Nutrition Information
Per serving (1 cup):
- Calories: 245
- Total Fat: 17g
- Saturated Fat: 7g
- Cholesterol: 3mg
- Sodium: 125mg
- Total Carbohydrates: 21g
- Dietary Fiber: 2g
- Sugars: 17g
- Protein: 5g
Keep in mind these are treats, not health food. But at least you know exactly what’s going into them, which is more than you can say for the store-bought version.
Pairing Suggestions
These go perfectly with a cold glass of milk (obviously), but they’re also great alongside:
Coffee drinks: The chocolate-peanut butter combo pairs beautifully with a latte or cappuccino.
Ice cream: Chop them up and mix into vanilla ice cream for an easy homemade dessert.
Baked goods: Press a homemade Reese’s cup into the center of brownie batter before baking for an over-the-top treat.
Wine: If you’re into wine and chocolate pairings, try these with a tawny port or a bold cabernet sauvignon.
Leftovers and Storage
Store in an airtight container in the refrigerator for up to 2 weeks. Layer them between pieces of parchment paper so they don’t stick together.
For longer storage, freeze them in a freezer-safe container for up to 3 months. Let them thaw in the fridge for a few hours before eating, or eat them straight from the freezer if you like them extra firm.
If they start to look dull or develop a white film after being in the fridge, don’t panic. That’s called chocolate bloom and it’s totally safe to eat. It just means some of the fat or sugar has separated and risen to the surface. The taste won’t be affected.
FAQ
Can I use milk chocolate instead of semi-sweet?
Yes, but they’ll be much sweeter. If you go this route, reduce the powdered sugar in the filling to 2 tablespoons instead of 1/4 cup.
Why is my chocolate seizing up and getting grainy?
Water is chocolate’s enemy. Even a tiny drop can cause it to seize. Make sure your bowl is completely dry, and avoid covering the chocolate while it cools (condensation can drip back in).
Can I use silicone molds instead of a muffin tin?
Absolutely. Silicone candy molds work great and make the cups easier to pop out. Just make sure you still use the same layering technique.
My peanut butter filling is too soft. What do I do?
Add more powdered sugar, one tablespoon at a time, until it firms up. You can also pop it in the fridge for 10 minutes to help it set.
How do I get the chocolate layers to be even?
Work quickly and use a spoon to spread the chocolate evenly before it starts to set. Tapping the pan on the counter helps too. It takes a bit of practice, but even imperfect ones taste amazing.
Can I use crunchy peanut butter?
You can, but the texture will be different. The peanut pieces can poke through the chocolate and make the cups look a bit messy. If you want some crunch, I’d suggest adding chopped peanuts to smooth peanut butter instead.
Do these need to stay refrigerated?
Yes. Without preservatives, they’ll get soft and melty at room temperature. Plus, they taste better cold anyway.
Wrapping Up
Making your own Reese’s cups at home is one of those things that feels way harder than it actually is.
Once you try it, you’ll realize how simple it is to control exactly what goes into your treats. No stabilizers, no preservatives, no weird ingredients you can’t pronounce.
Just chocolate, peanut butter, and a little bit of time.
Give this recipe a try and see for yourself why homemade always wins. And when you do, drop a comment and let me know how they turned out. Did you add any fun variations? Make them mini-sized? Eat them all in one sitting? 😋
I want to hear about it.


