You know what’s funny about apple crisp?
People treat it like this complicated fall dessert that requires a PhD in baking. Like you need to sacrifice a cinnamon stick to the dessert gods and pray your topping doesn’t turn into concrete.
But here’s the thing: apple crisp is literally one of the easiest desserts you can make. And I’m not talking about “easy for someone who bakes every day” easy. I mean “you’ve never touched a mixing bowl and you’re still going to nail this” easy.
I’ve been making this recipe for years now, and every single time, people ask me if I went to culinary school. (I didn’t. I just followed a recipe and didn’t overthink it.)
The smell alone is worth making it. That butter-cinnamon-apple situation that takes over your entire house? Chef’s kiss. 💋
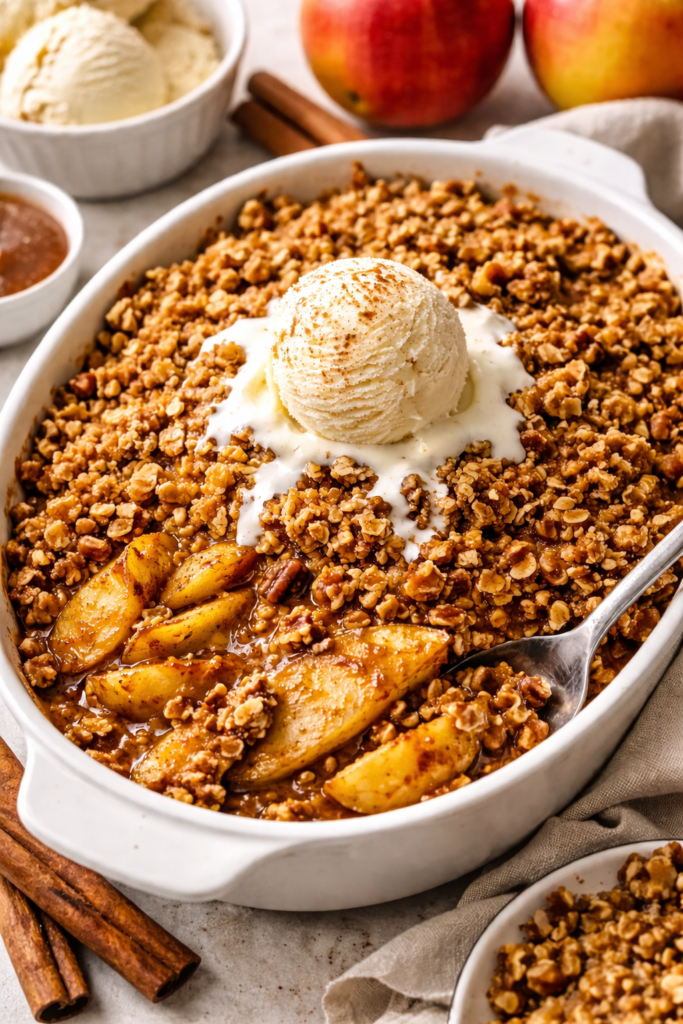
And the texture? Crispy, buttery topping meets soft, cinnamon-sugar apples. It’s warm, it’s comforting, and it’s the kind of dessert that makes you want to curl up in a blanket and pretend it’s October even if it’s still 75 degrees outside.
So grab some apples and let’s do this.
What You’ll Need
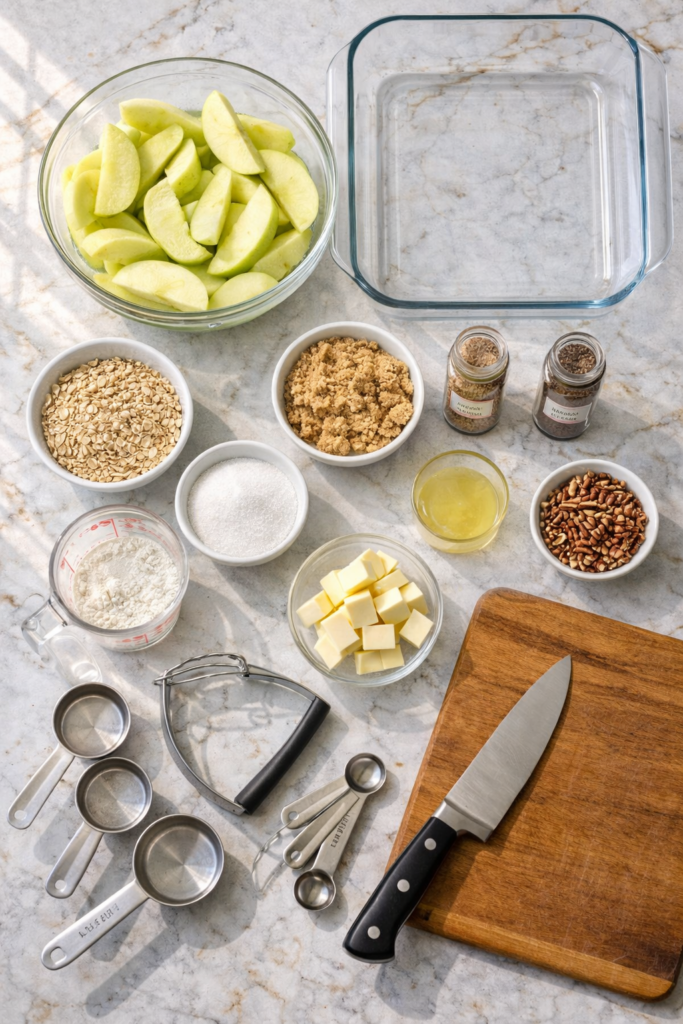
For the Apple Filling:
- 6 medium Granny Smith apples (peeled, cored, and sliced)
- 2 tablespoons lemon juice
- 1/2 cup granulated sugar
- 1 teaspoon ground cinnamon
- 1/4 teaspoon ground nutmeg
- 2 tablespoons all-purpose flour
For the Crisp Topping:
- 1 cup old-fashioned rolled oats
- 3/4 cup all-purpose flour
- 3/4 cup packed light brown sugar
- 1/2 teaspoon ground cinnamon
- 1/4 teaspoon salt
- 1/2 cup (1 stick) unsalted butter (cold and cut into small cubes)
- 1/2 cup chopped pecans or walnuts (optional, but really good)
Tools You’ll Need
You don’t need fancy equipment for this. Just grab:
- 9×13 inch baking dish (or 8×8 if you want it thicker)
- Large mixing bowl (for the apples)
- Medium mixing bowl (for the topping)
- Peeler
- Sharp knife
- Cutting board
- Measuring cups and spoons
- Fork or pastry cutter (for mixing the topping)
That’s it. No stand mixer, no food processor, no complicated tools that cost $200 and take up half your counter.
Pro Tips
Use cold butter and work fast. Room temperature butter will make your topping soggy instead of crispy. Keep it cold and use your fingers or a fork to break it into pea-sized pieces. The chunks of butter are what create those crispy, golden pockets of deliciousness.
Mix your apples well. Don’t just toss the cinnamon on top and call it a day. Get in there and make sure every single slice is coated. Nobody wants to bite into a plain apple piece when the rest of the dessert is cinnamon heaven.
Let it rest before serving. I know it smells incredible and you want to dive in immediately, but give it 10-15 minutes to cool. The filling needs time to thicken up. If you scoop it right away, you’ll have apple soup instead of apple crisp.
Toast your oats first (optional but worth it). If you want next-level flavor, toast your oats in a dry pan for 3-4 minutes before mixing them into the topping. They get this nutty, rich flavor that makes the whole thing taste like you spent way more time on it than you did.
Double the topping. Listen, some people are all about the apples. I’m all about that crispy, buttery topping. If you’re like me, make 1.5x or even 2x the topping recipe. You won’t regret it.
How to Make It
Prep Your Apples
Preheat your oven to 350°F.
Peel and core your apples, then slice them into thin pieces (about 1/4 inch thick). Toss them in a large bowl with the lemon juice right away so they don’t turn brown.
Add the sugar, cinnamon, nutmeg, and flour. Mix everything together until each slice is coated. The flour helps thicken the juices as it bakes, so don’t skip it.
Pour the apple mixture into your greased baking dish and spread it out evenly.
Make the Topping
In a medium bowl, combine the oats, flour, brown sugar, cinnamon, and salt. Mix it up.
Add your cold butter cubes. Use a fork, pastry cutter, or your fingers to work the butter into the dry ingredients. You want it to look like coarse crumbs with some pea-sized butter chunks. This is where the magic happens.
If you’re using nuts, fold them in now.
Assemble and Bake
Sprinkle the topping evenly over the apples. Don’t press it down. Just let it sit on top in a nice, even layer.
Bake for 45-50 minutes. You’ll know it’s done when the topping is golden brown and crispy, and the apple filling is bubbling around the edges.
Pull it out and let it cool for 10-15 minutes. This is the hardest part because it smells insane and you just want to eat it immediately.
Serve it warm with vanilla ice cream, whipped cream, or just straight up with a spoon.
Substitutions and Variations
Different apples: Granny Smith is my go-to because they’re tart and hold their shape when baked, but you can mix it up. Honeycrisp, Fuji, or a mix of tart and sweet apples all work. Just avoid Red Delicious because they turn mushy.
Make it gluten-free: Swap the all-purpose flour for a 1:1 gluten-free baking blend. Use certified gluten-free oats. Done.
Make it vegan: Use coconut oil or vegan butter instead of regular butter. It won’t have quite the same buttery richness, but it’ll still be good.
Add other fruit: Mix in some fresh cranberries, pears, or even a handful of frozen blueberries with the apples. Just keep the total fruit amount around 6 cups.
Spice it up: Add a pinch of ground ginger or cardamom to the filling. Or drizzle some caramel sauce over the top before serving.
Skip the nuts: If you’re not a nut person or have allergies, just leave them out. The topping is still amazing without them.
Make Ahead Tips
You can prep the apple filling and the topping separately, then store them in the fridge for up to 24 hours. When you’re ready to bake, just assemble and pop it in the oven.
You can also assemble the whole thing (apples + topping) and freeze it unbaked. Wrap it tightly in plastic wrap and foil, then freeze for up to 3 months. When you’re ready to bake, let it thaw in the fridge overnight, then bake as directed. You might need to add 5-10 extra minutes to the bake time.
Leftovers and Storage
Store leftovers covered in the fridge for up to 4 days.
Reheat individual portions in the microwave for 30-45 seconds, or warm the whole thing in a 300°F oven for 15-20 minutes.
You can also eat it cold straight from the fridge. Some people (me) actually prefer it that way for breakfast with yogurt.
To freeze baked apple crisp, let it cool completely, then wrap it tightly and freeze for up to 3 months. Thaw in the fridge and reheat in the oven.
Serving Suggestions
This is incredible with vanilla ice cream. Like, life-changing incredible. The cold ice cream melting into the warm crisp? Pure bliss.
You can also serve it with:
- Whipped cream (homemade or store-bought)
- Caramel sauce drizzled on top
- A dollop of Greek yogurt for breakfast (yes, breakfast)
- Crème fraîche if you’re feeling fancy
- Just a fork and zero shame
Nutritional Info
Per serving (assuming 12 servings):
- Calories: 280
- Total Fat: 11g
- Saturated Fat: 6g
- Cholesterol: 25mg
- Sodium: 85mg
- Total Carbohydrates: 45g
- Dietary Fiber: 4g
- Sugars: 30g
- Protein: 3g
Keep in mind this is an estimate. If you add ice cream or extra nuts, the numbers will change. But honestly, if you’re eating apple crisp, you’re not really counting calories anyway.
Meal Pairing Suggestions
Apple crisp is the perfect ending to a cozy fall dinner. Try pairing it with:
Roasted chicken with root vegetables: Something savory and hearty balances out the sweetness of the dessert.
Pork chops with apples and onions: Double down on the apple theme. It works.
Butternut squash soup: Light dinner, heavy dessert. That’s the move.
Grilled cheese and tomato soup: Comfort food overload, but sometimes that’s exactly what you need.
Thanksgiving dinner: This is a crowd-pleaser and way easier than pie. Your family will thank you.
Why This Recipe Works
The key to a good apple crisp is balance.
Too much topping and you lose the apple flavor. Too little topping and it’s just baked apples (which is fine, but not crisp).
The ratio in this recipe is spot on. You get enough crispy, buttery topping to make every bite satisfying, but the apples are still the star.
The brown sugar in the topping adds this deep, caramel-like sweetness that white sugar just can’t match. And the oats give you texture and that classic crisp vibe.
Cold butter is non-negotiable. It creates those little pockets of crispy, flaky goodness when it melts in the oven. Room temperature butter just makes everything soggy.
And the lemon juice? It keeps the apples from oxidizing, but it also brightens up all the sweetness. Without it, the whole thing can taste a little one-note.
FAQ
Can I use quick oats instead of old-fashioned oats?
You can, but old-fashioned oats give you a better texture. Quick oats are more processed and can turn mushy. Stick with old-fashioned if you can.
Why is my topping soggy?
Your butter was probably too warm, or you pressed the topping down too much when assembling. Keep the butter cold and just sprinkle the topping on top without packing it down.
Can I make this in individual ramekins?
Yes! Divide the filling and topping among 6-8 ramekins and bake for 25-30 minutes. Perfect for portion control or if you’re serving guests.
Do I have to peel the apples?
You don’t have to, but I recommend it. The peels can get tough and chewy when baked. If you want to keep them on for extra fiber, go for it. Just know the texture will be different.
Can I use apple pie filling from a can?
I mean, you can, but why would you? Fresh apples take like 10 minutes to prep and taste a million times better. Save the canned stuff for when you’re truly desperate.
How do I know when it’s done?
The topping should be golden brown and crispy, and the apple filling should be bubbling around the edges. If the topping is browning too fast, cover it loosely with foil for the last 10-15 minutes of baking.
Can I make this ahead for a party?
Absolutely. Bake it earlier in the day and reheat it before serving. Or prep everything the night before and bake it fresh right before your guests arrive.
What’s the difference between apple crisp and apple crumble?
They’re basically the same thing. Some people say crisp has oats and crumble doesn’t, but honestly, the terms are used interchangeably. Don’t overthink it.
Wrapping Up
If you’ve been intimidated by fall baking, this apple crisp is your entry point.
It’s simple, it’s delicious, and it makes your house smell like a candle store in the best way possible. You don’t need any special skills or equipment. Just apples, butter, oats, and a little bit of time.
The crispy topping, the warm cinnamon apples, the way it pairs with vanilla ice cream… it’s the kind of dessert that makes you excited for sweater weather.
So go make it. Then come back and tell me how it went. Did you add extra topping? Did you mix in pears? Did you eat it straight from the pan at midnight?
I want to hear all about it in the comments. 👇