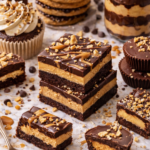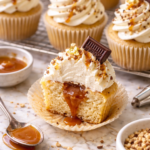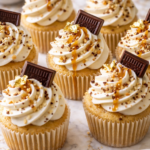
Brown butter batter, a molten caramel center, and a whipped caramel buttercream that somehow gets better the next day.
I need to be upfront with you about something.
These cupcakes are not fair to every other cupcake that has ever existed. They’re in a completely different category. And once you make them, you’ll understand why I say that with zero exaggeration. 😌
The brown butter in the batter is the thing that separates this from a regular vanilla cupcake. It adds this deep, nutty, almost caramel-like flavor before you’ve even added caramel. Then you hollow out the center and fill it with homemade salted caramel. And then you pipe on a caramel buttercream that’s basically dessert on top of dessert.
I’ve made a lot of cupcakes over the years. These are the ones people text me about afterward.
“The caramel center genuinely shocked me. I wasn’t expecting it and I had to immediately make another batch.”
Here’s what’s wild: they’re actually not that hard to make. The caramel takes a little nerve the first time, but once you’ve done it once, you’ll make it on autopilot for the rest of your life.
Let’s get into it.
What You’ll Need
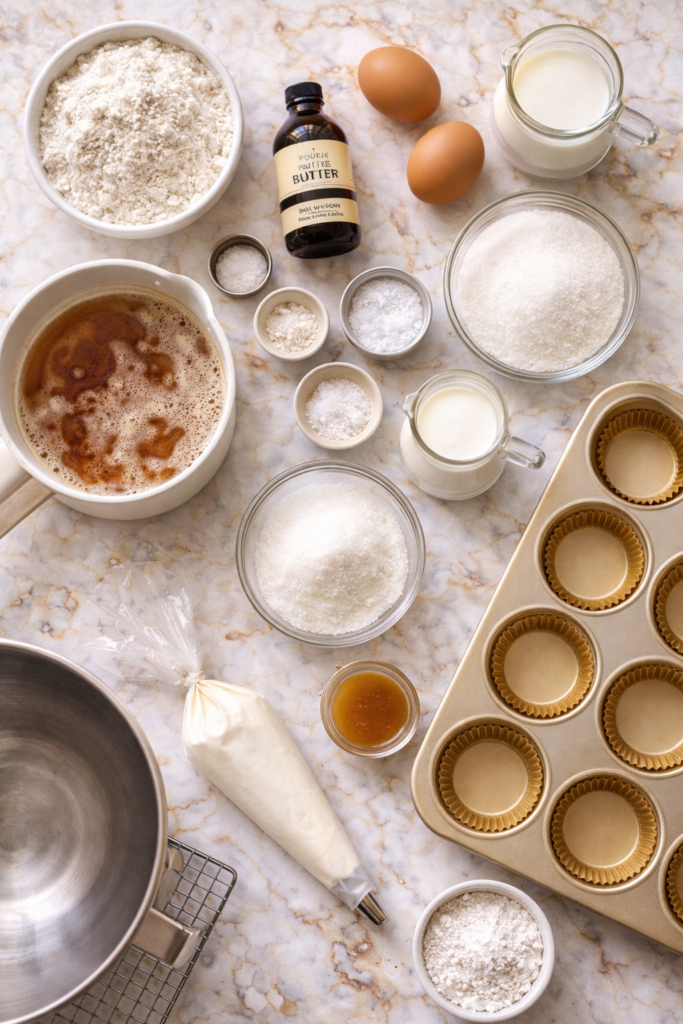
For the Brown Butter Cupcakes (Makes 12)
- 2 ¼ cups (280g) all-purpose flour
- 1 cup (225g) unsalted butter (for browning)
- 1 ½ cups (300g) granulated sugar
- 3 large eggs, room temperature
- 2 tsp pure vanilla extract
- 1 cup (240ml) whole milk, room temperature
- 2 tsp baking powder
- ½ tsp fine sea salt
For the Salted Caramel Filling
- 1 cup (200g) granulated sugar
- 6 tbsp (85g) unsalted butter, cubed, room temperature
- ½ cup (120ml) heavy cream, room temperature
- 1 tsp flaky sea salt (Maldon works beautifully)
For the Caramel Buttercream
- 1 cup (225g) unsalted butter, softened
- 3 cups (360g) powdered sugar, sifted
- ¼ cup (60ml) salted caramel (from above)
- 2 tbsp heavy cream
- Pinch of fine sea salt
- Extra flaky salt + caramel drizzle to finish
Tools You’ll Need
- Stand mixer or hand mixer
- 12-cup muffin tin + cupcake liners
- Light-colored saucepan for browning butter (you need to see the color change)
- Heavy-bottomed medium saucepan for the caramel
- Apple corer or cupcake corer for the caramel center
- Piping bag + large star tip (Wilton 1M is the one)
- Wire cooling rack
- Kitchen scale (highly recommended for baking accuracy)
- Mixing bowls, rubber spatula, whisk
Pro Tips
1
Brown your butter past where you’re comfortable.Most people pull it too early and lose the flavor. You want the milk solids to turn a deep amber and smell like toasted hazelnuts. Watch it in those last two minutes, it goes from perfect to burnt fast.
2
Room temperature ingredients are non-negotiable.Cold eggs or cold milk will make your batter break and the texture will suffer. Set everything out 30 minutes before you start baking.
3
Do not stir the caramel.Seriously. Once the sugar starts melting, only swirl the pan gently if needed. Stirring causes crystallization and you’ll end up with grainy, seized caramel. One of the most common first-timer mistakes.
4
Core cupcakes only after they’re completely cool.Fill them while even slightly warm and the caramel melts straight through the cake and vanishes. Patience pays off here.
5
Chill your buttercream 15 minutes before pipingif your kitchen is warm. You’ll get cleaner, sharper swirls that actually hold their shape instead of drooping sideways.
Substitutions & Variations
| Original | Swap | Notes |
|---|---|---|
| All-purpose flour | 1:1 gluten-free blend | Slightly denser texture, still great |
| Whole milk | Oat milk or almond milk | Less rich but works well |
| Unsalted butter (all) | Miyoko’s vegan butter | Best dairy-free option available |
| Heavy cream | Full-fat coconut cream | Adds a slight coconut note |
| Granulated sugar (caramel) | Coconut sugar | Deeper, molasses-forward caramel |
Flavor variations worth trying:
- Add 1 tbsp espresso powder to the batter for an espresso-caramel version that’s honestly ridiculous 🤌
- Swap the vanilla base for a chocolate cupcake and keep the caramel filling
- Add 1 tsp cinnamon + ½ tsp apple pie spice for a fall version that’ll make your whole kitchen smell incredible
Make Ahead Tips
Plan Ahead & Save Time
- Salted caramel: Makes up to 2 weeks in advance. Store in a sealed jar in the fridge. Reheat in 10-second microwave bursts and stir before using.
- Brown butter: Make up to a month ahead. Store in the fridge, let it come to room temp before using in batter.
- Unfrosted cupcakes: Bake up to 2 days ahead. Airtight container at room temperature.
- Buttercream: Up to 5 days in the fridge. Re-whip for 2 minutes before piping.
Nutritional Breakdown
| Per Cupcake | Amount |
|---|---|
| Calories | ~420 kcal |
| Total Fat | 22g |
| Saturated Fat | 13g |
| Carbohydrates | 55g |
| Total Sugar | 42g |
| Protein | 4g |
| Sodium | 280mg |
Approximate values based on 12 servings. Values will shift with ingredient swaps.
To reduce sugar: cut powdered sugar in the buttercream to 2 cups and add a tiny pinch more salt to balance. It deepens the flavor anyway.
How to Make Them

1
Brown the Butter
Add 1 cup butter to a light-colored saucepan over medium heat. Stir occasionally. After 5-7 minutes, the butter will foam, the foam will subside, and you’ll see golden-brown bits forming at the bottom with a nutty aroma.
Pull off heat immediately, pour into a bowl, and let it cool until solid again. About 1 hour at room temp, or 20 minutes in the fridge. Don’t skip this step.
2
Make the Salted Caramel
Add sugar to a heavy-bottomed saucepan over medium heat. Don’t touch it for the first minute. Once the edges start liquefying, gently swirl the pan. Cook until all the sugar is a deep amber (copper-penny color).
Add cubed butter carefully, it will bubble aggressively. Stir until fully melted. Slowly pour in the cream (room temp!) while stirring constantly. Stir in flaky salt. Pour into a jar and set aside.
3
Make the Batter
Preheat oven to 350°F (175°C). Line your muffin tin with cupcake liners.
Beat the solidified brown butter and sugar on medium-high for 3 minutes until pale and fluffy. Add eggs one at a time, then vanilla. Whisk together flour, baking powder, and salt in a separate bowl. Alternate adding the flour mixture and milk in 3 additions, starting and ending with flour. Mix until just combined. Do not overmix.
4
Bake
Fill liners ⅔ full. Bake 18-22 minutes until a toothpick comes out clean. Rest in the pan 5 minutes, then transfer to a cooling rack. Let them cool completely before moving to the next step.
5
Fill with Caramel
Use an apple corer or small knife to cut a small well in the center of each cooled cupcake. Don’t go through the bottom. Spoon 1-2 teaspoons of caramel into each hole. Place the cut-out piece back on top as a lid.
6
Make the Buttercream
Beat softened butter on high for 3 minutes until light and fluffy. Add sifted powdered sugar one cup at a time on low. Add the caramel, cream, and salt. Beat on high 2 more minutes. Too thick: add cream a teaspoon at a time. Too thin: add more powdered sugar.
7
Pipe & Finish
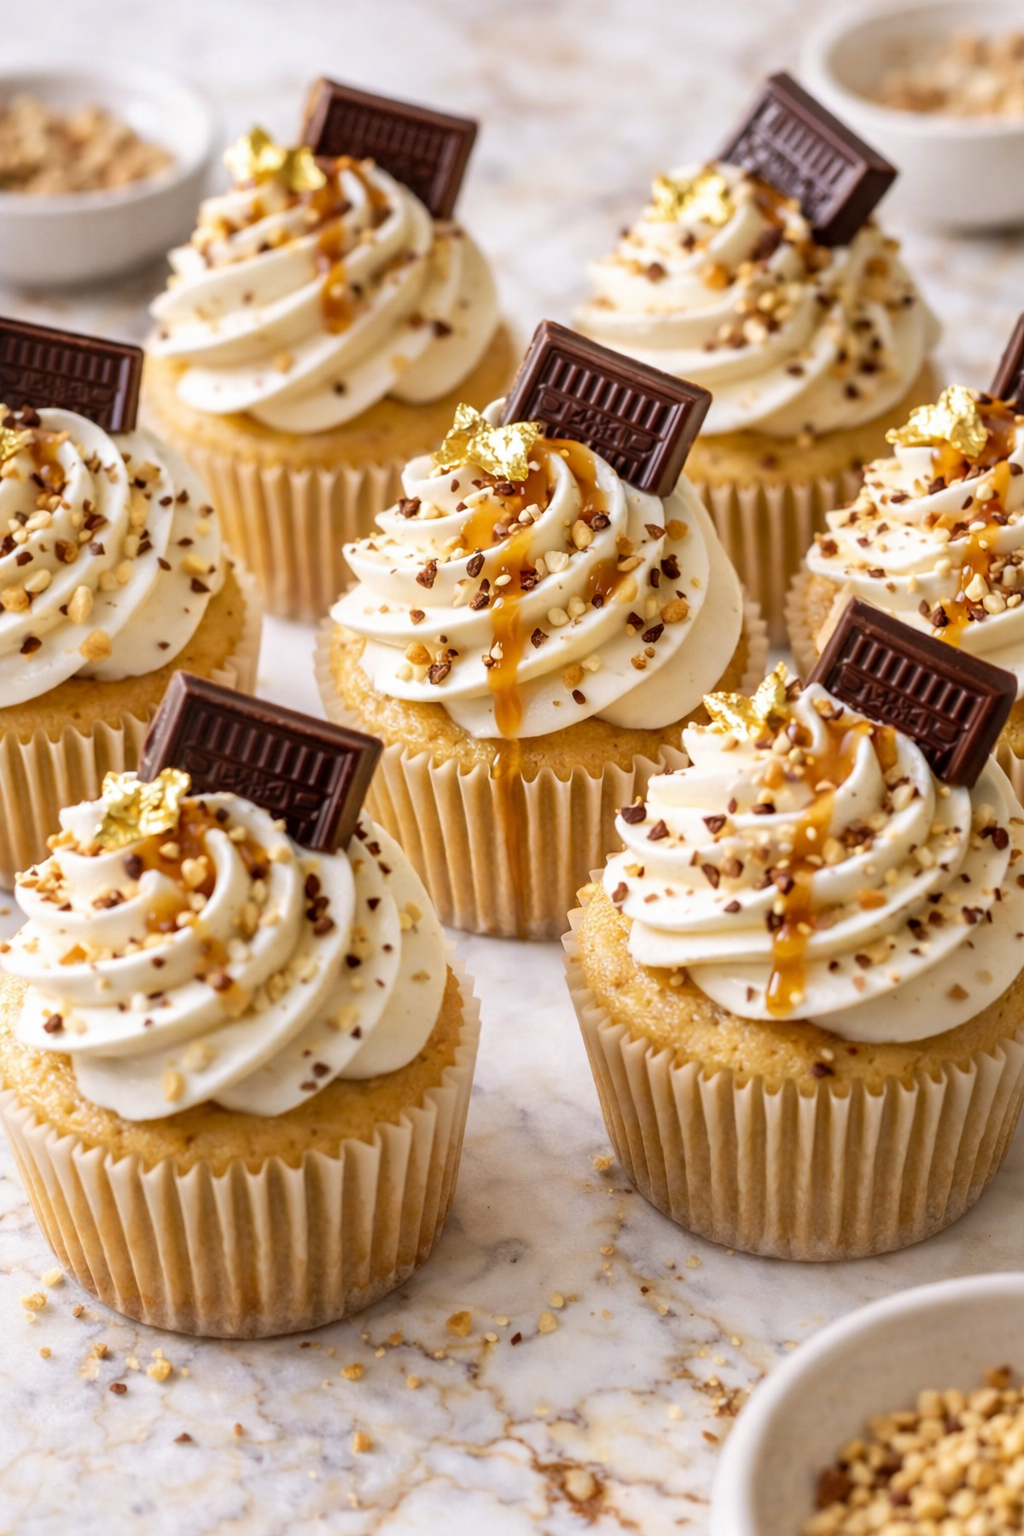
Transfer buttercream to a piping bag with a large star tip. Pipe in a circular motion, starting from the outer edge and spiraling inward and upward. Drizzle extra caramel on top and finish with a pinch of flaky sea salt.
💡 The caramel center is the surprise. When someone bites into one without knowing it’s there, the reaction is always the same. Remember that moment for yourself.
Meal Pairing Suggestions
| Occasion | Pair With |
|---|---|
| Dinner party dessert | Strong espresso or a salted caramel latte |
| Afternoon treat | Earl Grey or a vanilla chai |
| Birthday setup | Champagne or prosecco |
| Fall / holiday table | Apple cider or a warm spiced drink |
Leftovers & Storage
| Storage Method | How Long |
|---|---|
| Room temperature (airtight) | Up to 2 days |
| Refrigerator (airtight) | Up to 5 days |
| Freezer (unfrosted) | Up to 3 months |
| Freezer (frosted) | Up to 1 month |
- If stored in the fridge, let cupcakes sit at room temperature for 30 minutes before eating. Cold buttercream is dense and loses its creaminess.
- Freeze unfrosted cupcakes individually wrapped in plastic wrap, then placed in a zip-lock bag.
- Extra caramel keeps in the fridge for 2 weeks and is outrageously good on vanilla ice cream, toast, or oatmeal.
FAQ
Can I use store-bought caramel?
You can. It won’t be the same experience. Store-bought caramel is almost always sweeter and much less complex. If you’re short on time, Trader Joe’s fleur de sel caramel sauce is a solid backup option. But the homemade version takes about 12 minutes and changes the whole recipe.
My caramel seized and turned grainy. What happened?
Temperature shock. Either the butter or cream was too cold when it hit the hot sugar. Make sure both are fully at room temperature before you add them. If it seizes slightly, keep stirring over low heat and it can sometimes come back together.
My brown butter smells sharp and bitter. Did I burn it?
If it smells acrid rather than nutty, start over. The difference between perfectly browned and burnt is about 60 seconds. Watch it closely in the last 2 minutes and pull it the second it smells like toasted hazelnuts.
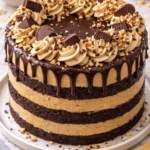
Can I make this as a layer cake?
Yes. Two 8-inch round pans at 350°F for 28-32 minutes. Spread caramel between the layers before frosting the outside. It’s a little dramatic in the best way.
Do I need a stand mixer?
A hand mixer works just fine. Mixing by hand is technically possible but your arm will make it very clear it has opinions about this.
Can I double the recipe?
Absolutely. The batter doubles well. For the caramel, make two separate batches rather than doubling in one pan. A larger volume of sugar behaves differently in the pan and is harder to control.
Wrapping Up
The brown butter alone would make this a great recipe. But with the caramel center, it crosses into something people talk about for a while.
They look impressive, they taste like something from a gourmet bakery, and the process of making them from scratch is genuinely satisfying. There’s something about watching that butter go golden and amber that never gets old.
Give these a go and drop a comment below letting me know how they turned out. Did you stick with the classic version, or did you try one of the variations? Any questions along the way, leave them below too. I read every single one.