You know that smell that makes you want to float across the room like a cartoon character? That’s what fresh cinnamon buns do.
And I’m not talking about the ones from the mall food court or those can-pop tubes from the grocery store. I’m talking about real, homemade cinnamon buns with gooey centers and cream cheese frosting that drips down the sides.
The kind that makes your kitchen smell like a bakery and has your neighbors knocking on your door asking what you’re making.
Here’s the thing: homemade cinnamon buns aren’t as hard as you think. Yes, there’s yeast involved. Yes, you have to let the dough rise. But I promise you, if I can make these in my tiny kitchen while half asleep on a Sunday morning, you absolutely can too.
And once you taste them warm from the oven? You’ll never go back to the store-bought version.
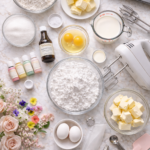
What You’ll Need
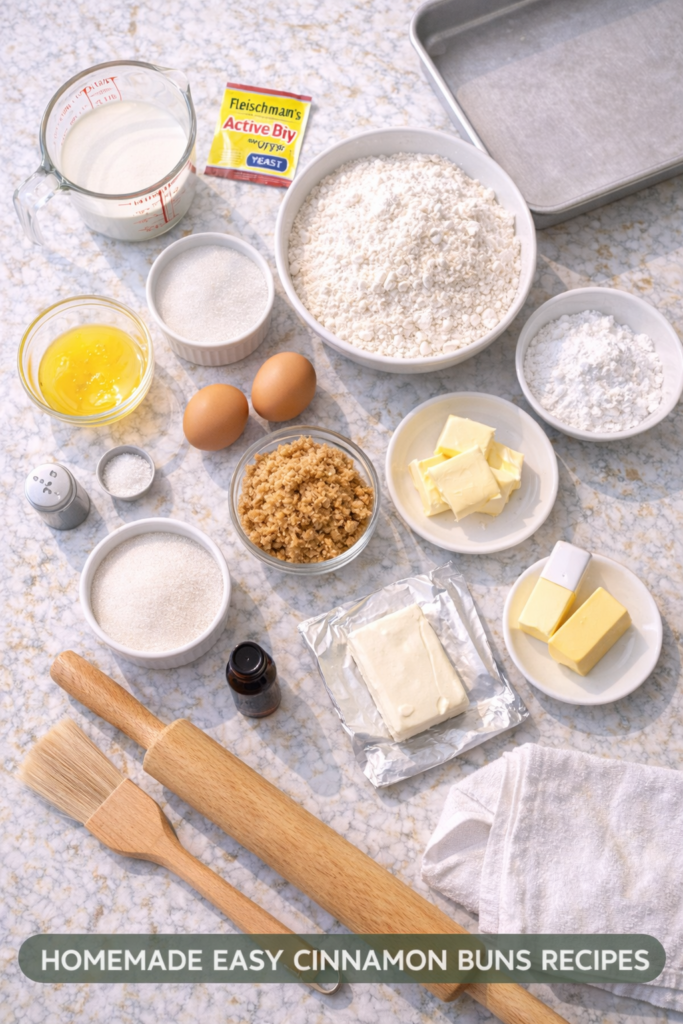
For the Dough:
- 1 cup whole milk, warmed to 110°F
- 2¼ teaspoons active dry yeast (one packet)
- ½ cup granulated sugar
- ⅓ cup unsalted butter, melted
- 2 large eggs, room temperature
- 1 teaspoon salt
- 4½ cups all-purpose flour
For the Filling:
- ½ cup unsalted butter, softened
- 1 cup light brown sugar, packed
- 2½ tablespoons ground cinnamon
- Pinch of salt
For the Cream Cheese Frosting:
- 4 oz cream cheese, softened
- ¼ cup unsalted butter, softened
- 1½ cups powdered sugar
- ½ teaspoon vanilla extract
- 2-3 tablespoons milk
Tools You’ll Need
- Large mixing bowl
- Stand mixer with dough hook (or your hands and some elbow grease)
- Rolling pin
- 9×13 inch baking dish
- Clean kitchen towel
- Pastry brush
- Offset spatula or butter knife for frosting
Pro Tips
1. Temperature matters with yeast
Your milk needs to be warm, not hot. Think baby bottle temperature. Too hot and you’ll kill the yeast. Too cold and it won’t activate. Between 105-110°F is the sweet spot. If you don’t have a thermometer, it should feel warm on your wrist but not burning.
2. Don’t rush the rise
I know waiting is the hardest part, but this is where the magic happens. Your dough needs time to double in size, and that usually takes about an hour in a warm spot. On cold days, I turn my oven on for just one minute, turn it off, and then let the dough rise in there. Works like a charm.
3. Roll tightly, but not too tight
When you’re rolling up your dough, you want it snug but not strangling. Too loose and your buns will be flat. Too tight and they’ll burst open while baking. Think of it like rolling a sleeping bag. Firm but gentle.
4. Use dental floss to cut
This sounds weird, but trust me. Slide unflavored dental floss under your rolled dough, cross the ends over the top, and pull. It cuts through without squishing the rolls. You can also use a sharp knife if you’re careful, but floss is genuinely easier.
5. Let them touch
When you place your cut rolls in the baking dish, let them barely touch each other. They’ll rise together and create those soft, pillowy sides that pull apart beautifully. It’s like they’re giving each other a little hug while they bake.
Substitutions and Variations
Make them dairy-free: Use almond milk or oat milk instead of regular milk, and swap the butter for vegan butter. For the frosting, use dairy-free cream cheese and butter alternatives.
Cut the sugar: You can reduce the sugar in the dough to ¼ cup if you want them less sweet. The filling and frosting have plenty of sweetness on their own.
Add nuts: Sprinkle ½ cup of chopped pecans or walnuts over the filling before rolling.
Try different flavors: Mix in some orange zest with the filling, or add a tablespoon of maple syrup to the frosting. You can also do a chocolate version by adding ⅓ cup cocoa powder to the filling.
Use honey instead of sugar: Swap half the granulated sugar in the dough with honey. It makes them extra soft and adds a nice depth of flavor.
Make Ahead Tips
Overnight option: Assemble the rolls completely, cover tightly with plastic wrap, and refrigerate overnight. In the morning, let them sit at room temperature for 30 minutes while your oven preheats, then bake.
Freeze before baking: After cutting the rolls and placing them in the pan, freeze the entire pan for up to 3 months. When you’re ready to bake, thaw overnight in the fridge, let come to room temperature, then bake as directed.
Freeze after baking: Bake the rolls but skip the frosting. Let them cool completely, wrap individually in plastic wrap, then store in a freezer bag for up to 2 months. Thaw, warm in the microwave for 20-30 seconds, and add fresh frosting.
How to Make Homemade Cinnamon Buns
Step 1: Wake up the yeast
Pour your warm milk into a large bowl. Sprinkle the yeast over the top and add a pinch of sugar. Let it sit for about 5 minutes until it gets foamy. This is called “proofing” and it tells you your yeast is alive and ready to work.
If nothing happens after 10 minutes, your yeast is dead or your milk was too hot. Start over with fresh yeast and cooler milk.
Step 2: Mix the dough
Add the sugar, melted butter, eggs, and salt to your foamy yeast mixture. Stir it all together.
Start adding the flour one cup at a time. After about 3 cups, the dough will start to come together. Keep adding flour until you have a soft dough that pulls away from the sides of the bowl but is still slightly sticky.
If using a stand mixer, knead with the dough hook for 5 minutes. If doing it by hand, turn the dough out onto a floured surface and knead for about 8 minutes. You want it smooth and elastic.
Step 3: Let it rise
Place your dough in a greased bowl, turning it once to coat all sides with oil. Cover with a clean kitchen towel and put it somewhere warm.
Wait an hour, or until it’s doubled in size. This is a good time to catch up on that show you’ve been watching or scroll through your phone guilt-free.
Step 4: Make the filling
While your dough is rising, mix together the softened butter, brown sugar, cinnamon, and salt in a bowl. It should look like thick, spreadable paste.
Room temperature butter is key here. Cold butter won’t spread and melted butter will just run off the dough.
Step 5: Roll it out
Once your dough has doubled, punch it down (literally, just punch it). Turn it out onto a lightly floured surface.
Roll it into a rectangle about 15×10 inches. It doesn’t have to be perfect. Mine never is.
Step 6: Spread and roll
Spread your cinnamon filling all over the dough, leaving about a half-inch border on one of the long sides.
Starting from the opposite long side, roll the dough up tightly. When you get to the end, pinch the seam closed.
Step 7: Cut the rolls
Use that dental floss trick or a sharp knife to cut the log into 12 equal pieces. They’ll be about 1¼ inches thick.
Grease your 9×13 baking dish and arrange the rolls cut-side up. They should barely touch each other.
Step 8: Second rise
Cover the pan with a towel and let the rolls rise again for 30 minutes. They’ll puff up and get even closer together.
While they’re rising, preheat your oven to 350°F.
Step 9: Bake
Bake for 25-30 minutes until they’re golden brown on top. You’ll know they’re done when they spring back lightly when you touch them.
The smell at this point will be absolutely incredible. Try not to eat them immediately (I know it’s hard).
Step 10: Make the frosting
While the buns are baking, beat together the cream cheese and butter until smooth and fluffy.
Add the powdered sugar and vanilla. Mix until combined. Add milk one tablespoon at a time until you reach your desired consistency. I like mine thick but spreadable.
Step 11: Frost and serve
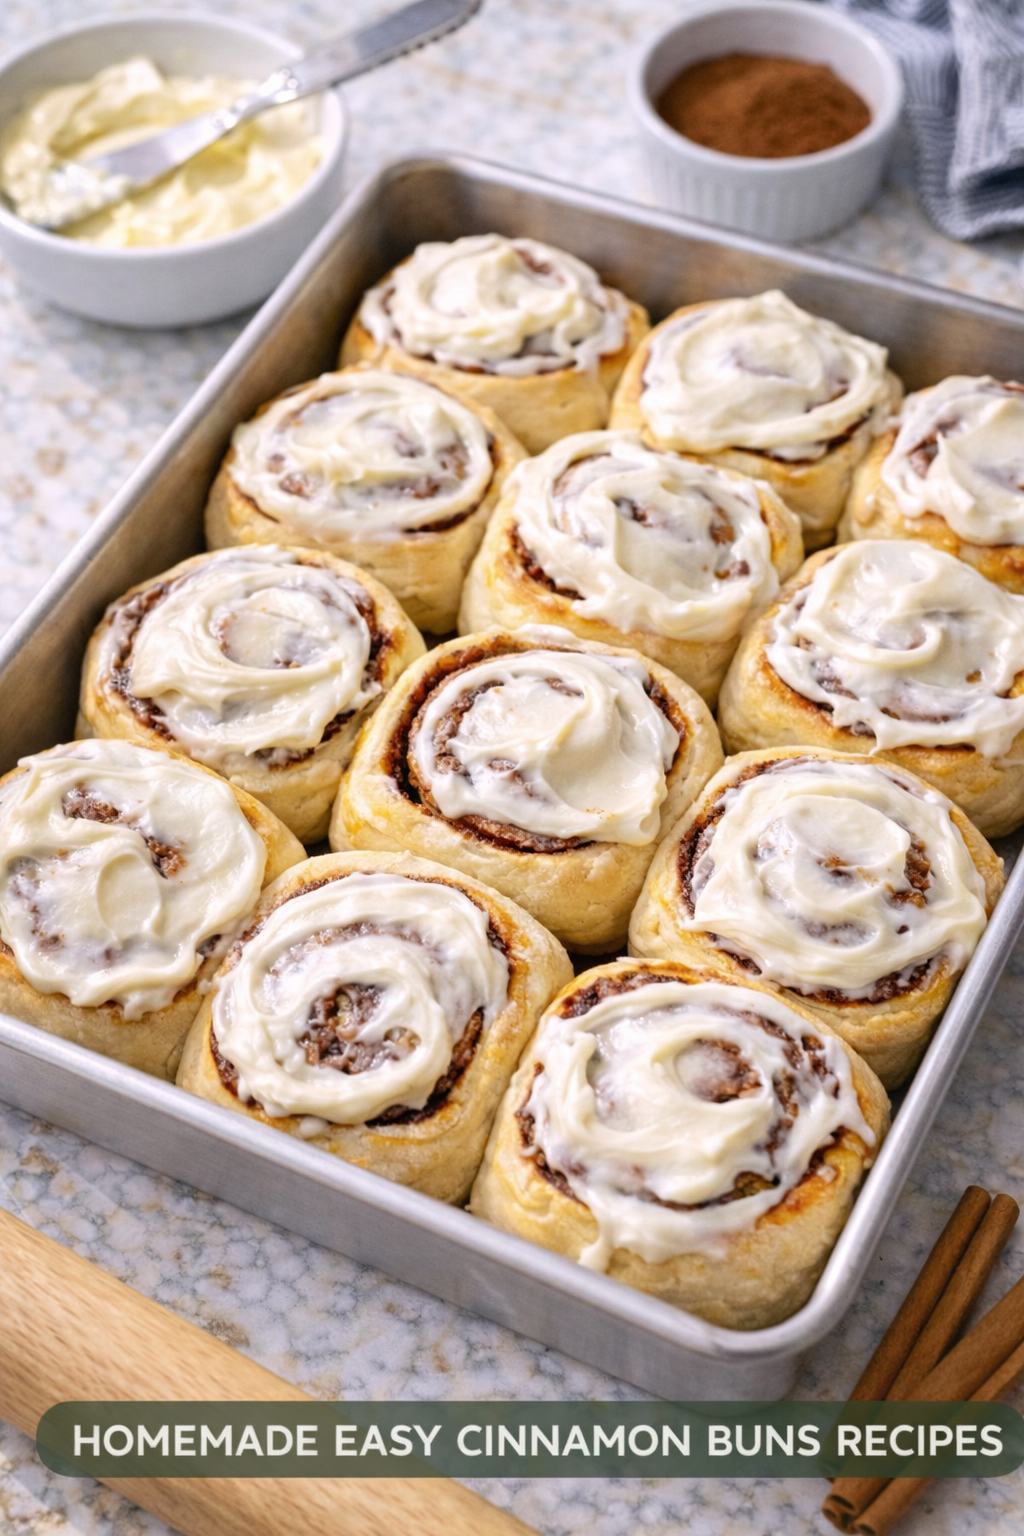
Let the buns cool for about 5 minutes, then spread the frosting over the top while they’re still warm. The frosting will melt slightly into all the crevices and it’s absolutely perfect.
Serve them warm and watch them disappear.

Leftovers and Storage
Room temperature: Store in an airtight container for up to 2 days. They’ll stay soft and delicious, though let’s be real, they probably won’t last that long.
Refrigerator: Keep in the fridge for up to 5 days. Warm individual rolls in the microwave for 15-20 seconds before eating.
Freezer: Wrap individual frosted rolls in plastic wrap and store in a freezer bag for up to 2 months. Thaw at room temperature or microwave for 30-45 seconds.
Reheating tip: Put a cup of water in the microwave next to your roll. The steam keeps them from getting tough.
Nutritional Information
Per roll (makes 12):
- Calories: 425
- Total Fat: 18g
- Saturated Fat: 11g
- Cholesterol: 75mg
- Sodium: 250mg
- Total Carbohydrates: 62g
- Dietary Fiber: 2g
- Sugars: 32g
- Protein: 6g
FAQ
Can I use instant yeast instead of active dry?
Yes! You can skip the proofing step and just mix it right into your dry ingredients. Use the same amount.
My dough isn’t rising. What happened?
Usually it’s one of three things: your yeast was expired, your milk was too hot and killed the yeast, or your kitchen is too cold. Try putting the dough in a warm (not hot) oven with the light on.
Can I make these without a stand mixer?
Absolutely. It just takes a little more arm workout. Mix everything in a bowl until it comes together, then knead by hand on a floured surface for about 8 minutes.
How do I know when my dough has risen enough?
Poke it with your finger. If the indent stays, it’s ready. If it springs back immediately, give it more time.
Can I use margarine instead of butter?
You can, but I wouldn’t recommend it. Butter gives these rolls their rich flavor and tender texture. Margarine just doesn’t compare.
Why are my cinnamon buns dry?
You probably added too much flour or overbaked them. The dough should be soft and slightly sticky before the first rise. And pull them from the oven when they’re just golden, not dark brown.
Can I add raisins?
If you want to, sure. Sprinkle ½ cup of raisins over the filling before rolling. Just know that some people have strong feelings about raisins in cinnamon buns.
Do I have to use cream cheese frosting?
Not at all. You can make a simple powdered sugar glaze with just powdered sugar and milk. Or drizzle them with maple syrup. Or eat them plain if you’re feeling rebellious.
Wrapping Up
These homemade cinnamon buns are one of those recipes that seem intimidating until you actually make them. Then you realize they’re just a series of simple steps that result in something absolutely delicious.
The first time I made these, I was convinced I’d mess them up. But they came out of the oven golden and perfect, and the whole house smelled like a bakery. I was hooked.
Now they’re a weekend staple in my kitchen. Sometimes I make them for brunch with friends. Sometimes I make them just because it’s Sunday and I want something warm and sweet. Sometimes I make them because I had a rough week and kneading dough is surprisingly therapeutic.
The point is, you don’t need a special occasion to make cinnamon buns. You just need a few hours and the desire to make your kitchen smell amazing.
So go ahead and try them. Your future self (and anyone who gets to eat these) will thank you.
And when you do make them, come back and tell me how it went. Did you add nuts? Try a different frosting? Eat three of them in one sitting? I want to hear about it.