You know that buttery, flaky croissant you pay $6 for at the bakery?
You can make it at home. And I’m not talking about the kind that comes out dense and bread-like. I’m talking about those impossibly layered, golden brown, shatter-when-you-bite-into-them croissants that make you close your eyes for a second.
I’ll be honest with you: making croissants isn’t a quick Tuesday night dinner situation. This is a weekend project. A labor of love. The kind of thing you do when you want to impress yourself (and maybe everyone else in your house).
But here’s what most recipes won’t tell you: it’s not actually hard. It’s just a process. And once you understand that process, you’ll wonder why you ever thought croissants were some mysterious French magic you’d never master.
So let’s get into it.
What You’ll Need
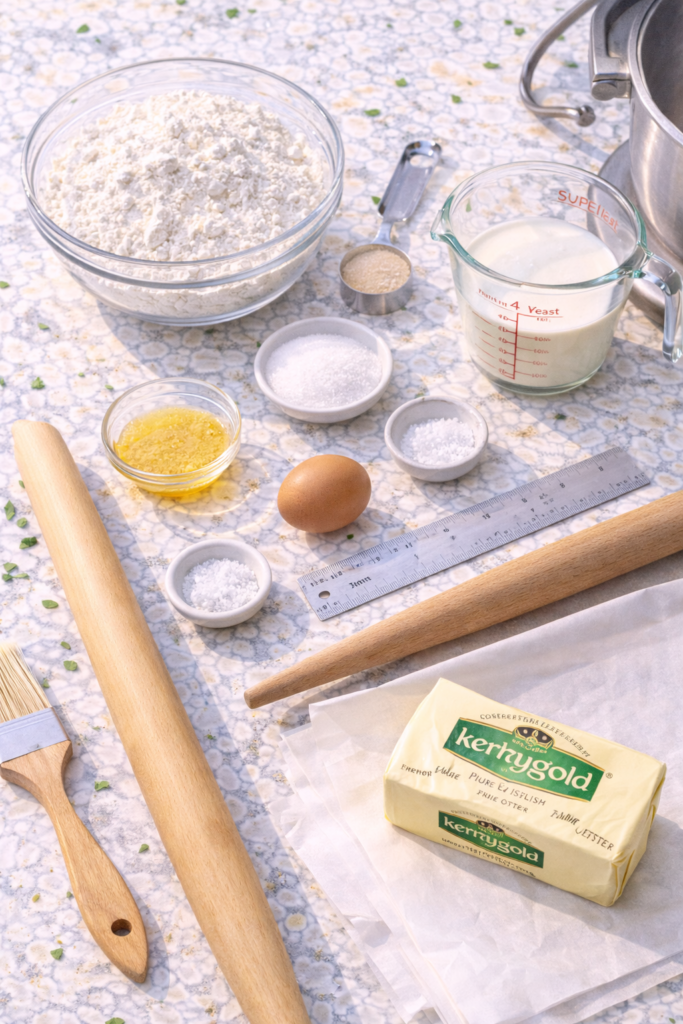
For the Dough:
- 4 cups (500g) all-purpose flour, plus more for dusting
- 1/4 cup (50g) granulated sugar
- 1 tablespoon instant yeast
- 1 1/4 cups (300ml) whole milk, cold
- 1 1/2 teaspoons salt
- 2 tablespoons (30g) unsalted butter, melted and cooled
For the Butter Block:
- 1 1/4 cups (280g) unsalted butter, cold (European-style butter works best here)
For the Egg Wash:
- 1 large egg
- 1 tablespoon milk or water
Tools You’ll Need
You don’t need a fancy kitchen for this, but a few specific tools will make your life so much easier:
- Rolling pin (a French-style rolling pin without handles gives you better control)
- Large baking sheet (or two)
- Parchment paper
- Plastic wrap
- Ruler or measuring tape (trust me on this one)
- Sharp knife or pizza cutter
- Pastry brush
- Stand mixer with dough hook (you can do this by hand, but your arms will hate you)
Pro Tips
1. Temperature is everything
Your butter needs to be cold but pliable. Not rock-hard, not melty. If it’s too hard, it’ll crack through your dough. Too soft, and it’ll just seep out. You’re looking for the texture of a cold stick of butter that’s been sitting out for about 10 minutes.
2. Don’t skip the rest times
I know it’s tempting to rush through the resting periods, especially when you’re on a roll. But those rest times are when the gluten relaxes and the butter firms back up. Skip them and you’ll end up with tough, greasy croissants that fight you every step of the way.
3. Work in a cool kitchen
If it’s 85°F in your kitchen, this is going to be a nightmare. The butter will start melting before you even get it into the dough. I like to do this on cooler mornings, and sometimes I’ll even chill my work surface in the freezer for a few minutes between folds.
4. Your first batch won’t be perfect
And that’s completely fine. You’re learning a new skill. Your second batch will be better. Your third batch will be the ones you post on Instagram. Just enjoy the process and remember that even “failed” croissants still taste pretty amazing with some good jam.
5. Use European-style butter if you can
It has a higher fat content and less water, which means flakier layers. Brands like Kerrygold, Plugrá, or any butter labeled “European-style” will give you noticeably better results.

Substitutions and Variations
Milk: You can use 2% milk if that’s what you have, but whole milk gives you a richer dough. Some bakers even use half milk, half cream for extra decadence.
Flour: Bread flour will give you a slightly chewier texture, which some people prefer. All-purpose is more traditional for croissants, though.
Butter: Please don’t use margarine or any kind of butter substitute. This is one of those times where the real thing matters. If you can’t have dairy, honestly, croissants might not be your recipe.
Sweet variations: Once you’ve mastered the classic, try brushing them with a simple syrup after baking, or filling them with chocolate, almond paste, or ham and cheese before rolling.
Whole wheat: You can replace up to 1/4 of the all-purpose flour with whole wheat for a nuttier flavor, but don’t go beyond that or they’ll be too dense.
Make Ahead Tips
This is actually one of those recipes that wants to be made ahead.
After shaping your croissants, you can cover them and refrigerate overnight for the final rise. They’ll take longer to proof when they’re cold (3-4 hours at room temperature), but the flavor development is worth it.
You can also freeze shaped, unproofed croissants for up to a month. Just place them on a baking sheet until frozen solid, then transfer to a freezer bag. When you’re ready to bake, let them thaw and proof overnight in the fridge, then bring to room temperature and finish proofing before baking.
How to Make Croissants (Step by Step)
Step 1: Make the Dough
In your stand mixer bowl, combine flour, sugar, and yeast. Add the cold milk and mix on low speed with the dough hook until it comes together into a shaggy dough (about 2 minutes).
Add the salt and melted butter. Mix on medium speed for about 5-6 minutes until the dough is smooth and elastic. It should clear the sides of the bowl but still be slightly sticky.
Shape it into a rectangle about 1 inch thick, wrap tightly in plastic wrap, and refrigerate for at least 2 hours or overnight.
Step 2: Prepare the Butter Block
This is where it gets real. Take your cold butter and place it between two sheets of parchment paper. Using your rolling pin, pound it into a 7×10 inch rectangle. I know this sounds aggressive, but you need to make the butter pliable without warming it up.
Once you’ve got your rectangle, refrigerate it for about 10 minutes while you roll out your dough.
Step 3: Lock in the Butter (Enclosing)
Roll your chilled dough into a 10×16 inch rectangle on a lightly floured surface. Place your butter block in the center of the dough.
Fold the dough over the butter like you’re closing a book, with the two ends meeting in the middle. Pinch all the seams to seal the butter inside completely. You’ve just “locked in” your butter.
Step 4: First Turn (Letter Fold)
Roll the dough out into a long rectangle, about 8×24 inches. Keep your work surface lightly floured, but brush off any excess flour as you go.
Fold the dough like a business letter: bottom third up, top third down. You’ve just completed your first turn.
Wrap in plastic and refrigerate for 30 minutes.
Step 5: Second and Third Turns
Repeat the rolling and folding process two more times, refrigerating for 30 minutes between each turn. By the third turn, you should see distinct layers starting to form in the dough.
After the third turn, refrigerate for at least 2 hours or overnight.
Step 6: Roll and Cut
On a lightly floured surface, roll your dough into a large rectangle about 10×30 inches and 1/4 inch thick.
Using a ruler and sharp knife, cut the dough into triangles. I like to make them about 4 inches wide at the base and 8 inches tall. You should get 12-14 croissants.
Make a small 1-inch cut at the center of the wide end of each triangle. This helps them roll more evenly.
Step 7: Shape the Croissants
Starting at the wide end, gently stretch the two corners outward slightly. Then roll the dough toward the point, keeping it relatively tight but not so tight that you squeeze out all the butter.
Place each croissant on a parchment-lined baking sheet with the point tucked underneath. Curve the ends inward slightly to create that classic crescent shape.
Step 8: Proof
Cover the croissants loosely with plastic wrap and let them proof at room temperature for 2-3 hours. They should nearly double in size and look puffy and jiggly when you shake the pan gently.
This is where patience really pays off. Underproofed croissants will be dense. Overproofed ones will deflate in the oven.
Step 9: Egg Wash and Bake
Preheat your oven to 400°F (200°C).
Whisk together the egg and milk until smooth. Gently brush the egg wash over each croissant, being careful not to let it pool in the layers (this can glue them together).
Bake for 18-22 minutes, rotating the pan halfway through, until deep golden brown. You want them darker than you think. That’s where the flavor is.
Step 10: Cool and Devour
Let them cool on the baking sheet for 5 minutes, then transfer to a wire rack.
The hardest part? Waiting another 10 minutes before eating them. But trust me, they’re worth the wait.
Leftovers and Storage
Croissants are absolutely best the day they’re made. Like, there’s no comparison.
But if you have leftovers (lucky you), store them in an airtight container at room temperature for up to 2 days. Reheat in a 350°F oven for 5-7 minutes to crisp them back up.
You can freeze baked croissants for up to a month. Thaw at room temperature, then reheat in the oven. They won’t be quite as good as fresh, but they’ll still be pretty great.
Fun fact: day-old croissants make incredible bread pudding or almond croissants. Just split them, fill with almond cream, and bake. You’re welcome.
Nutritional Information
Per croissant (based on 12 croissants):
- Calories: 310
- Total Fat: 18g
- Saturated Fat: 11g
- Cholesterol: 65mg
- Sodium: 240mg
- Total Carbohydrates: 32g
- Protein: 5g
Yes, they’re butter bombs. That’s literally the point. If you’re making croissants, embrace it.
Pairing Suggestions
Morning: Serve with good coffee (a cappuccino is my go-to) and a bowl of fresh berries
Brunch: Slice them in half and make croissant breakfast sandwiches with scrambled eggs, bacon, and gruyere
Afternoon: Pair with a cup of tea and some good jam (apricot or raspberry preserves are my favorites)
Dinner: Use them to soak up the sauce from French onion soup or serve alongside a simple salad
FAQ
Can I make croissants without a stand mixer?
You can, but it’s going to be a workout. Mix the dough by hand in a large bowl, then knead it on a floured surface for about 10 minutes until smooth. Your arms will get tired, but it’s doable.
Why did my butter leak out during baking?
This usually happens for one of two reasons: either your butter was too soft when you were laminating, or you didn’t seal the edges well enough when you locked it in. Make sure you’re working in a cool kitchen and that you pinch those seams shut.
How do I know when they’re proofed enough?
They should be visibly puffy and jiggly when you gently shake the pan. If you press lightly with your finger, the dough should spring back slowly. If it springs back immediately, they need more time. If it doesn’t spring back at all, you’ve gone too far.
Can I use instant yeast or do I need active dry?
Instant yeast is actually what I prefer for this recipe because you can mix it right into the dry ingredients. If you’re using active dry yeast, dissolve it in the warm milk first and let it sit for 5 minutes before adding to the flour.
Why are my croissants dense instead of flaky?
This usually comes down to one of three things: the butter wasn’t cold enough during lamination (it got absorbed into the dough instead of staying in separate layers), you didn’t do enough turns, or they weren’t proofed long enough before baking.
Can I add fillings?
Once you get comfortable with the basic recipe, absolutely. Add a piece of dark chocolate before rolling for pain au chocolat, or brush with almond cream for almond croissants. Just don’t overfill them or they’ll be hard to roll.
How long does the whole process take?
From start to finish, you’re looking at about 8-10 hours, but most of that is inactive time (resting, chilling, proofing). The actual hands-on work is maybe 1-2 hours spread across a day or two.
Wrapping Up
Here’s the thing about croissants: they’re not going to turn out perfect on your first try.
You might get butter leaking everywhere. Your layers might not be as distinct as you hoped. They might be a little too pale or a little too dark.
But you know what? You still made croissants from scratch. That’s something most people will never do.
And the second time you make them? They’ll be better. The third time? Even better still. Before you know it, you’ll be the person everyone asks to bring pastries to brunch.
So go ahead. Set aside a weekend. Put on some good music. Make a mess of your kitchen. And make some damn croissants.
Then come back and tell me how it went. Did they turn out flaky? Did your butter cooperate? Did you burn the first batch and nail the second one? I want to hear all about it in the comments below.