Ever opened a jar of sauerkraut and thought it smelled like your gym bag? 🤢
You’re not alone.
But here’s what nobody tells you: when you make sauerkraut at home with fresh veggies, it’s a completely different experience. The flavors are bright, the crunch is satisfying, and you’ll actually want to eat it.
I’m not talking about that sad, soggy stuff from a can. I’m talking about vibrant, probiotic-rich sauerkraut that’s bursting with color and flavor. The kind that makes your gut happy and your taste buds happier.
And the crazy part? It’s stupid easy to make.
You literally just massage some salt into cabbage and wait. That’s it. No fancy equipment, no culinary degree, no sacrifice to the fermentation gods required.
So if you’ve been curious about making your own sauerkraut (or if you’re just tired of buying overpriced jars at Whole Foods), this is your sign to try it. Your gut will thank you, your wallet will thank you, and you might just become that person who won’t shut up about fermented vegetables.
Let’s get into it.
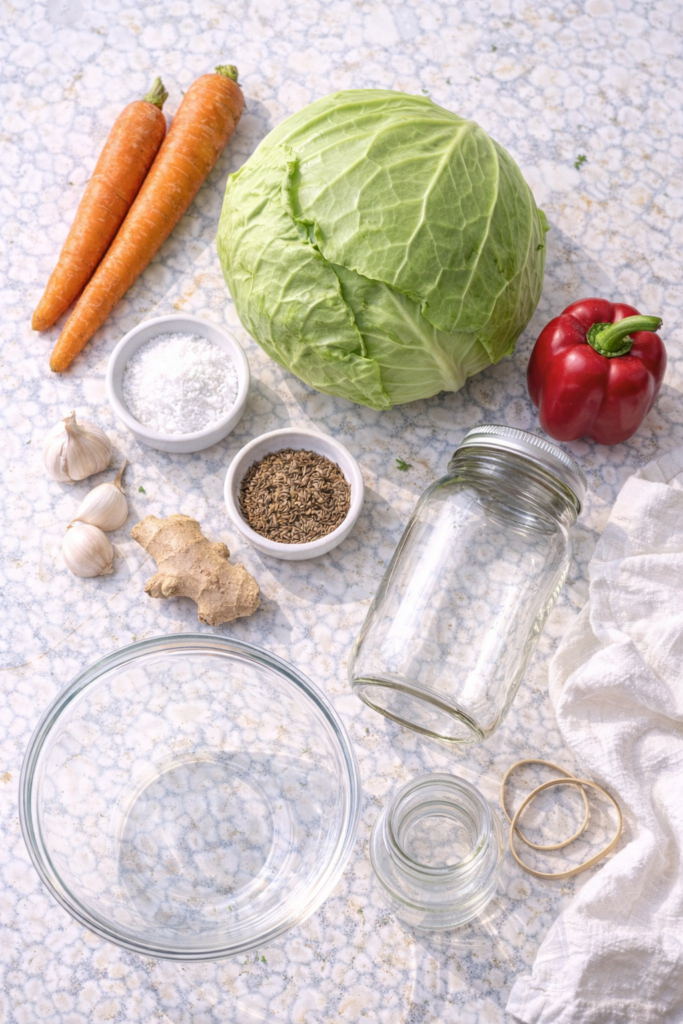
What You’ll Need`
For the Base:
- 1 medium head of green cabbage (about 2 pounds)
- 1 tablespoon fine sea salt (or 2 tablespoons kosher salt)
For the Veggie Mix-Ins:
- 2 medium carrots, grated
- 1 red bell pepper, thinly sliced
- 3 cloves garlic, minced
- 1 tablespoon fresh ginger, grated
- 1 teaspoon caraway seeds (optional, but traditional)
Equipment:
- 1 large mixing bowl
- 1 clean glass jar (32 oz or larger)
- 1 smaller jar or fermentation weight
- Clean kitchen towel or coffee filter
- Rubber band
Pro Tips
Before you dive in, here are some things I wish someone had told me before my first fermentation attempt:
Use the freshest cabbage you can find. Older cabbage has less natural water content, which means less brine. You want that cabbage nice and crisp so it releases plenty of liquid when you massage it. The farmer’s market is your friend here.
Don’t skimp on the massaging time. I know your hands might get tired, but this is where the magic happens. You need to really work that salt into the cabbage until it gets super wilted and releases a ton of liquid. This usually takes about 10 minutes of solid massaging. Put on a podcast and get to work.
Keep everything submerged. Any vegetable that floats above the brine is going to grow mold. Use a smaller jar filled with water as a weight, or buy actual fermentation weights if you’re planning to make this regularly. Trust me on this one.
Temperature matters more than you think. Your sauerkraut will ferment faster in a warm kitchen (75°F+) and slower in a cool one (65°F). Neither is wrong, but it’ll affect your timeline. In summer, I check mine after 3 days. In winter, I wait a full week before even tasting.
Burp your jar daily. As the vegetables ferment, they release carbon dioxide. If you don’t release this pressure daily, your jar could explode. Just unscrew the lid once a day to let the gas escape, then seal it back up. Takes 5 seconds and saves you from cleaning sauerkraut off your ceiling.
Tools You’ll Need
You probably already have everything:
- Large mixing bowl (big enough to really get your hands in there)
- Mason jar or any clean glass jar with a lid
- Smaller jar for weighing down the veggies
- Clean kitchen towel or coffee filter
- Rubber band to secure the cloth
That’s it. No special fermenting crocks, no airlocks, no weird gadgets. Just basic kitchen stuff.
Substitutions and Variations
Different Cabbages:
- Red cabbage instead of green (gives you a gorgeous purple color)
- Napa cabbage for a softer, milder flavor
- Mix half green, half red for visual interest
Veggie Swaps:
- Skip the carrots and add thinly sliced beets (they’ll turn everything pink)
- Use daikon radish instead of regular carrots
- Add thinly sliced jalapeños if you like heat
- Throw in some sliced radishes for extra crunch
Flavor Variations:
- Add 1 teaspoon of turmeric for golden kraut
- Use fennel seeds instead of caraway
- Add a tablespoon of fresh dill
- Mix in some sliced apples for a sweet-savory combo
Salt Options: You can use sea salt, kosher salt, or Himalayan pink salt. Just avoid iodized table salt because the iodine can interfere with fermentation. Also, if you’re using kosher salt, you’ll need about twice as much by volume since the crystals are bigger.
Make Ahead Tips
The beautiful thing about sauerkraut is that it’s basically designed to be made ahead.
Once it’s fermented to your liking, just stick it in the fridge. It’ll keep for months (seriously, like 4-6 months). The cold dramatically slows down fermentation, so it won’t get more sour sitting in there.
I like to make a big batch once a month and just keep it in the fridge. That way I always have it ready to throw on sandwiches, tacos, or just eat straight from the jar at 2am when I’m feeling snacky.
You can also prep all your veggies in advance. Shred the cabbage and carrots, slice everything else, and store them in separate containers in the fridge for up to 2 days before you’re ready to mix and ferment.

How to Make It
Step 1: Prep Your Vegetables
Remove the outer leaves from your cabbage (save one clean outer leaf for later). Cut the cabbage into quarters and remove the core. Slice it super thin, like coleslaw thin. The thinner you slice it, the better it will ferment and the nicer the texture will be.
Grate your carrots, slice your bell pepper thin, mince your garlic, and grate your ginger. Put everything in your large mixing bowl.
Step 2: Add Salt and Massage
Sprinkle the salt over all the vegetables. Now comes the fun part.
Get your hands in there and start massaging. Squeeze, press, and knead the vegetables like you’re giving them a deep tissue massage. You’ll start to see liquid pooling at the bottom of the bowl after a few minutes.
Keep going. Your arms might get tired. Do it anyway.
After about 10 minutes, you should have vegetables that look wilted and sad, swimming in their own brine. This is exactly what you want.
Step 3: Pack It Tight
Start transferring the vegetables to your clean glass jar, packing them down really firmly with your fist or a wooden spoon as you go. You want to eliminate air pockets.
Pour all that brine from the bowl over the vegetables. The liquid should completely cover the vegetables by at least an inch. If it doesn’t, you can make a quick brine by dissolving 1 teaspoon of salt in 1 cup of water and pour enough over to cover everything.
Step 4: Keep Everything Submerged
This is critical. Take that clean outer cabbage leaf you saved and fold it to fit on top of your shredded vegetables. Then place your smaller jar (filled with water) on top to weigh everything down. Or use fermentation weights if you have them.
The goal is to make sure no vegetables are floating above the liquid line.
Step 5: Cover and Wait
Cover the mouth of your jar with a clean kitchen towel or coffee filter and secure it with a rubber band. This lets gases escape while keeping dust and bugs out.
Set your jar on a plate (it might bubble over a bit) and put it somewhere out of direct sunlight where you’ll remember to check it daily.
Step 6: Burp and Monitor
Every day, press down on your weight to make sure everything stays submerged. If you see any scum or white film on the surface, just skim it off. That’s totally normal.
Unscrew or lift your weight once a day to let gases escape (burping).
Start tasting after 3 days. When it’s as sour as you like it, seal it up and move it to the fridge.
Detailed Nutritional Breakdown
One half-cup serving of homemade sauerkraut gives you:
| Nutrient | Amount |
|---|---|
| Calories | 27 |
| Protein | 1.3g |
| Carbs | 6g |
| Fiber | 4g |
| Vitamin C | 35% DV |
| Vitamin K | 23% DV |
| Iron | 9% DV |
| Probiotics | Billions of CFUs |
The probiotic content is where this stuff really shines. Each serving contains billions of beneficial bacteria that support gut health, digestion, and even immune function. Store-bought, pasteurized sauerkraut doesn’t have these because the heat kills the good bacteria.
Pairing Suggestions
Sauerkraut isn’t just for hot dogs (though it’s great on those too). Here’s where I love using it:
Breakfast: Top your scrambled eggs or avocado toast with a forkful of kraut. The tangy bite wakes up your taste buds.
Lunch: Add it to grain bowls, sandwiches, or wraps. It pairs especially well with hummus and roasted vegetables.
Dinner: Serve it alongside grilled sausages, roasted chicken, or pork chops. The acidity cuts through rich, fatty meats beautifully.
Snacks: Just eat it straight from the jar. No judgment. I do this all the time.
It also goes surprisingly well with cheese. Try it with sharp cheddar on crackers.
Leftovers and Storage
Your sauerkraut will last for months in the fridge. Seriously. I’ve had jars that were good for 6+ months.
Just make sure you’re using clean utensils every time you scoop some out. Introducing bacteria from a dirty spoon can cause issues.
If you see mold growing on the surface, scoop it off along with a generous amount of the kraut below it. The rest should still be fine. But if it smells off or looks weird throughout, just toss it and start over.
The flavor will continue to develop slowly even in the fridge, getting slightly more sour over time. Some people love super aged kraut, others prefer it fresher. It’s all personal preference.
Pro tip: save the brine. You can drink it (I know, sounds weird, but it’s great for your gut), use it as a salad dressing, or use it as a starter for your next batch of sauerkraut to speed up fermentation.
FAQ
How long does it take to ferment?
Anywhere from 3 days to 3 weeks, depending on temperature and your taste preference. Start tasting after day 3. When it’s as tangy as you like it, move it to the fridge.
What if there’s not enough brine?
Make a quick brine by dissolving 1 teaspoon salt in 1 cup water and pour enough to cover the vegetables completely.
Is that white stuff on top mold?
Probably not. It’s likely kahm yeast, which looks like a white film on the surface. It’s harmless but can make your kraut taste a bit off. Just skim it off.
Can I use iodized salt?
Nope. The iodine can prevent fermentation. Stick with sea salt, kosher salt, or any non-iodized salt.
Why is my sauerkraut slimy?
This can happen if your temperature is too warm or if you didn’t use enough salt. It’s still safe to eat if it smells okay, but the texture won’t be great. Use it in cooked dishes.
Do I need to sterilize my jar?
Just wash it really well with hot soapy water. You don’t need to sterilize it like you would for canning. The salt and fermentation process create an environment where bad bacteria can’t survive.
Can I ferment other vegetables this way?
Absolutely! Carrots, radishes, beets, green beans, and cucumbers all ferment beautifully using this same method.
How do I know if it’s gone bad?
Trust your nose. If it smells rotten, putrid, or just wrong (not the normal sauerkraut tang), toss it. If there’s black or pink mold, toss it. If it smells like sauerkraut and looks normal, you’re good.
Wrapping Up
Making your own sauerkraut is one of those things that sounds complicated but is actually ridiculously simple.
You’re literally just letting cabbage sit in its own juices for a few days. That’s it. No cooking, no canning, no stress.
And the payoff is huge. You get probiotics, crunch, flavor, and bragging rights all in one jar.
Plus, once you nail the basic recipe, you can start getting creative with different vegetables and flavor combinations. Red cabbage with apple and ginger. Green cabbage with jalapeño and lime. Beets with caraway. The possibilities are endless.
So grab a head of cabbage and give it a try. Start checking it after a few days, and when it tastes good to you, stick it in the fridge.
Then come back and drop a comment about how yours turned out. Did you add any fun mix-ins? How long did you ferment it? Did your family think you were crazy when they saw a jar of vegetables bubbling on the counter?
I want to hear all about it. 💬