You know what’s underrated? Savory breakfast muffins.
I’m talking about fluffy, cheesy, vegetable-loaded muffins that you can grab on your way out the door. No scrambling eggs at 6 AM. No skipping breakfast because you hit snooze three times.
Just real food that tastes like you actually tried.
I started making these when I got tired of the same boring breakfast options. Sweet muffins are great and all, but sometimes you want something that feels more like an actual meal. Something with protein, vegetables, and enough flavor to wake up your taste buds.
These muffins check every box. They’re packed with sharp cheddar, diced ham, bell peppers, and green onions. The texture is soft and tender (thanks to sour cream), and they taste incredible whether you eat them fresh from the oven or reheated three days later.
The best part? You can make a batch on Sunday and have breakfast sorted for the entire week. No daily cooking, no morning stress, just grab-and-go goodness.
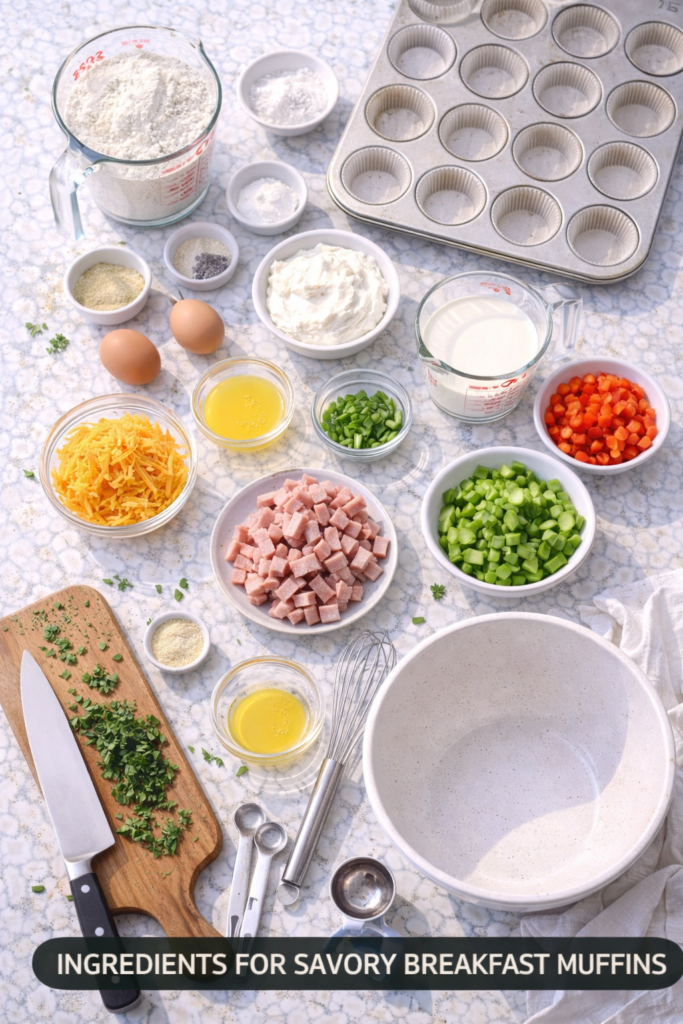
What You’ll Need
For the Muffins:
- 2 cups all-purpose flour
- 1 tablespoon baking powder
- 1 teaspoon salt
- ½ teaspoon black pepper
- ¼ teaspoon garlic powder
- 2 large eggs
- 1 cup whole milk
- ½ cup sour cream
- ¼ cup melted butter (cooled slightly)
- 1½ cups sharp cheddar cheese, shredded (divided)
- 1 cup diced ham (about 6 oz)
- ½ cup diced red bell pepper
- ½ cup diced green bell pepper
- ¼ cup sliced green onions
- 2 tablespoons fresh parsley, chopped (optional)
Tools You’ll Need:
- Standard 12-cup muffin tin
- Muffin liners or non-stick cooking spray
- Large mixing bowl
- Medium mixing bowl
- Whisk
- Rubber spatula
- Measuring cups and spoons
- Knife and cutting board
- Cooling rack
Pro Tips
Don’t Overmix the Batter This is the number one mistake people make with muffins. When you combine the wet and dry ingredients, mix just until everything is incorporated. You’ll still see some small lumps, and that’s perfectly fine. Overmixing develops the gluten in the flour, which leads to tough, dense muffins instead of light and fluffy ones.
Pat Your Add-Ins Dry Before adding your ham, peppers, and other ingredients to the batter, make sure they’re dry. Excess moisture can make your muffins soggy or prevent them from rising properly. I usually pat everything down with paper towels after dicing.
Fill Your Muffin Cups Generously Unlike sweet muffins that rise into big domes, savory muffins don’t rise as dramatically. Fill each cup about ¾ full to get a nice, hearty muffin. If you’re shy with the batter, you’ll end up with sad little muffins that look more like hockey pucks.
Use Room Temperature Ingredients Take your eggs, milk, and sour cream out of the fridge about 30 minutes before you start baking. Room temperature ingredients mix together more easily and create a smoother batter. Cold ingredients can also prevent your muffins from rising properly.
Save Some Cheese for Topping Reserve about ½ cup of the shredded cheese to sprinkle on top of the muffins before baking. This creates a gorgeous golden, crispy cheese crust that adds both flavor and visual appeal.
How to Make Savory Breakfast Muffins

Step 1: Prep Your Ingredients
Preheat your oven to 375°F (190°C). Line your muffin tin with paper liners or spray generously with non-stick cooking spray.
Dice your ham into small, bite-sized pieces (about ¼ inch). Do the same with your bell peppers. Slice your green onions thinly. Chop your parsley if using. Pat everything dry with paper towels.
Shred your cheese if you haven’t already. Set aside ½ cup for topping the muffins later.
Step 2: Mix Your Dry Ingredients
In a large bowl, whisk together the flour, baking powder, salt, black pepper, and garlic powder. Make sure everything is well combined. This is important because it distributes the leavening agents evenly throughout your batter.
Step 3: Combine Your Wet Ingredients
In a medium bowl, whisk together the eggs until they’re slightly beaten. Add the milk, sour cream, and melted butter. Whisk until everything is smooth and well combined.
The sour cream might seem like an unusual addition, but it’s the secret weapon here. It adds moisture and a subtle tang that balances out the richness of the cheese and ham.
Step 4: Bring It All Together
Pour your wet ingredients into the bowl with the dry ingredients. Using a rubber spatula, gently fold everything together. Stop as soon as you don’t see any more dry flour. Remember, lumps are your friend here.
Step 5: Add Your Mix-Ins
Fold in 1 cup of the shredded cheddar cheese, the diced ham, bell peppers, green onions, and parsley (if using). Again, be gentle. You want these ingredients evenly distributed, but you don’t want to overmix.
Step 6: Fill and Top
Divide the batter evenly among your 12 muffin cups. Each should be about ¾ full. Sprinkle the reserved ½ cup of cheese over the tops of the muffins.
Step 7: Bake
Bake for 20-25 minutes, or until the tops are golden brown and a toothpick inserted into the center comes out clean. The cheese on top should be bubbly and lightly browned.
Step 8: Cool and Enjoy
Let the muffins cool in the pan for about 5 minutes, then transfer them to a cooling rack. You can eat them warm, or let them cool completely before storing.
Substitutions and Variations
Make It Vegetarian Skip the ham and double up on the vegetables. Sautéed mushrooms, zucchini, or spinach work really well. You could also add sun-dried tomatoes for an extra flavor punch.
Different Cheese Options Sharp cheddar is my go-to, but you can experiment with other cheeses. Gruyere adds a nutty flavor, pepper jack brings heat, feta gives a Mediterranean vibe, and smoked gouda adds depth. You can also use a combination of cheeses.
Swap the Meat Don’t have ham? Use cooked bacon (crumbled), cooked sausage (crumbled), diced turkey, or even shredded rotisserie chicken. Just make sure whatever meat you use is already cooked.
Change Up the Veggies Bell peppers are just the starting point. Try diced tomatoes (squeeze out the seeds and juice first), corn kernels, jalapeños for heat, caramelized onions, or roasted red peppers.
Make Them Gluten-Free Substitute the all-purpose flour with a 1:1 gluten-free baking flour. Make sure your baking powder is also gluten-free. The texture might be slightly different, but they’ll still taste great.
Dairy-Free Version Use plant-based milk, dairy-free sour cream or plain yogurt, and vegan butter. Skip the cheese or use a dairy-free alternative (though I’ll be honest, the results won’t be quite as good without real cheese).
Add Fresh Herbs Beyond parsley, try adding chopped fresh basil, thyme, chives, or dill. Fresh herbs add a brightness that dried herbs can’t quite match.
Make Them Spicy Add a pinch of cayenne pepper to the batter, include diced jalapeños in the mix-ins, or top with a drizzle of hot sauce before serving.
Make Ahead Tips
These muffins are basically made for meal prep.
Bake them on Sunday, let them cool completely, and store them in an airtight container in the fridge. They’ll stay fresh for up to 5 days.
When you want one, just pop it in the microwave for 20-30 seconds or heat it in the oven at 350°F for about 10 minutes.
You can also freeze these for up to 3 months. Let them cool completely, then wrap each muffin individually in plastic wrap and place them all in a freezer-safe bag. To reheat from frozen, microwave for 60-90 seconds or bake at 350°F for 15-20 minutes.
If you want to prep ahead but bake fresh, you can mix the dry ingredients and prep your add-ins the night before. Store them separately and combine everything in the morning.
Leftovers and Storage
Room Temperature If you’re planning to eat them within 2 days, you can keep them in an airtight container on the counter. This works best if your kitchen isn’t too warm.
Refrigerator For longer storage, refrigerate them in an airtight container. They’ll keep for up to 5 days. The texture is best when you reheat them rather than eating them cold.
Freezer These freeze beautifully. Wrap individually and freeze for up to 3 months. The individual wrapping means you can grab just one or two at a time without defrosting the whole batch.
Reheating Tips Microwave works great for a quick reheat (20-30 seconds for refrigerated, 60-90 seconds for frozen). For the best texture, reheat in the oven at 350°F until warmed through. This brings back that fresh-baked quality.
Serving Suggestions Eat them plain, or get creative. Slice one in half and spread with cream cheese or butter. Serve alongside fresh fruit or a simple salad. Pair with scrambled eggs for a heartier breakfast. Or pack one in your lunch box with some veggies and hummus.
Nutrition Information (Per Muffin)
- Calories: 210
- Protein: 10g
- Carbohydrates: 18g
- Fat: 11g
- Fiber: 1g
- Sugar: 2g
- Sodium: 450mg
These numbers are approximate and will vary based on the specific ingredients you use.
Meal Pairing Suggestions
These muffins are filling enough to eat on their own, but they also pair well with lots of breakfast and brunch dishes.
Serve them alongside scrambled eggs for a classic breakfast spread. They’re great with a fresh fruit salad to balance out the savory flavors. A simple green salad with vinaigrette makes them work for lunch.
They also go really well with soup. I love eating one with tomato soup or a hearty vegetable soup for a cozy meal.
For brunch, set them out with a quiche, fresh croissants, and a platter of fresh fruit. They add variety without too much extra work.
FAQ
Can I make these in a mini muffin tin? Yes! Mini muffins are perfect for kids or parties. Reduce the baking time to 12-15 minutes and keep an eye on them. This recipe will make about 36 mini muffins.
Why did my muffins turn out dense? The most common reason is overmixing the batter. Mix just until the dry ingredients are incorporated. You should still see small lumps. Also make sure your baking powder is fresh (check the expiration date).
Can I use low-fat ingredients? You can, but the texture and flavor won’t be quite as good. The full-fat sour cream and whole milk contribute to the tender crumb. If you want to lighten them up, start by using 2% milk instead of whole milk.
Do I have to use muffin liners? No, but they make cleanup easier and help the muffins release from the pan. If you don’t use liners, grease your muffin tin really well with butter or cooking spray.
Can I make these as a loaf instead of muffins? Absolutely. Pour the batter into a greased 9×5 inch loaf pan and bake at 350°F for 45-55 minutes, or until a toothpick comes out clean. Let it cool in the pan for 10 minutes before removing.
What if I don’t have sour cream? Greek yogurt works as a 1:1 substitute. Plain yogurt also works, though the texture might be slightly less rich. In a pinch, you can use an extra ½ cup of milk, but the texture won’t be quite as tender.
Are these muffins kid-friendly? Most kids love them, especially if they already like ham and cheese. If your kids are picky about vegetables, you can reduce the amount of peppers or leave them out entirely. You can also let kids help make them, which often makes them more excited to eat them.
How do I know when they’re done? The tops should be golden brown, and a toothpick inserted into the center should come out clean or with just a few crumbs. The muffins should also spring back when you gently press on the top.
Can I double this recipe? Yes, this recipe doubles easily. You’ll need two 12-cup muffin tins, and you might need to bake in batches unless you have a really large oven.
Why are my muffins sticking to the liners? This usually happens when the muffins are too hot. Let them cool for at least 5-10 minutes before trying to peel the liners off. Also, cheaper paper liners tend to stick more than higher-quality ones.
Wrapping Up
Making a batch of these savory breakfast muffins might just be the easiest way to improve your mornings.
They’re simple to make, they taste incredible, and they solve the “I don’t have time for breakfast” problem once and for all. Plus, you can customize them based on whatever you have in your fridge.
The first time I made these, I wasn’t expecting much. But that first bite proved me wrong. They’re genuinely good. Not just “good for meal prep” but actually delicious in their own right.
So grab your ingredients, preheat that oven, and make your future self very happy.
Once you’ve tried them, I’d love to hear how they turned out! Drop a comment below and let me know what add-ins you used or what variations you tried. Did you make them spicy? Load them up with veggies? Swap in different cheese? I want to hear about it. 💬