
Store-bought donuts have been lying to you.
They taste fine. They look the part. But the moment you bite into a homemade donut — still warm, glazed while the dough is soft, with that faint golden crust — you’ll understand why people who make them from scratch never go back.
The surprising part? They’re not complicated. A little patience, a few pantry staples, and you’ve got a batch that’ll disappear before they even cool down.
Let’s get into it.
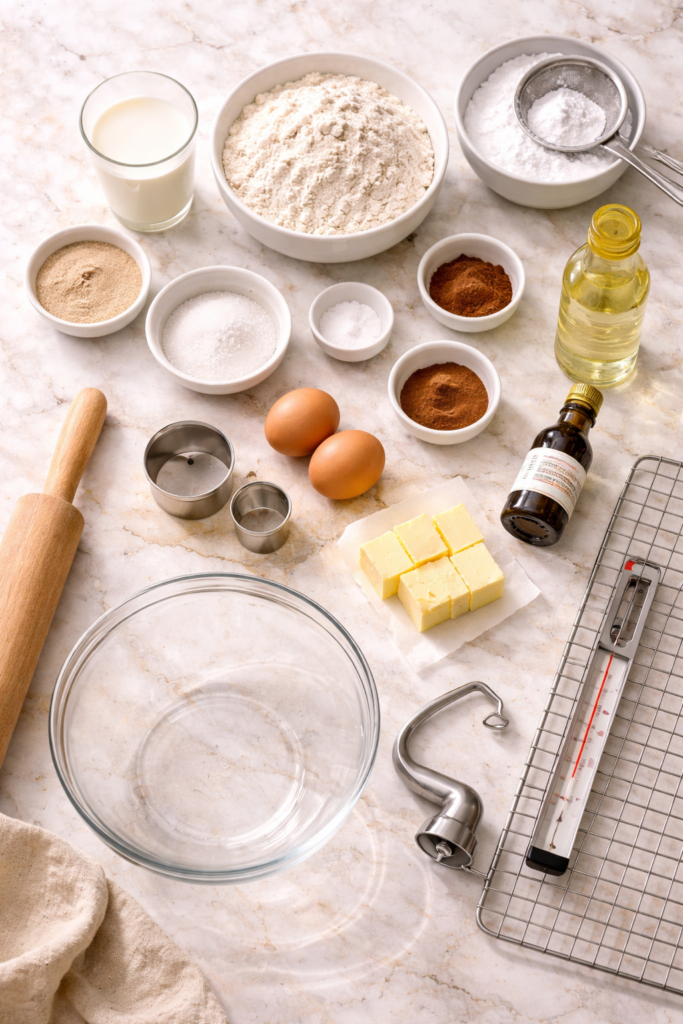
What You’ll Need
For the Dough
- 3 ½ cups all-purpose flour (plus extra for dusting)
- 2 ¼ tsp active dry yeast (one standard packet)
- ¾ cup whole milk (warm, around 110°F / 43°C)
- ¼ cup granulated sugar
- ½ tsp salt
- 2 large eggs (room temperature)
- 4 tbsp unsalted butter (softened)
- 1 tsp pure vanilla extract
For Frying
- 4–6 cups vegetable oil (or canola oil)
For Classic Glaze
- 2 cups powdered sugar
- 3–4 tbsp whole milk
- 1 tsp pure vanilla extract
For Chocolate Glaze (optional)
- 1 cup powdered sugar
- 3 tbsp unsweetened cocoa powder
- 3–4 tbsp whole milk
- ½ tsp pure vanilla extract
For Cinnamon Sugar (optional)
- ½ cup granulated sugar
- 1 ½ tsp ground cinnamon
Tools You’ll Need
- Stand mixer with dough hook (or a large mixing bowl + strong arms)
- Rolling pin
- Donut cutter (or two round cookie cutters: one 3-inch, one 1-inch)
- Large heavy-bottomed pot or Dutch oven
- Candy or deep fry thermometer
- Wire cooling rack
- Slotted spoon or spider strainer
- Baking sheets lined with parchment paper
- Two large shallow bowls (for glazing)
Pro Tips
1. The oil temperature is everything. Keep it at 350–360°F (177–182°C). Too hot = burnt outside, raw inside. Too cool = greasy, dense donuts. The thermometer isn’t optional here — it’s the one thing that separates great donuts from sad ones.
2. Don’t skip the second rise. Once you’ve cut your donuts, they need to puff up again before they hit the oil. This is what gives them that light, pillowy texture. Rush it and you’ll get chewy little hockey pucks instead.
3. Glaze them while they’re warm — not hot. Wait about 3–5 minutes after frying. Hot donuts make the glaze slide off. Completely cool donuts won’t absorb it properly. That short window is where the magic happens.
4. Fresh yeast matters. If your yeast is old or the milk is too hot, your dough won’t rise and you’ll spend two hours waiting for something that never puffs. Always test your yeast first: mix it with warm milk and a pinch of sugar. If it’s not foamy in 10 minutes, grab a new packet.
5. Flour your surface generously but not excessively. Too little flour = dough sticking everywhere. Too much = dense donuts. A light, even dusting is what you’re going for.
Substitutions and Variations
| Swap | Use Instead |
|---|---|
| Whole milk | Oat milk or almond milk (slightly less rich) |
| Unsalted butter | Vegan butter (works well) |
| All-purpose flour | Bread flour for a chewier bite |
| Vegetable oil | Canola or sunflower oil |
| Eggs (dairy-free) | 1 tbsp ground flaxseed + 3 tbsp water per egg |
Topping ideas to mix things up:
- Maple glaze + candied bacon crumbles
- Strawberry glaze (replace milk with strawberry puree)
- Nutella filling (fill with a piping bag after frying)
- Lemon glaze with a pinch of lemon zest
- Sprinkles (classic, no notes)
Make-Ahead Tips
You can make the dough the night before.
After the first rise, punch it down, wrap tightly in plastic wrap, and refrigerate overnight. The next morning, pull it out, let it come to room temperature for about 30 minutes, then roll, cut, and do the second rise as normal.
The dough stays good in the fridge for up to 24 hours. This actually develops more flavor, so it’s worth doing if you have the time.
How to Make Homemade Donuts
Step 1: Activate the Yeast
Warm your milk to around 110°F (43°C) — it should feel warm but not hot on your wrist.
Add the yeast and a pinch of sugar to the milk. Stir gently and let it sit for 10 minutes until it gets foamy. Foamy = alive and ready. If nothing happens, your yeast is dead and it’s better to find out now.
Step 2: Make the Dough
In the bowl of your stand mixer, combine flour, sugar, and salt. Make a well in the center.
Add the yeast mixture, eggs, softened butter, and vanilla. Mix on low with the dough hook for 2 minutes, then increase to medium and knead for 8–10 minutes until the dough is smooth, elastic, and slightly tacky — not sticky.
If kneading by hand, this takes about 12–15 minutes. You want the dough to pull away cleanly from the bowl and spring back when you poke it.
Step 3: First Rise
Form the dough into a ball and place it in a lightly oiled bowl. Cover with a clean kitchen towel or plastic wrap.
Let it rise in a warm spot for 1 to 1.5 hours until it doubles in size.
A good trick: turn your oven on for 2 minutes, turn it off, and put the bowl inside. The residual warmth speeds things up.
Step 4: Cut the Donuts
Lightly flour your surface and roll the dough out to about ½-inch thickness.
Cut out donuts using your donut cutter. Press straight down — don’t twist the cutter or you’ll seal the edges and they won’t rise properly.
Re-roll the scraps and cut more. You’ll get around 12–14 donuts plus the holes (which are their own little snack).
Step 5: Second Rise
Place the cut donuts on parchment-lined baking sheets with space between them. Cover loosely and let them rise for another 45 minutes to 1 hour until noticeably puffed.
This step is non-negotiable. Don’t skip it.
Step 6: Fry
Heat your oil in a deep, heavy-bottomed pot to 350–360°F (177–182°C).
Carefully slide 2–3 donuts at a time into the oil. Fry for 1 minute per side until golden brown.
They cook fast. Keep your eyes on them.
Remove with a slotted spoon and transfer to a wire rack. Let the oil come back up to temperature between batches.
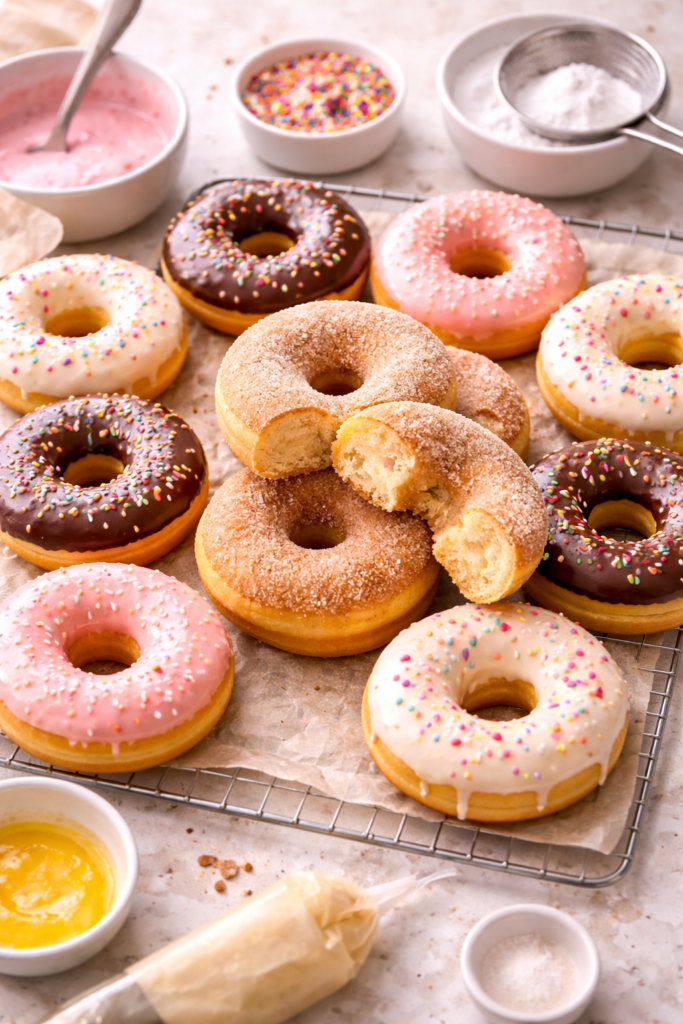
Step 7: Glaze
Classic glaze: Whisk together powdered sugar, milk, and vanilla until smooth. Adjust consistency — thicker for a coating, thinner for a drizzle.
Chocolate glaze: Sift powdered sugar and cocoa together, then whisk in milk and vanilla.
Cinnamon sugar: Mix sugar and cinnamon in a shallow bowl.
Dip warm donuts into the glaze (about 3–5 minutes after frying). Let excess drip off and set on the wire rack.
For cinnamon sugar, roll immediately after frying while still slightly warm.
Nutritional Breakdown (per glazed donut, approximate)
| Nutrient | Amount |
|---|---|
| Calories | ~310 kcal |
| Carbohydrates | ~48g |
| Protein | ~5g |
| Fat | ~11g |
| Saturated Fat | ~3g |
| Sugar | ~22g |
| Sodium | ~120mg |
Based on 12 donuts with classic glaze. Chocolate glaze adds approximately 15–20 calories per donut.
Meal Pairing Suggestions
These donuts are perfectly happy on their own, but if you’re putting together a proper brunch spread:
- Hot black coffee or an Americano (the bitterness cuts through the sweetness perfectly)
- Fresh fruit platter
- Scrambled eggs on the side if you want something savory to balance it out
- Hot chocolate for the kids (or let’s be honest, for everyone)
Leftovers and Storage
Room temperature: Store in an airtight container for up to 2 days. Glaze holds fine.
Reheating: 10 seconds in the microwave or 5 minutes in a 300°F (150°C) oven. They come back to life almost like fresh.
Freezing: Freeze un-glazed donuts in a single layer first, then transfer to a zip-lock bag. They keep for up to 2 months. Glaze after thawing and reheating.
Don’t refrigerate them — it makes the texture dry and stale faster than leaving them out.
FAQ
Can I bake these instead of frying?
You can. Brush them with melted butter and bake at 375°F (190°C) for 10–12 minutes. They won’t have the same golden exterior or classic texture, but they’ll still be good — more like a soft bread roll than a traditional donut. If you want the real deal, fry them.
My dough didn’t rise. What happened?
Almost always the yeast. Either it was old, the milk was too hot (above 115°F kills it), or the room was too cold. Test your yeast first every time.
How do I know when the oil is ready without a thermometer?
Drop a small piece of dough in. If it sizzles and rises to the surface slowly, you’re good. If it sinks and sits there, oil’s too cool. If it immediately turns dark, it’s too hot. A thermometer is still worth the $10 though.
Can I use instant yeast instead of active dry?
Yes. Use the same amount and skip the activation step — just mix it straight into the dry ingredients. The rise times will be slightly shorter.
Why are my donuts greasy?
Oil temperature dropped too low. This happens when you add too many donuts at once. Fry in small batches and let the oil recover between rounds.
Can I make the glaze ahead of time?
Absolutely. Store covered at room temperature for up to 2 days. Whisk it again before using.
Wrapping Up
There’s a particular kind of satisfaction that comes from pulling a tray of homemade donuts off the wire rack.
You made those. From scratch. And they look exactly like something from a bakery window.
The first time is always a little nerve-wracking — watching the thermometer, waiting on the dough to puff, hoping the glaze sets right. But once you’ve done it, you’ll realize it’s way less intimidating than it looks.
Now it’s your turn.
Make a batch this weekend, try a topping combination no one expects, and then come back and leave a comment below. What did you top them with? Did you do the overnight dough trick? Any questions along the way — drop them in the comments and I’ll answer every single one.


