You know those cookies at Panera that cost way too much but you buy them anyway because they’re loaded with everything good?
Let me save you the $4 per cookie.
These kitchen sink cookies are overflowing with chocolate chips, pretzels, potato chips, and caramel. They’re salty, sweet, crunchy, chewy, and absolutely ridiculous in the best way possible.
I’ve been making these for years and every single time someone asks for the recipe. My sister actually called them “crack cookies” which is mildly offensive but also accurate. They’re that addictive.
The cool thing about kitchen sink cookies is that the name literally means you throw everything but the kitchen sink into them. So if you hate pretzels? Toss in something else. Low on chocolate chips? Add M&Ms. You can customize these however you want.
And honestly, that’s the fun part. You get to play around and make them your own.
What You’ll Need
For the Cookie Dough:
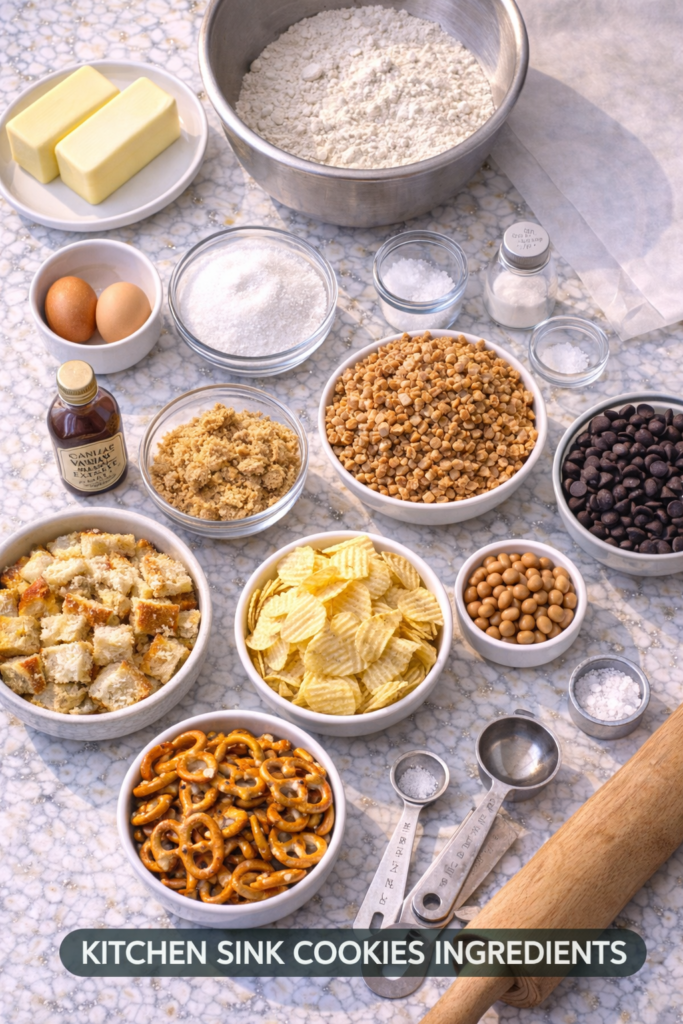
- 1 cup (2 sticks) unsalted butter, softened to room temperature
- 1 cup packed light brown sugar
- ½ cup granulated white sugar
- 2 large eggs, at room temperature
- 2 teaspoons vanilla extract
- 2 ¼ cups all-purpose flour
- 1 teaspoon baking soda
- 1 teaspoon fine sea salt
- ½ teaspoon baking powder
For the Mix-Ins:
- 1 ½ cups semi-sweet chocolate chips
- 1 cup crushed pretzels (break them up but leave some bigger chunks)
- ¾ cup crushed potato chips (I use ridged ones for extra crunch)
- ½ cup caramel bits or chopped soft caramels
- ½ cup toffee bits (optional but really good)
- Flaky sea salt for topping
Tools You’ll Need
- Stand mixer or hand mixer
- Large mixing bowls
- Measuring cups and spoons
- Cookie scoop (3 tablespoon size works great)
- Baking sheets
- Parchment paper or silicone baking mats
- Cooling rack
- Spatula
Pro Tips
Don’t overmix the dough. Once you add your flour, mix just until you can’t see any more white streaks. Overmixing makes cookies tough and nobody wants that.
Chill the dough for at least 30 minutes. I know waiting sucks but this step is huge. It prevents the cookies from spreading too thin and gives you those thick, bakery-style cookies everyone loves. If you’re in a rush, 15 minutes is better than nothing.
Use room temperature ingredients. Cold eggs and butter don’t mix well together and you’ll end up with a lumpy mess. Just set everything out about an hour before you start baking.
Press extra mix-ins on top before baking. This is how bakeries make their cookies look Instagram-worthy. Right before the pan goes in the oven, gently press a few extra chocolate chips, pretzel pieces, and potato chips into the tops of each cookie ball.
Salt matters here. Don’t skip the flaky sea salt sprinkle at the end. It cuts through all that sweetness and makes every flavor pop. Trust me on this one.
How to Make Kitchen Sink Cookies
Step 1: Prep everything
Preheat your oven to 350°F and line two baking sheets with parchment paper.
Take your butter out to soften if you haven’t already. You want it soft enough that your finger leaves an indent when you press it, but not melted or greasy.
Step 2: Cream the butter and sugars
In your stand mixer (or a large bowl if using a hand mixer), beat the softened butter, brown sugar, and granulated sugar together on medium speed for about 3 minutes.
You’re looking for it to get light and fluffy. It should look almost like frosting.
Step 3: Add eggs and vanilla
Beat in the eggs one at a time, making sure each one is fully mixed in before adding the next.
Add the vanilla and mix until everything is combined and smooth.
Step 4: Mix the dry ingredients
In a separate bowl, whisk together the flour, baking soda, salt, and baking powder.
This distributes everything evenly so you don’t end up with pockets of baking soda or salt in your cookies.
Step 5: Combine wet and dry
With your mixer on low speed, slowly add the flour mixture to the wet ingredients.
Mix just until you can’t see any white streaks. Stop mixing. Seriously, stop. You’re done with this part.
Step 6: Fold in the mix-ins
Using a spatula, gently fold in the chocolate chips, crushed pretzels, potato chips, caramel bits, and toffee bits if you’re using them.
You want everything distributed but you’re not trying to break up all those good chunks.
Step 7: Chill the dough
Cover the bowl with plastic wrap and stick it in the fridge for at least 30 minutes. An hour is even better if you’ve got the time.
If you’re really impatient, you can scoop the cookies first and then chill the individual dough balls.
Step 8: Scoop and bake
Use your cookie scoop to portion out the dough onto your prepared baking sheets. Leave about 3 inches between each cookie because these spread.
Press a few extra chocolate chips, pretzel pieces, and potato chip fragments on top of each dough ball.
Bake for 11-13 minutes. They should look slightly underdone in the center when you pull them out. The edges will be golden brown but the middle will still look soft and puffy.
Step 9: Add the finishing touch
As soon as the cookies come out of the oven, sprinkle them with flaky sea salt while they’re still hot.
Let them cool on the baking sheet for 5 minutes before moving them to a cooling rack. They’ll continue to set up as they cool.

Substitutions and Variations
No potato chips? Use more pretzels or try crushed tortilla chips for a different vibe.
Different chocolate: Dark chocolate chips, white chocolate chips, or milk chocolate all work great. You can also chop up your favorite candy bars.
Nut lovers: Add ½ cup of chopped pecans or walnuts. They add a nice earthy flavor.
Make them gluten-free: Use a 1:1 gluten-free baking flour. I’ve had good results with Bob’s Red Mill.
Extra salty: Double the potato chips and pretzels. Cut back slightly on the chocolate if you do this.
Peanut butter version: Swap half the chocolate chips for peanut butter chips and add chopped Reese’s cups.
Butterscotch twist: Replace the caramel bits with butterscotch chips.
Make Ahead Tips
The dough freezes beautifully.
Scoop out individual cookie portions, freeze them on a baking sheet for about an hour, then transfer the frozen dough balls to a freezer bag. They’ll keep for up to 3 months.
When you want fresh cookies, just add 2-3 minutes to the baking time. No need to thaw.
You can also make the dough and keep it in the fridge for up to 3 days before baking. Let it sit at room temperature for about 10 minutes before scooping if it’s too firm.
Leftovers and Storage
These cookies stay soft for about 3-4 days when stored in an airtight container at room temperature.
If they start to get hard (though honestly they never last that long), microwave one for about 10 seconds. It’ll taste like it just came out of the oven.
You can also freeze baked cookies for up to 2 months. Layer them between sheets of parchment paper in an airtight container. Thaw at room temperature or warm them up in the oven at 300°F for a few minutes.
Nutritional Information
Per cookie (makes about 24 cookies):
- Calories: 245
- Total Fat: 12g
- Saturated Fat: 7g
- Cholesterol: 35mg
- Sodium: 180mg
- Total Carbohydrates: 32g
- Dietary Fiber: 1g
- Sugars: 20g
- Protein: 3g
Keep in mind these are treats, not health food. But you already knew that. 🍪
Meal Pairing Suggestions
These cookies are perfect with:
- A cold glass of milk (obviously)
- Hot coffee or a latte
- Vanilla ice cream for cookie ice cream sandwiches
- A scoop of salted caramel ice cream on top while they’re still warm
I also love bringing these to potlucks because they’re way more interesting than regular chocolate chip cookies. Everyone always wants to know what’s in them.
FAQ
Why are my cookies spreading too much?
Your butter was probably too warm or you didn’t chill the dough long enough. Make sure your butter is just softened, not melted, and give that dough at least 30 minutes in the fridge.
Can I use salted butter instead?
You can, but reduce the salt in the recipe to ½ teaspoon. Otherwise they might be too salty even with all the sweet mix-ins.
My cookies came out flat and crispy. What happened?
This usually means you either didn’t use enough flour or you overmixed the dough. Make sure you’re measuring flour correctly (spoon it into the measuring cup and level it off) and stop mixing as soon as you don’t see white streaks.
Can I make these cookies smaller?
Sure! Use a smaller cookie scoop and reduce the baking time to 9-10 minutes. Just watch them carefully.
Do I really need both baking soda AND baking powder?
Yes. The baking soda helps with browning and spread while the baking powder gives you extra lift and thickness. They work together.
What if I can’t find caramel bits?
Chop up soft caramels or use butterscotch chips instead. You could also leave them out entirely and add more chocolate chips.
How do I know when they’re done?
The edges should be golden brown and set, but the centers will still look slightly underdone and puffy. They firm up as they cool. If you wait until they look fully cooked, they’ll be overbaked.
Can I add other mix-ins?
Go for it! That’s the whole point of kitchen sink cookies. Try adding crushed cookies, different candies, or even a handful of oats.
Wrapping Up
I’m telling you, once you make these kitchen sink cookies, regular chocolate chip cookies are going to feel boring.
The combination of sweet chocolate, salty pretzels and chips, and gooey caramel is ridiculously good. And every bite is different depending on what mix-ins you get.
My favorite way to eat these is warm from the oven with a cold glass of milk. The chocolate is still melty and the caramel gets all gooey. It’s basically heaven.
Give these a try and let me know what mix-ins you used! Drop a comment below with your favorite combination or any questions you have. I love hearing what you all create in your kitchens.