You know those moments when you’re craving something sweet but don’t want to spend hours in the kitchen?
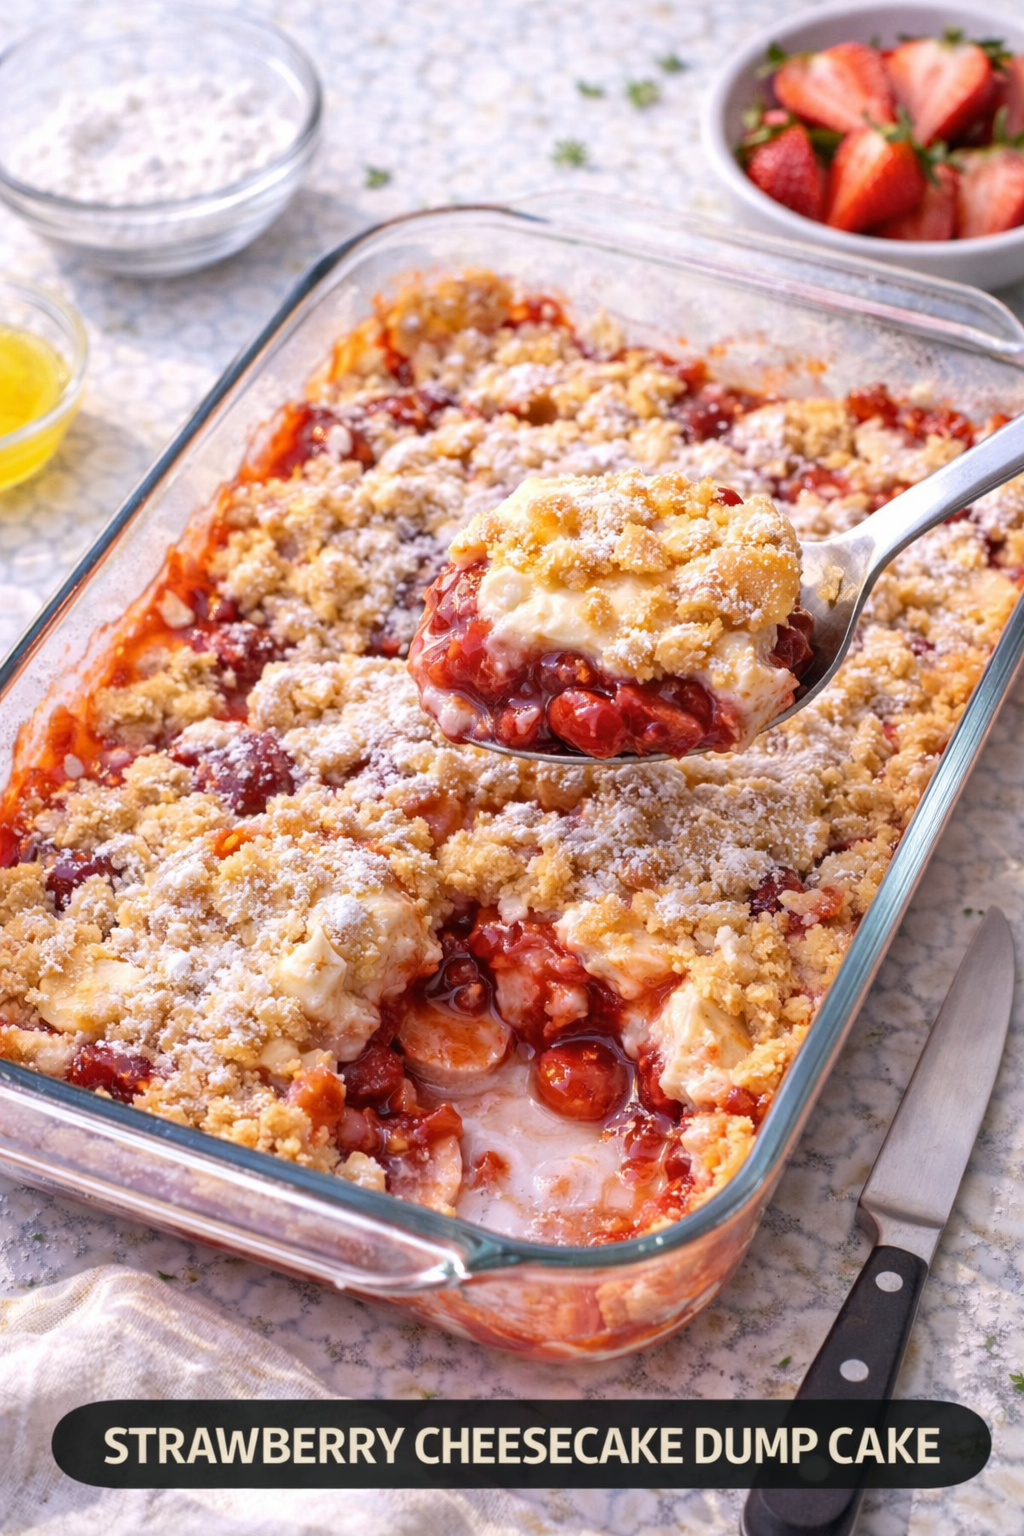
This strawberry cheesecake dump cake is about to become your new favorite lazy dessert. And yes, it really is as simple as dumping ingredients into a pan.
I’m talking 5 ingredients, zero mixer required, and a dessert that’ll have people convinced you spent all afternoon baking. The crunchy, buttery top layer gives way to pockets of melted cream cheese and jammy strawberries underneath. It’s like cheesecake and cobbler had a baby.
The name sounds almost too good to be true, right? But dump cakes are exactly what they sound like. You literally dump everything into a baking dish and let the oven do all the work. No mixing bowls, no hand mixers, no complicated techniques.
Just pure, unapologetic dessert magic.
What You’ll Need
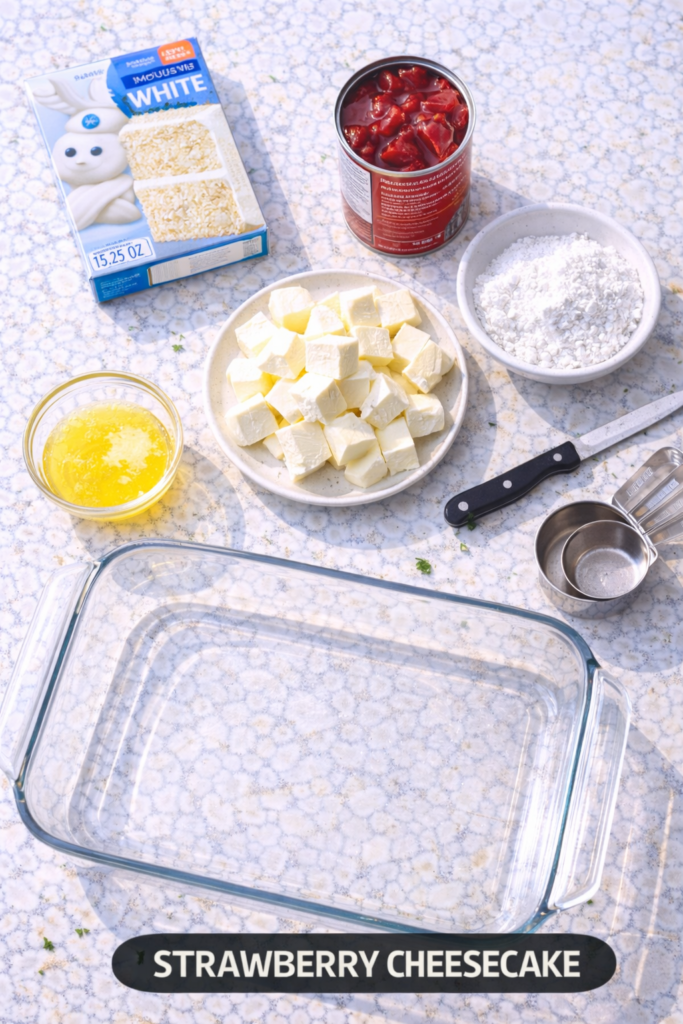
For the Cake:
- 1 box (15.25 oz) white or yellow cake mix (I prefer white for this one)
- 1 package (8 oz) cream cheese, cut into small cubes
- 1 can (21 oz) strawberry pie filling (or use fresh strawberries if they’re in season)
- 1/2 cup (1 stick) unsalted butter, melted
- 1/4 cup powdered sugar (for dusting, optional but makes it look fancy)
Optional Add-ins:
- 1 tsp vanilla extract (mix into the melted butter)
- 1/2 cup white chocolate chips
- Fresh strawberries for topping
- Whipped cream or vanilla ice cream for serving
Tools You’ll Need
You probably have all of these already:
- 9×13 inch baking dish
- Small knife or kitchen scissors (for cutting cream cheese)
- Measuring cups
- Small bowl (for melting butter)
- Cooling rack
That’s it. No stand mixer, no hand mixer, no fancy equipment.
Pro Tips
1. Don’t skip cutting the cream cheese into small cubes. I learned this the hard way. Larger chunks don’t melt evenly and you’ll end up with some bites that are pure cream cheese (not terrible, but not the goal). Aim for roughly 1/2-inch cubes and your future self will thank you.
2. Use cold butter straight from the fridge, then melt it completely. I know it sounds weird, but completely melted butter creates those crispy, golden pockets on top. If you use softened butter, you’ll get a denser, less crispy topping. Trust me on this one.
3. Let it cool for at least 15 minutes before serving. I get it, waiting is torture when something smells this good. But those first 15 minutes let everything set up properly. The cream cheese firms up just enough to create that cheesecake-like texture instead of being totally molten.
4. Make it in a clear glass dish if you have one. This isn’t just for looks (though it does look pretty). You can see when the bottom is bubbling and know it’s done without having to guess.
5. Double the recipe for a crowd. This serves about 12, but I’ve seen people devour this at potlucks. If you’re feeding more than 8-10 people, just make two pans. They bake at the same time and you’ll be a hero.
Substitutions and Variations
Different Fruits:
- Swap strawberry pie filling for cherry, blueberry, or apple
- Use fresh berries (about 3 cups) tossed with 1/4 cup sugar and 2 tbsp cornstarch
- Try mixed berry pie filling for a more complex flavor
- Peach pie filling is incredible if you’re into stone fruits
Cake Mix Options:
- Yellow cake mix works great and adds a slightly richer flavor
- Strawberry cake mix makes this VERY strawberry-forward
- Chocolate cake mix turns this into a chocolate-covered strawberry situation
- Gluten-free cake mix works just fine (I’ve tested it)
Cream Cheese Alternatives:
- Regular cream cheese is best, but Neufchâtel (1/3 less fat) works in a pinch
- For dairy-free, use vegan cream cheese (just know the texture will be slightly different)
- Mascarpone makes this extra decadent (and expensive, but wow)
Butter Swaps:
- Salted butter is fine, just skip any added salt
- Coconut oil works for dairy-free (use refined for less coconut flavor)
- Margarine works but doesn’t taste quite as rich
Mix-ins to Try:
- White chocolate chips scattered on top before baking
- Crushed graham crackers mixed into the dry cake mix
- Lemon zest in the melted butter for brightness
- Chopped pecans or almonds for crunch

How to Make It
Step 1: Prep Everything
Preheat your oven to 350°F (175°C). Grab your 9×13 inch baking dish and give it a light spray with cooking spray. You don’t need to go crazy here, just a quick coat.
Cut your cream cheese into small cubes (about 1/2 inch) and pop them back in the fridge. You want them cold when they go into the pan.
Step 2: Layer the Strawberry Filling
Open that can of strawberry pie filling and spread it evenly across the bottom of your baking dish. Use a spoon to make sure it reaches all the corners. This creates your fruity base layer.
If you’re using fresh strawberries, toss them with sugar and cornstarch first, then spread them out.
Step 3: Add the Cream Cheese
Take those cold cream cheese cubes and scatter them evenly over the strawberry layer. Don’t dump them all in one spot. You want little pockets of cream cheese throughout the entire pan.
This is what gives you that cheesecake swirl effect.
Step 4: Add the Cake Mix
Sprinkle the dry cake mix evenly over everything. And I mean evenly. Don’t just dump it in the center and call it a day. Use your hands or a spoon to spread it into an even layer covering all the strawberries and cream cheese.
You shouldn’t see any fruit peeking through.
Step 5: Drizzle with Butter
Melt that butter completely (I use the microwave for 30-45 seconds). Then drizzle it evenly over the entire surface of the cake mix. You want to cover as much of the dry mix as possible.
The butter is what activates the cake mix and creates that golden, crispy top layer. Some spots will stay a little dry and that’s totally fine. Those create extra crunchy bits.
Step 6: Bake
Slide the pan into your preheated oven and bake for 45-50 minutes. You’re looking for a golden brown top and edges that are bubbling.
The center should be set (not jiggly) and the top should look crispy and golden. If the top is browning too fast but the center isn’t done, tent it loosely with foil and keep baking.
Step 7: Cool and Serve
This is the hardest part. Let it cool on a wire rack for 15-20 minutes minimum. I know it smells incredible and you want to dive in immediately, but patience pays off here.
The filling needs time to thicken up and the cream cheese needs to firm back up slightly. Otherwise, you’ll just have a molten mess (which still tastes good, but isn’t quite right).
Dust with powdered sugar if you’re feeling fancy. Serve warm with vanilla ice cream or whipped cream.
Make Ahead Tips
This dessert is actually perfect for making ahead.
Same Day: Assemble everything up to step 5 (before adding the butter), cover with plastic wrap, and refrigerate for up to 4 hours. When you’re ready to bake, drizzle with the melted butter and pop it in the oven. You might need to add 5 minutes to the baking time since it’s starting cold.
Day Before: Fully bake the dump cake, let it cool completely, then cover tightly with foil or plastic wrap. Store at room temperature overnight. Reheat individual portions in the microwave for 30-45 seconds, or warm the whole pan in a 300°F oven for 15-20 minutes.
Freezing: Bake it completely, let it cool, then wrap the entire pan in plastic wrap and then foil. Freeze for up to 3 months. Thaw overnight in the fridge, then reheat in a 325°F oven for 20-25 minutes until warmed through.
You can also freeze individual portions in airtight containers. They thaw faster and you can grab just one serving at a time.
Leftovers and Storage
Room Temperature: Cover the pan tightly with foil or plastic wrap. It’ll keep for 2 days at room temperature. The top might lose some of its crispness, but it still tastes great.
Refrigerator: Covered tightly, this lasts 4-5 days in the fridge. The cold temperature makes the cream cheese layer firm up even more, which is actually kind of nice. Reheat before serving for the best texture.
Reheating: Microwave individual portions for 30-45 seconds. For larger portions or the whole pan, use a 300°F oven for 10-15 minutes. You want it warmed through but not dried out.
Pro tip: Add a scoop of vanilla ice cream when you reheat it. The contrast between warm dump cake and cold ice cream is 🔥
Frequently Asked Questions
Can I use a different size pan?
You can, but you’ll need to adjust baking times. An 8×8 inch pan makes this thicker and will need about 55-60 minutes. A larger pan (like 10×15) makes it thinner and will bake faster, around 35-40 minutes. Just watch for that golden top and bubbling edges.
Why is it called a dump cake?
Because you literally dump all the ingredients into a pan without mixing them. No bowls, no stirring, no fuss. It’s the ultimate lazy baker’s dessert.
Can I make this without cream cheese?
You can, but you’ll lose that cheesecake element that makes this special. If you skip it, you basically have a regular dump cake (which is still delicious, just different). You could also double the fruit filling to make up for the missing layer.
Do I have to use pie filling?
Nope! Fresh or frozen fruit works great. You’ll just need to add sugar (about 1/4 cup) and a thickener like cornstarch (2 tablespoons) to help it set up. Frozen fruit might release more liquid, so add an extra tablespoon of cornstarch.
My top didn’t get crispy. What happened?
Two common culprits: either you didn’t use enough melted butter, or you mixed the cake mix with the butter instead of drizzling it on top. The dry cake mix needs to stay mostly dry on top to get crispy. Also make sure your oven temperature is accurate.
Can I make this in a slow cooker?
I haven’t personally tested this, but some people do make dump cakes in slow cookers. You’d cook on high for 2-3 hours or low for 4-5 hours. The texture will be more “cobbler-like” and less crispy on top, but it works.
Is this actually like cheesecake?
It’s not exactly like traditional cheesecake (there are no eggs, for one thing). But the pockets of cream cheese that melt into the strawberry filling create a creamy, tangy element that’s very cheesecake-reminiscent. Think of it as a hybrid between cheesecake and fruit cobbler.
Can I halve this recipe?
Absolutely. Use an 8×8 or 9×9 pan and halve all ingredients. Baking time will be similar, maybe 5 minutes less. Just check for doneness around the 40-minute mark.
What’s the best way to serve this?
Warm is definitely best. I love it with vanilla ice cream, but it’s also great with whipped cream, Cool Whip, or even a drizzle of heavy cream. Fresh strawberries on top make it look bakery-worthy.
My cake mix has pudding in it. Does that matter?
Some cake mixes include pudding mix. It’s fine to use those. They might make your dump cake slightly denser and moister, but it’ll still taste great. I’ve used both kinds and honestly can’t tell much difference.
Wrapping Up
So there you have it. Five ingredients, one pan, and about 10 minutes of actual work for a dessert that tastes like you spent all day in the kitchen.
This strawberry cheesecake dump cake has become my go-to when I need to bring something to a potluck, have last-minute guests, or just want something sweet without the fuss. It’s foolproof, crowd-pleasing, and uses ingredients you probably already have in your pantry.
The combo of tart strawberries, creamy cheesecake pockets, and that crunchy buttery topping hits every note. Serve it warm with ice cream and watch it disappear.
Give it a try this week and drop a comment below. I want to know what variation you tried, if you changed anything up, or if you served it to friends who couldn’t believe how easy it was. And if you have any questions, ask away!