
Store-bought pepperoni is fine. This is not fine. This is a whole different situation.
I’m going to say something that might get me in trouble: most pepperoni is kind of boring.
You open the bag, the slices are pale, slightly rubbery, and have that weird plastic smell. You throw them on a pizza and they’re… okay. They do the job.
But homemade pepperoni? That’s a completely different experience.
When you make it yourself, you control the heat, the smokiness, the fat content, and the depth of flavor. And the result is a deeply spiced, slightly smoky, perfectly snappy sausage that turns even a simple pizza into something people ask you for the recipe on.
Also, here’s a fact that genuinely surprised me: traditional pepperoni is an American invention, not Italian. It was created by Italian-American immigrants in the early 1900s and has almost no equivalent in Italy. Wild, right? 🤯
Stick around because the Pro Tips section alone will save you from the most common mistakes people make with this.
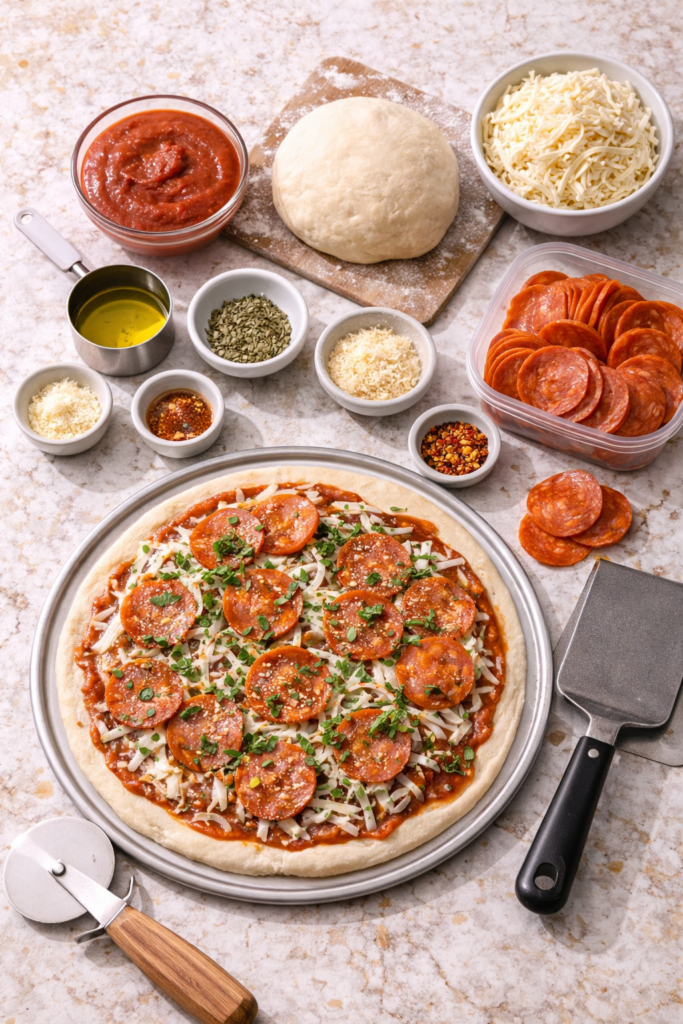
What You’ll Need
Ingredients
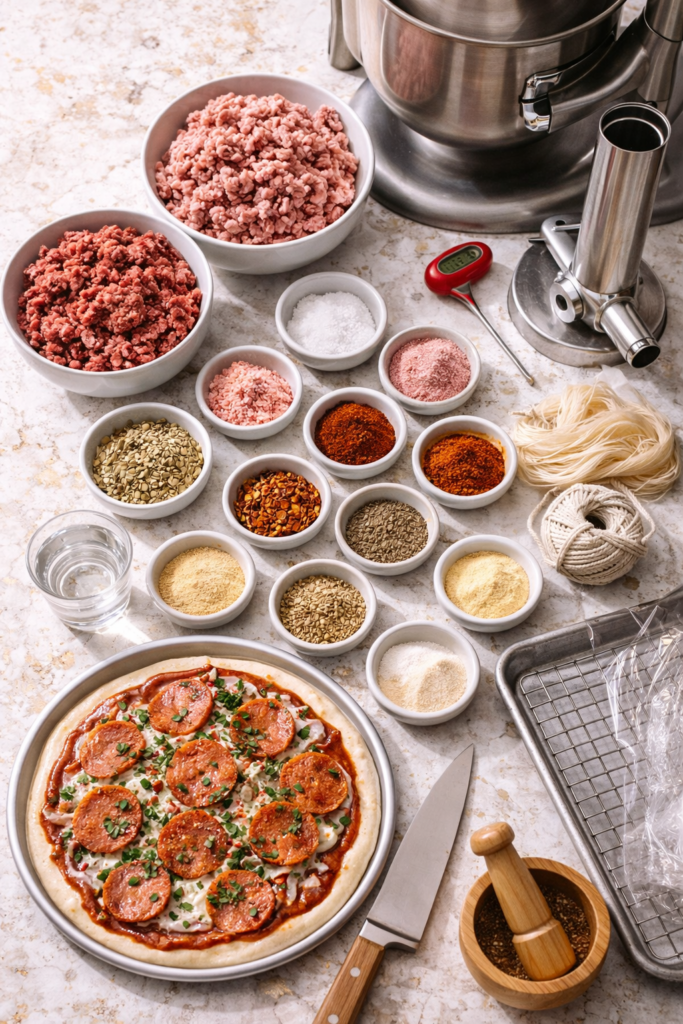
- 2 lbs (900g) ground pork (80/20 fat ratio)
- ½ lb (225g) ground beef (80/20 fat ratio)
- 1 tbsp kosher salt
- 1 tsp curing salt (Prague Powder #1 / pink curing salt)
- 2 tsp smoked paprika
- 1 tsp regular paprika
- 1½ tsp cayenne pepper (adjust to heat preference)
- 1½ tsp crushed red pepper flakes
- 1 tsp fennel seeds
- 1 tsp garlic powder
- ½ tsp onion powder
- ½ tsp black pepper
- ½ tsp anise seeds
- ¼ tsp mustard seed powder
- ¼ tsp sugar
- 2 tbsp cold water
- Collagen or natural hog casings (32–35mm diameter)
Tools Required
- Stand mixer with paddle attachment (or large mixing bowl)
- Sausage stuffer or sausage stuffing attachment for a stand mixer
- Meat thermometer (instant read)
- Smoker OR oven with a wire rack
- Kitchen twine or butcher’s twine
- Sharp knife
- Baking sheet
- Wire cooling rack
- Plastic wrap
- Spice grinder or mortar and pestle
Pro Tips
These are the things I wish someone had told me before my first attempt:
- Keep everything cold, always. Warm meat fat smears instead of binds, and you end up with a greasy, dense texture. Chill your mixing bowl, your meat, even your hands if you can. Cold is your friend here.
- Don’t skip the curing salt. This isn’t optional for safety. Pink curing salt (Prague Powder #1) prevents bacterial growth during the slow cooking process. Regular table salt will not do the same job. Pick it up online or at a specialty butcher.
- Let the flavors marry overnight. After mixing, wrap the seasoned meat tightly and refrigerate it for at least 12 hours. The spice blend needs that time to fully penetrate. Skipping this step gives you flat-tasting pepperoni.
- Low and slow wins. Starting at a low oven or smoker temp (around 150°F / 65°C) and gradually increasing is what gives you that classic pepperoni snap. High heat from the start = rubbery texture.
- Rest before slicing. After cooking, let the pepperoni cool completely at room temperature, then refrigerate for at least 4 hours before cutting. If you slice it hot, you lose all the juices and the texture suffers.
Substitutions and Variations
Meat Swaps
- All pork: Skip the beef entirely for a softer, more traditional texture.
- Turkey pepperoni: Use ground turkey (85/15 fat ratio). It’ll be leaner and slightly drier but still great.
- Venison pepperoni: Mix venison with pork fat (30% fat by weight) since venison is very lean on its own.
Spice Adjustments
- Mild version: Cut the cayenne to ¼ tsp and reduce the red pepper flakes to ½ tsp.
- Extra smoky: Add ½ tsp liquid smoke to the water and use only smoked paprika.
- Honey pepperoni: Add 1 tsp of honey to the mix. It creates a subtle sweet-heat contrast that is surprisingly good on pizza.
No Casing Option
Roll the seasoned meat mix into a tight log using plastic wrap. Twist the ends to seal. Refrigerate overnight, then bake on a wire rack at 225°F (107°C) for 2–3 hours until the internal temp hits 165°F (74°C). Same result, less equipment.
Make Ahead Tips
- The spice mix can be pre-made and stored in an airtight jar for up to 3 months. Make a double batch and it’s ready whenever you are.
- Season and mix the meat the night before, let it rest in the fridge, and stuff/cook the next day. This actually improves the flavor significantly.
- Cooked pepperoni keeps in the fridge for up to 3 weeks or in the freezer for 3 months. Slice it before freezing for easy grab-and-use portions.
Nutritional Info (Per 1 oz / 28g Serving)
| Nutrient | Amount |
|---|---|
| Calories | ~140 kcal |
| Protein | 6g |
| Fat | 12g |
| Saturated Fat | 4.5g |
| Carbohydrates | 0.5g |
| Sodium | ~420mg |
Note: Homemade pepperoni is lower in sodium than most store-bought versions, which often contain 480–550mg per ounce. That’s one of the hidden perks of making it yourself.
Diet Notes
- Keto/Low-carb: Naturally fits. No changes needed.
- Gluten-free: Already gluten-free as written. Just verify your spice brands are certified GF.
- Dairy-free: Yes, entirely.
- Paleo: Sub the sugar for a small amount of maple syrup and it qualifies.
Meal Pairing Ideas
- Classic pizza (obviously) — but try it on a white garlic base instead of tomato for something different
- Charcuterie and cheese boards
- Pasta with pepperoni, roasted red peppers, and ricotta
- Stuffed mushrooms with pepperoni and mozzarella
- Pepperoni flatbreads with arugula and parmesan
How to Make Homemade Pepperoni
- Toast your spices. In a dry skillet over medium-low heat, briefly toast the fennel seeds and anise seeds for 60–90 seconds until fragrant. Remove from heat, let cool, then grind coarsely in a spice grinder or with a mortar and pestle. This step is small but it makes a noticeable difference.
- Mix the spice blend. Combine the toasted ground spices with the smoked paprika, regular paprika, cayenne, red pepper flakes, garlic powder, onion powder, black pepper, mustard seed powder, and sugar. Mix well in a small bowl and set aside.
- Combine the meat. In a large, cold mixing bowl (or stand mixer with paddle attachment), combine the ground pork and ground beef. Keep everything as cold as possible throughout this process.
- Add curing salt and kosher salt first. Mix these into the meat thoroughly before adding anything else. This helps the curing process begin evenly distributed throughout the mixture.
- Add the spice blend and cold water. Mix on medium-low (or by hand) for 2–3 minutes until the spices are fully incorporated and the mixture starts to look slightly sticky and cohesive. Don’t over-mix or the fat will smear.
- Rest the meat. Wrap the seasoned meat tightly in plastic wrap and refrigerate for a minimum of 12 hours, up to 24 hours. This is non-negotiable for good flavor.
- Prepare your casings. If using natural hog casings, soak them in cold water for 30 minutes, then rinse thoroughly by running water through them. If using collagen casings, no soaking is needed.
- Stuff the sausages. Attach the casing to your sausage stuffer and fill it with the meat mixture. Stuff at a consistent, medium-tight pressure — too loose and you’ll get air pockets; too tight and the casings will split during cooking. Twist into 8–10 inch links and tie the ends with butcher’s twine.
- Dry the sausages. Hang or lay the stuffed pepperoni on a wire rack at room temperature for 1 hour to form a pellicle (a slightly tacky skin). This helps the smoke adhere if you’re using a smoker, and improves the texture regardless.
- Cook low and slow.
Smoker method: Start at 150°F (65°C) for 1 hour, increase to 170°F (77°C) for 1 hour, then finish at 190°F (88°C) until the internal temperature reaches 165°F (74°C). Use a mild wood like apple or cherry for smoking.
Oven method: Place on a wire rack over a baking sheet. Start at 170°F (77°C) for 1 hour, increase to 225°F (107°C) for another 1–2 hours until the internal temp hits 165°F (74°C). - Cool and rest. Remove from heat and let cool completely at room temperature (about 1–2 hours). Then refrigerate uncovered for at least 4 hours before slicing. The texture firms up significantly during this rest.
- Slice and use. Slice to your desired thickness. For pizza, go around ⅛ inch. For charcuterie boards, thinner is better. Store in an airtight container or wrapped tightly in the fridge.
Leftovers and Storage
- Refrigerator: Store tightly wrapped or in an airtight container for up to 3 weeks.
- Freezer: Slice first, then freeze in portions separated by parchment paper. Keeps well for up to 3 months. Thaw overnight in the fridge.
- Vacuum sealed: If you have a vacuum sealer, this is the move. Properly sealed pepperoni keeps for up to 6 weeks in the fridge and 6 months in the freezer.
- Avoid leaving pepperoni at room temperature for more than 2 hours once cooked.
FAQ
Can I make this without a sausage stuffer?
Absolutely. Use the plastic wrap roll method described in the Substitutions section. Same flavor, no equipment needed.
Is curing salt really necessary? Can I skip it?
For food safety — yes, it is necessary. Curing salt (Prague Powder #1) prevents the growth of harmful bacteria like Clostridium botulinum during the low and slow cooking process. Skipping it isn’t worth the risk. It’s inexpensive and easy to order online.
Can I use this recipe to make pepperoni sticks instead of sausage links?
Yes. Use narrower casings (19–21mm) and reduce the cooking time slightly, checking the internal temperature more frequently. The same seasoning works perfectly.
My pepperoni came out soft and didn’t have the classic snap. What went wrong?
Two likely culprits: the cooking temperature was too high too fast, or you didn’t rest it long enough after cooking. Both affect texture significantly. Low and slow, then a proper rest, is the formula.
Does homemade pepperoni curl up on pizza like restaurant pepperoni?
That cup-and-char curl you love is partly down to how the pepperoni is sliced and the fat content. Slice it slightly thicker (around ¼ inch) for maximum curl. Higher oven temperatures also help — 500°F (260°C) or higher if your oven allows it.
How long does the whole process take?
Active time is about 45–60 minutes. Hands-off time (resting + cooking + cooling) is around 16–20 hours total. Plan to make it one day and use it the next. Totally worth the timeline.
Can I double the batch?
Yes, and honestly — you should. The process takes the same amount of effort whether you’re making one pound or four. Make a big batch, freeze portions, and you’ll have pepperoni on hand for weeks.
Wrapping Up
Making pepperoni at home sounds like a project. And it kind of is — but it’s the fun kind.
Once you try a slice of your own, cured, spiced, and smoked just the way you like it, going back to the plastic-wrapped stuff feels a little tragic.
And the satisfaction of pulling a homemade pizza out of the oven topped with pepperoni you made yourself? That’s a level of smug happiness that’s hard to put into words. 😄
Give it a try this weekend and come back to leave a comment below. I want to know how it turned out, what you changed, what you’re putting it on, and any questions that came up along the way. Your experience might save someone else a headache — or inspire them to finally give this a go.


