Prep: 20 min · Churn: 25 min · Freeze: 4 hrs
Store-bought strawberry ice cream is one of the biggest lies in the freezer aisle.
It’s usually pink, faintly fruity, and weirdly sweet. Not exactly what you signed up for. Real strawberry ice cream — the kind made with actual strawberries — tastes completely different. We’re talking deep, jammy, sun-ripened flavor in every single bite.
And here’s the part that surprises most people: you don’t need an ice cream machine to make it. (Though if you have one, even better.)
I made this recipe for the first time on a random Tuesday because strawberries were on sale. It’s now the one dessert that makes people stop mid-conversation and go, “wait, what is this?” Keep reading, because there’s a trick in the Pro Tips section that changes everything.
This post covers everything you need — the ingredients, the steps, tips for first-timers, substitutions, and storage. Let’s get into it.
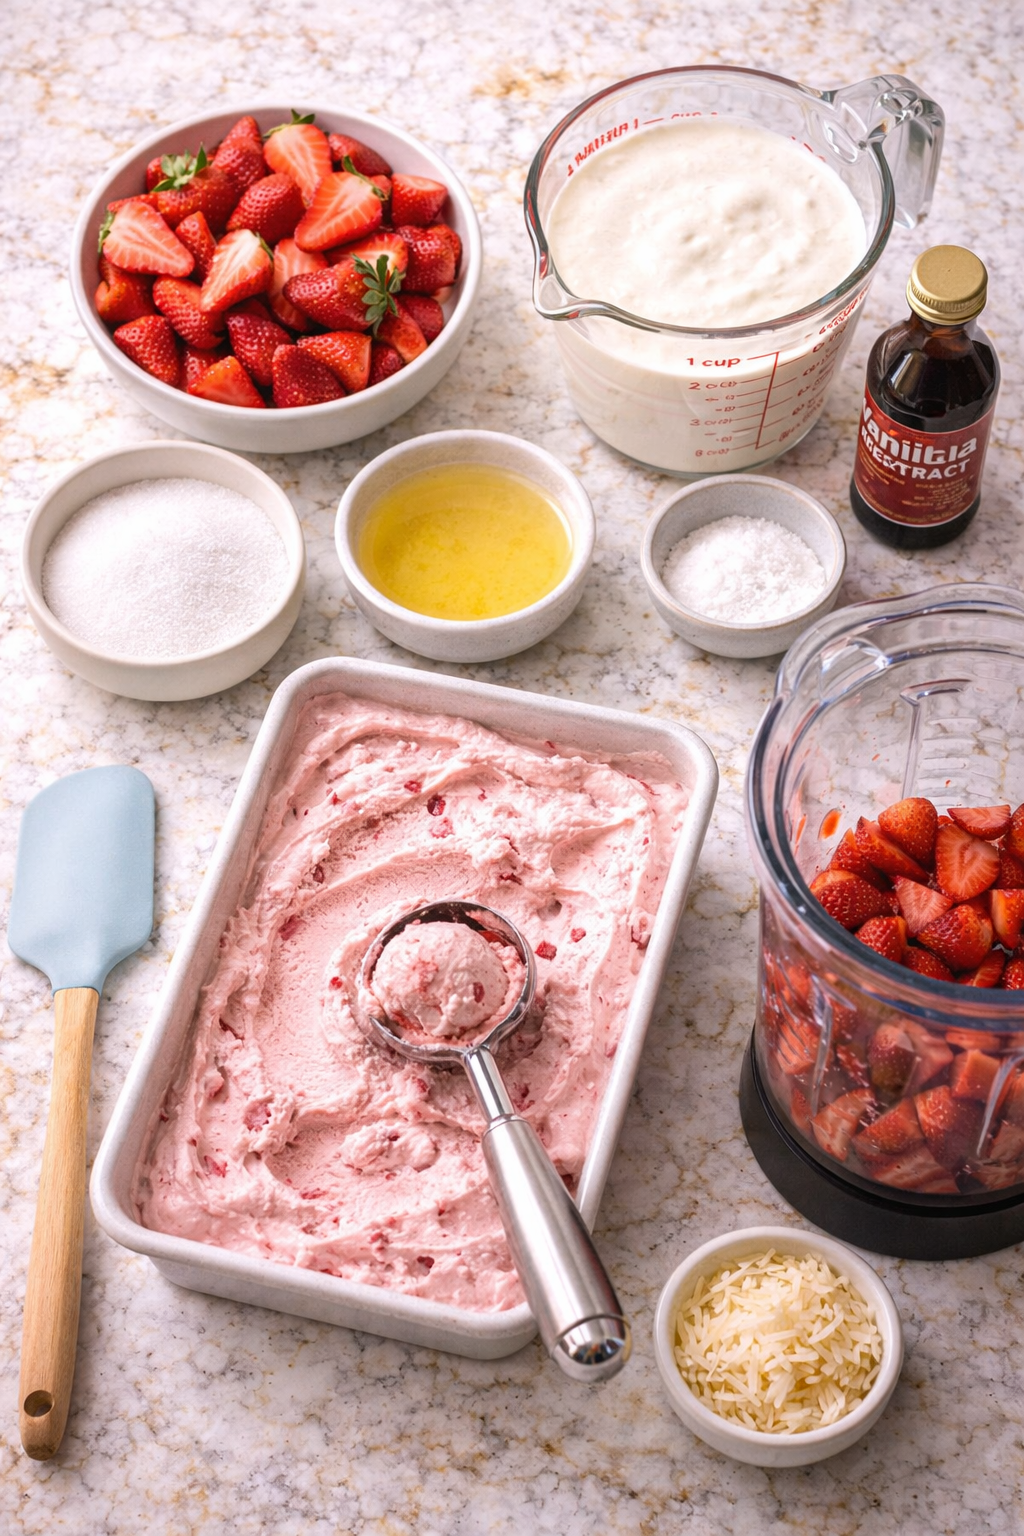
What You’ll Need
Main Ingredients
- 500g (about 3 cups) fresh strawberries, hulled and halved
- 200g (1 cup) granulated white sugar, divided
- 2 tablespoons fresh lemon juice
- 480ml (2 cups) heavy whipping cream, cold
- 240ml (1 cup) whole milk, cold
- 1 teaspoon pure vanilla extract
- Pinch of fine sea salt
Optional (but Recommended)
- 2 tablespoons cream cheese, softened (adds creaminess and subtle tang)
- 1 tablespoon vodka or light corn syrup (keeps it scoopable when frozen)
Tools You’ll Need
- Ice cream machine (or a large freezer-safe loaf pan + electric hand mixer if you don’t have one)
- Medium saucepan
- Blender or immersion blender
- Mixing bowls (1 large, 1 medium)
- Fine mesh strainer
- Rubber spatula
- Measuring cups and spoons
- Freezer-safe container with lid (loaf pan works great)
- Plastic wrap
Pro Tips
- Macerate the strawberries first. Toss them with half the sugar and a squeeze of lemon and let them sit for 30 minutes before cooking. This pulls out the juices and creates a much deeper, more concentrated flavor. It’s not optional if you want restaurant-level results.
- Cook down part of the berries. Blend half into a smooth puree, and cook the other half until they become jammy and thick. Folding both into the base gives you two layers of flavor — fruity and fresh, plus rich and caramelized.
- Add a tiny pinch of salt. Sounds strange in a dessert recipe, but salt in ice cream amplifies the sweetness and makes the strawberry flavor pop. Don’t skip it.
- Keep your base ice cold before churning. If you’re using an ice cream machine, the mix needs to be very cold before it goes in — ideally refrigerated for at least 2 hours. Warm mix = grainy ice cream.
- Press plastic wrap directly on the surface before freezing. This prevents ice crystals from forming on top and keeps the texture smooth and creamy all the way to the bottom of the container.
· · ·
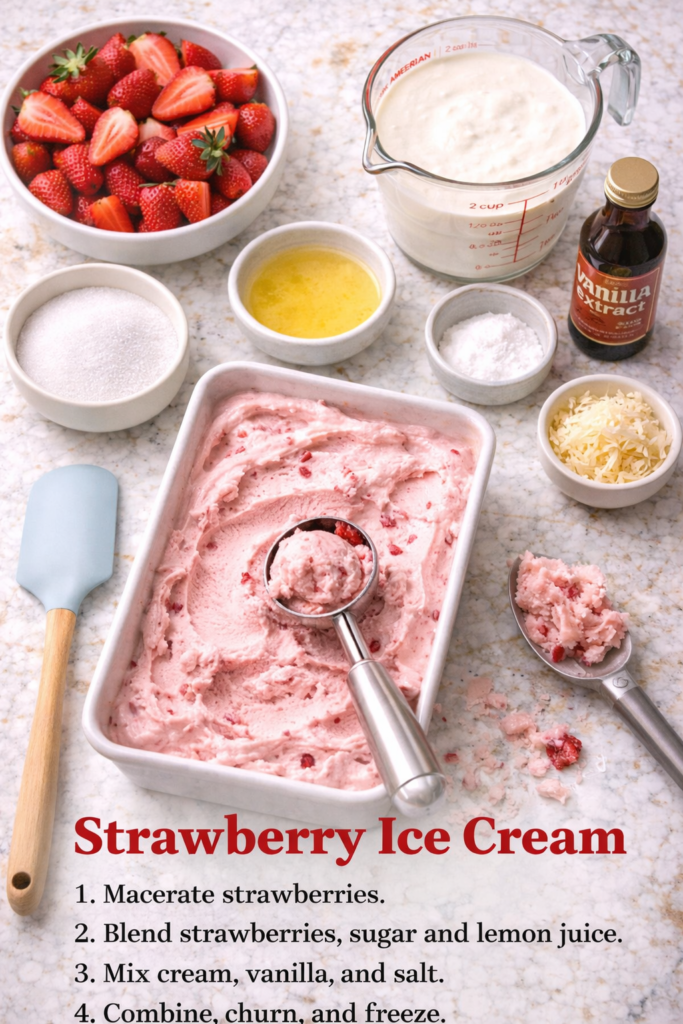
How to Make Homemade Strawberry Ice Cream
1
Macerate the strawberriesCombine the hulled and halved strawberries with 100g (½ cup) of the sugar and the lemon juice in a bowl. Stir, cover, and leave at room temperature for 30 minutes. The strawberries will release a gorgeous, fragrant syrup.
2
Cook and reduce half the berriesTransfer half the macerated strawberries (with all their juices) to a medium saucepan. Cook over medium heat, stirring occasionally, for about 10–12 minutes until the mixture is thick and jammy. Remove from heat and let cool completely.
3
Blend the other halfBlend the remaining macerated strawberries into a smooth puree. If you want a silky-smooth texture, strain through a fine mesh strainer to remove seeds. Set aside.
4
Make the cream baseWhisk together the cold heavy cream, whole milk, remaining 100g (½ cup) sugar, vanilla extract, and sea salt in a large bowl until the sugar fully dissolves. If using cream cheese, whisk it in now until smooth. Stir in both the strawberry puree and the cooled jammy strawberries.
5
Chill the baseCover the bowl and refrigerate for at least 2 hours, or overnight for even better flavor. Cold base = better churn. This step makes a real difference.
6
Churn (with a machine)Pour the chilled base into your ice cream maker and churn according to the manufacturer’s instructions — usually 20–25 minutes until it reaches a soft-serve consistency. If using vodka or corn syrup, add it in the last 2 minutes of churning.
6B
No machine? No problem.Pour the base into a freezer-safe loaf pan and freeze for 45 minutes. Take it out, beat it vigorously with an electric hand mixer or fork to break up ice crystals. Repeat this every 45 minutes, 3–4 times total. It gets fluffier each round.
7
Freeze until firmTransfer the churned ice cream into a freezer-safe container. Press plastic wrap directly onto the surface, seal the lid, and freeze for at least 4 hours or until firm enough to scoop.
8
Scoop and serveLet the container sit on the counter for 5 minutes before scooping. It makes a big difference — the texture goes from rock solid to perfectly creamy.
· · ·
Substitutions and Variations
| If You Want To… | Try This |
|---|---|
| Make it dairy-free | Full-fat coconut milk + coconut cream instead of heavy cream and whole milk |
| Cut the sugar | Swap half the sugar for maple syrup or honey — adds a subtle depth |
| Boost the flavor | Add 1 tsp of balsamic vinegar to the cooked strawberries — sounds weird, tastes incredible |
| Make it chunkier | Fold in diced fresh strawberries after churning for a strawberry-swirl effect |
| Use frozen strawberries | Works perfectly in the cooked portion — just thaw and drain first |
| Add mix-ins | Crushed graham crackers, mini chocolate chips, or a ribbon of strawberry jam stirred in before freezing |
Make Ahead Tips
- The macerated and cooked strawberry mixture can be made up to 3 days ahead and stored in the fridge in a sealed jar.
- The full ice cream base (before churning) keeps in the fridge for up to 24 hours — so you can prep it the night before and churn fresh the next day.
- The finished ice cream is best eaten within 2 weeks for peak texture and flavor.
Nutritional Breakdown
Approximate per serving (based on 8 servings):
| Nutrient | Amount |
|---|---|
| Calories | ~290 kcal |
| Total Fat | 20g |
| Saturated Fat | 12g |
| Carbohydrates | 26g |
| Sugar | 24g |
| Protein | 2.5g |
| Fiber | 0.8g |
| Vitamin C | ~35% DV |
Numbers are estimates and will vary depending on exact ingredient brands and quantities used.
Meal Pairing Suggestions
Strawberry ice cream pairs beautifully with:
- Warm brownies or a slice of pound cake
- A simple waffle cone or sugar cone (obviously)
- Grilled peaches or pineapple for a summer dessert plate
- A generous spoonful over vanilla or lemon cake
- Alongside a sparkling rosé if you’re making it a thing
Leftovers and Storage
Storage Guide
- Freezer: Store in an airtight, freezer-safe container for up to 2 weeks. After that it’s still safe to eat but the texture starts to get icier.
- Surface protection: Always press plastic wrap directly onto the ice cream surface before sealing. This is the single best thing you can do for long-term texture.
- Scooping from frozen: Let the container sit at room temperature for 4–6 minutes before scooping. Running your scoop under warm water for a few seconds helps too.
- Don’t refreeze melted ice cream. If it’s fully melted, the texture and food safety are both compromised. Just eat it as a milkshake — not the worst outcome.
FAQ
Can I use frozen strawberries instead of fresh?
Yes, frozen strawberries work well for the cooked and pureed portions. Thaw them first and drain off the excess liquid so you don’t water down the base. For the best flavor though, fresh and ripe strawberries are the way to go.
Why is my homemade ice cream icy and hard?
A few possible reasons: the base wasn’t cold enough before churning, there wasn’t enough fat in the mix, or it’s been in the freezer too long. The vodka or corn syrup trick in the Pro Tips section genuinely helps with this — alcohol lowers the freezing point and keeps the texture softer.
Do I really need to press plastic wrap onto the surface?
You don’t have to, but the top layer will form ice crystals if you skip it. It’s a 10-second step that makes a noticeable difference in texture.
Can I make this without an ice cream machine?
Yes. It takes a bit more effort with the repeated freeze-and-whip method, but the results are still great. See Step 6B in the instructions above.
How do I know when the strawberries are ripe enough?
They should smell sweet and fragrant even before you cut them. If they don’t smell like much in the store, they won’t taste like much in your ice cream. Ripe strawberries are deep red all the way through — not white at the center.
Can I double the recipe?
Absolutely. Just make sure your ice cream machine bowl is large enough. Most standard home machines hold about 1–1.5 quarts, so you may need to churn in two batches.
What’s the cream cheese for?
It adds a subtle tang that actually makes the strawberry flavor taste more vivid, and it improves the overall creaminess of the texture. It’s completely optional, but once you try it, you’ll probably keep using it.
Wrapping Up
There’s something genuinely satisfying about making ice cream from scratch and having it turn out better than the stuff in stores. This recipe isn’t complicated — it just asks for a little patience at a few key moments.
Once you taste the difference that real, macerated strawberries make, you’ll understand why this one gets requested on repeat.
Give it a try and let me know how it goes in the comments below. Did you try any of the variations? Make it dairy-free? Use the no-churn method? I want to hear everything. Drop your questions down there too — I read every single one. 🍓


